
How to make concrete pillars for the foundation. How to make a columnar foundation on your own. Foundation laying prices
Almost all happy owners of private houses, cottages or country houses would like to have a separate bathhouse on their site. For its construction, you can use the services of professional builders or build a bathhouse yourself.
The basis of the strength and durability of each building is undoubtedly the foundation. Often, for the construction of a bath, wooden material is used - logs or timber, thanks to which the construction is quite easy. That is why it is advisable to build a bathhouse on a columnar foundation, which is support pillars buried in the soil from various materials. Such supports can be mounted from wood, brick, stone, pipes, foundation blocks, reinforced concrete.
Column foundation - scheme 


Before starting work, it is necessary to clean and plan the site for future construction. To do this, remove the top layer of soil (about 30 centimeters) under the planned building, along with all vegetation.

Then it is necessary to level all the pits, irregularities as much as possible, and in case of clay soil, add sand and gravel.


Next, we transfer the plan of the bath directly to the land using a tape measure, a building level, ordinary wooden or metal pegs and a construction thread to indicate the axes. If the site is located on a terrain with a significant difference in the height of the sides, then it is advisable to use the help of a professional to determine the height of the foundation pillars and level the surface. This is a guarantee that the future bath will not have distortions.


Excavation
Regardless of the choice of material for the installation of columnar supports, all foundations of this type are mounted according to a similar principle (except for the option with a grillage). This also applies to earthworks, before starting which it is necessary to determine the type of soil, proximity to the groundwater surface and the depth of its freezing.


These factors directly affect the installation depth of the supporting poles. To determine the type of soil and the level of groundwater, it is necessary to dig a hole with a depth of at least 1-1.2 meters (optimal). If there is no groundwater at this depth, and the soil is not heaving - freezing, then this depth is quite enough for the columnar foundation of the bath.


Otherwise, you need to dig to a dense, incompressible soil layer, focusing on the following indicator: freezing depth + 40 centimeters. It must be remembered that heaving soils include those that have clay in their composition. And the more it is contained, the more the earth is prone to freezing. If these conditions are not met, then under the influence of water or sub-zero temperatures, the foundation can not only crack or deform, but also completely collapse.

Columnar supports of the foundation must be located at the corners of the building, at the intersection of walls, along the entire perimeter and under the partitions every 1.5-2.0 meters, depending on the total weight of the structure. Pits for supports can be dug with a shovel, or you can use a special hand-held cone-shaped drill of the required diameter, thanks to which it is possible to obtain the most even holes.

Based on what material will be used for the construction of the columnar foundation, the required diameter of the holes is determined, which should be 7-10 centimeters larger than the following parameters:
- for pillars made of brick and stone, optimally 50x50 centimeters;
- for pillars made of rubble stone - 60x60 centimeters;
- for asbestos-cement pipes Ø200 mm;
- for reinforced concrete supports, 30-35 centimeters are enough;
- for intermediate - this is 25-30 centimeters.
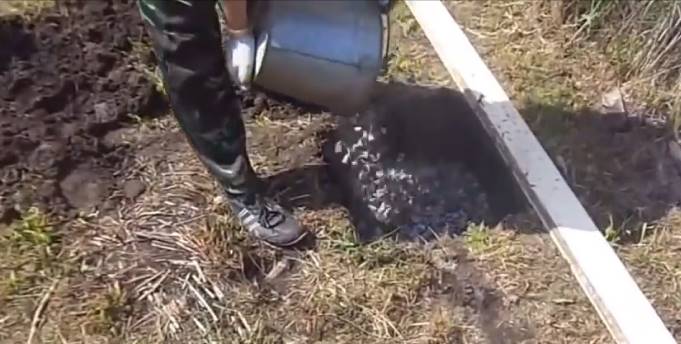
We pour about 20 centimeters of sand at the bottom of each prepared pit, add a little water and carefully tamp, thus obtaining the desired sand cushion. This completed the preparatory and earthworks. You can proceed to the direct arrangement of the columnar foundation from the selected material.


Column foundation made of pipes

The best option for a columnar foundation of a bath is metal or asbestos-cement pipes Ø200 millimeters, which are easily cut by a grinder into pieces of the desired length. It should be noted that a pole made of a pipe should protrude approximately 0.4 meters above the surface.

| Name of product | Weight of 1 pipe, kg | Inner outer diameter, mm | Price 1 p/m, rub. |
|---|---|---|---|
| BNT 100*3.95m | 24 | 100/118 | 102,97 |
| BNT 150*3.95m | 36 | 141/161 | 165,79 |
| BNT 200*5m | 85 | 200/222 | 319,99 |
| BNT 250*5m | 125 | 238/266 | 392,76 |
| BNT 300*5m | 162 | 292/320 | 617,46 |
| BNT 400*5m | 279 | 365/407 | 958,66 |
| BNT 500*5m | 430 | 456/508 | 1732,51 |
Without fail, pipes must be protected from moisture and other negative factors. To do this, you need to make waterproofing - wrap the surface of the pipe with roofing material with bitumen, gluing waterproofing materials or treat with special mastics.

Prepared pipes are carefully and evenly lowered into each hole.

The gap between the pipe wall and the soil is filled with previously excavated earth or sand with gravel (layer thickness 40-50 centimeters), which should preferably be carefully compacted.
Reinforcing bars Ø12-14 millimeters should be inserted into the middle of the installed pipes at a distance of 7 centimeters from each other, which act as a reinforcing frame. Since the reinforcement must protrude above the finished pillars, its length must be 20% greater than the size of the pipe.


Having carried out these preparatory work, you can begin to pour the foundation pillars. The best option is concrete grade M400. It can be ordered from specialized enterprises or made by yourself using a concrete mixer. For self-production, it is enough to use cement of the M400 brand, coarse sand, gravel of fine and medium fractions, which must be mixed in a ratio of 1: 1.5: 3. The required amount of water is 0.4 part of the amount of cement taken.
The process of pouring the concrete mixture itself takes place in several stages (see table).
| Work order | Illustration |
|---|---|
| concrete is poured inside the installed pipe to a third of its height |
|
| the pipe rises, which allows the concrete to form a kind of pillow, and then is pressed into this base |
|
| subsequently, we continue to pour concrete in and around the pipe in stages, tamping it every 0.3 meters with a deep vibrator for concrete, and in its absence, you can use a reinforcing bar. This is necessary to get rid of air bubbles and improve the quality of concrete. |
|


We cover the piles made in this way with a film and let them stand for 7-10 days. During this time, the concrete gains the necessary strength and you can continue the construction of the bath.
This method of erecting columnar foundations is one of the most popular due to its high reliability, relative cheapness, speed of installation with minimal skills.

Prices for asbestos-cement non-pressure pipes
asbestos-cement non-pressure pipes
Preparatory and earthworks before arranging a brick column foundation are similar to working with pipes. But for the convenience of the master, holes for future pillars will not have to be drilled, but dug manually or using equipment, which is much faster, but also more expensive. At the same time, do not forget to slightly increase the volume for the convenience of work.

We fill the bottom of the prepared pit with a fifteen- or twenty-centimeter layer of sand, which we tamp down, forming a sand cushion. On top of it, it is necessary to pour a concrete base, reinforced with a mesh of reinforcement. For the manufacture of the grid, we take reinforcing bars with a section of 12-14 millimeters, cut according to the parameters of the pit. We lay them perpendicularly, forming square cells, the intersections of which we fasten with a thin knitting wire with a diameter of 2-3 millimeters. For the convenience of knitting, you can use a special hook, which should be purchased at a hardware store. The thickness of the concrete base (M400), together with the reinforcing mesh, should not exceed 20 centimeters.

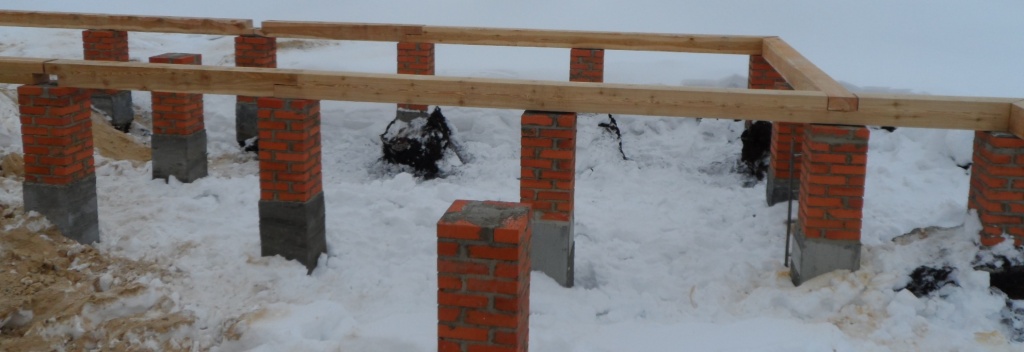
Pillar foundation made of bricks - scheme
After giving the concrete a few days to gain strength, you can proceed directly to the brickwork. It should be noted that a hollow brick is completely unsuitable for this. It would be optimal to use a solid ceramic brick (for example, M-100), which has the necessary strength and resistance to low temperatures.
When making brickwork, it is advisable to check each row with a level. This will allow you to get an even column. For greater strength of the pillars, you can lay a mesh of reinforcement through 3-4 rows of bricks. We murine the brick support of the foundation 15-20 centimeters above ground level and protect it with waterproofing material - mastic or roofing material with hot bitumen. After 5-7 days, we cover the finished brick pillar with earth, which we carefully tamp.


Despite the popularity of such a columnar foundation, it has its drawbacks. The seams between the bricks make such a support rather fragile and, under the influence of adverse factors, it can be destroyed.
Brick prices


For its manufacture, foundation concrete blocks of industrial production are used. Most often, we use a corpulent or with minor voids block measuring 20x20x40 centimeters.

It is a durable building material that can withstand significant loads. The columnar foundation of blocks is mounted by analogy with brick supports, taking into account some differences:
- due to the greater weight of the blocks, the thickness of the monolithic reinforced concrete base over the sand cushion varies from 50 to 70 centimeters;
- it is permissible to make it from crushed stone of large and medium fractions instead of sandy bedding. This helps to remove the moisture present;
- before installing the first row of blocks, it is necessary to make a pillow from the solution, on which the building material should be installed;
- the row to be mounted must consist of at least two blocks. Each subsequent one is installed perpendicular to the previous one and fastened to it with ordinary cement mortar for masonry.


The last row of blocks is mounted with an excess of 20-30 centimeters above the ground and is covered with waterproofing material to protect the joints and the blocks themselves from moisture and low temperature conditions, which together can lead to the destruction of this type of columnar foundation. When laying blocks on the surface, it is necessary to carefully control their location relative to the marked axes of the future bath building. We backfill the gap around the mounted block supports with previously excavated soil, which is also rammed.

Block foundation - photo
Laying blocks on a sloping site requires special attention. In no way can block supports be laid at the same depth. This can lead to the subsequent skew of the bath and the destruction of the columnar foundation.
Column foundation made of concrete
The reinforced monolithic columnar foundation made of concrete is considered the strongest and most reliable.


For its manufacture, we carry out preparatory and earthworks in accordance with the general technology. From reinforcement Ø12-14 millimeters we make round and square frames (we use 3 or 4 rods, respectively) of the required length, taking into account the protrusion above the pole by 15-20 centimeters. To do this, we connect the rods with a thin wire with round or square rings bent from smooth reinforcement Ø6-8 millimeters.
It is possible to pour a foundation pillar of the required size only with the help of formwork, which should be made from edged boards, chipboard and other suitable materials. However, this method is quite lengthy, laborious and financially costly.

At the bottom of the prepared pit with a layer of 10-20 centimeters, we pour and tamp a sand cushion, on top of which we lay roofing material or polyethylene, which is necessary to retain moisture in the poured concrete.
We immerse the mounted formwork into the hole and install the reinforced frame there.

Column foundation - formwork and reinforcement scheme

We pour concrete grade 400 into the formwork, which is prepared from cement grade M 400, coarse sand, gravel of fine and medium fractions, mixed in a ratio of 1: 1.5: 3 with water in an amount of 0.4 parts of the cement used.

Every 30-35 centimeters of pouring, we ram the concrete, removing air.
We cover the finished support with a film and let it stand for several days, after which we remove the formwork from the hardened concrete.

We cover the finished supports with waterproofing materials and fill the sinuses with previously excavated earth.
To reduce costs and time when arranging a columnar foundation for a concrete bath, instead of a hard formwork, you can use a fixed soft formwork, which is a roofing material with a fiberglass mesh. In this case, the holes for the support must be made using a drill of the appropriate size. Having cut off the roofing material of the required length, we twist it and install it in the prepared hole. At the same time, a sand cushion and a lower insulating layer are also necessary. Next, we install the reinforcement cage and pour concrete, as in the case of removable formwork. Using such material, we get a finished pile, immediately covered with a waterproofing material. And immediately after gaining concrete strength, you can perform the next stage of work.


 Photo - pouring process

Prices for roofing material
ruberoid
Video - Pouring a columnar foundation
When building a heavier bathhouse building (for example, made of bricks) or if you want to equip a basement, you can mount a columnar foundation with a grillage. This is a monolithic reinforced concrete strip structure that connects the upper points of all foundation elements buried in the ground.


To fill the grillage, you will need formwork material: edged board with a thickness of 20 to 40 millimeters, plywood, OSB or other similar building material. As well as reinforcement with a cross section of 10-12 millimeters and concrete not lower than grade 150. Most often, concrete grade 200 is used to fill the grillage, and if you make it yourself, you need to mix M400 cement, coarse sand and crushed stone of medium or fine fraction in a ratio of 1: 2, 5:4.5.
Calculate the amount of lumber for formwork. It should be noted that the height of the grillage should be at least 0.3 meters, and its width should be 10 centimeters greater than the width of the manufactured columnar supports.
- We determine the immediate height of the grillage and add another 0.2 meters to it, since the height of the formwork must be greater than the level of concrete poured into it.
- We fix the thickness of the formwork material in meters.
- We measure the total length of the future grillage.
- We multiply together all the obtained parameters and get the required amount of material for formwork in cubic meters.
We knock down the formwork box from the prepared lumber. In its lower part, holes should be cut for previously made pillars, which should rise slightly above the bottom of the formwork.

Video - Formwork installation
It is necessary to make frames with transverse square clamps from reinforcement rods, which can be bent from thinner smooth reinforcement or from wire Ø6-8 mm. They will give the necessary strength and reliability of the structure. Every 30-35 centimeters we connect the clamps and reinforcement rods with a knitting wire in an amount equal to the entire perimeter of the grillage. We calculate the size of the frame in such a way that it is 5-7 centimeters from it to the walls of the formwork.
If the finished foundation pillars are at a considerable distance from each other, then for reliability it is possible to strengthen the formwork with wooden supports, which must be installed strictly horizontally.
Before pouring concrete into the formwork box, we will install a reinforcing frame, fixing its lower part to the reinforcement protruding from the columns.
Video - Columnar foundation. Formwork, reinforcement, pouring
If pouring is carried out from a concrete mixer truck, then we pour the entire concrete mixture at a time, while removing air with a construction vibrator, a reinforcement bar, or simply with a shovel.

If you have to mix the concrete yourself and pour it for several days, then:
- at one time we fill in part of the grillage, divided vertically, not forgetting to remove air;
- before pouring the next part, the edge of the finished block with already hardened concrete is abundantly moistened with water.
Filling the formwork with a completely concrete mixture, cover it with a film and let it stand for several days. Then carefully remove the wooden box and our hanging grillage is ready.
It should be noted that regardless of the material used to equip the columnar foundation, this version of the foundation for the future bath is more reliable than the traditional tape one, and at the same time much cheaper (almost twice).


Video - Pile-grillage foundation
Video - The nuances of building a pile-grillage foundation
The choice of foundation for a house or other building is influenced by many factors. For each specific case, its own foundation design can be used. In the first place in terms of frequency of use is a tape structure; for unstable soils, a pile foundation is common. It is quite simple to build a columnar foundation with your own hands, which, in some respects, is not inferior to the listed base options. This design has its own varieties and nuances in the bookmark. Each of these points will be discussed in the article.
Solution Benefits
During the use of this type of foundation design, users and builders managed to compile a certain list of positive qualities that were identified. Among them are:
- the possibility of independent design;
- relative simplicity of calculations;
- the possibility of using on various types of soil;
- possibility of use in areas with level differences;
- the ability to avoid site planning;
- high speed of erection;
- long service life;
- relatively low cost of the project.

Perhaps these nuances do not apply to all types of columnar foundation structures, but this is exactly the case for a classic structure with a concrete grillage. There are also disadvantages, which are much less. One of them is the impossibility of building heavy buildings, the walls of which are made of bricks. The latter is able to exert significant pressure on the base, which often leads to destruction. This happens due to shrinkage, although on an industrial scale this foundation design is used for brick buildings on soils with permafrost. Another unpleasant moment is the inability to arrange a basement or garage directly under the house, since this type of foundation does not provide for laying a monolithic structure to a great depth.

Note! Pillar foundations are most often used for the construction of structures that use gas-filled blocks or are made using frame technology. It is also allowed to build buildings from rounded logs.
Varieties of designs

The design of the columnar foundation will largely depend on what specific structure it will be used for. If we are talking about an ordinary gazebo, then its dimensions will be much smaller than those needed for a bathhouse or a cottage. According to the material used, the types of columnar foundations can be divided into:
- monolithic with concrete grillage;
- monolithic with a wooden grillage;
- brick;
- bud-filled;
- rubble concrete;
- wood;
- monolithic from asbestos pipes;
- column-pile.
The first design option is the most durable. This is due to the fact that the pillars and grillage are a single structure that is able to evenly distribute the load exerted on all pillars. This design is more expensive than others, but will last much longer. Such a columnar foundation allows the construction of houses on several floors using frame technology or from a log house. The next version of the columnar foundation with a grillage is performed using a similar technology. Its pillars are also poured with monolithic concrete with reinforcement, only wooden beams are laid on them, which are the basis for the walls of the structure.

Most often, when they talk about a columnar foundation, they mean exactly the third design option, which is laid using bricks. Unlike the previous options, a brick column foundation is quite simple in construction and requires relatively lower costs. With good soil quality, as well as the right approach to construction, a service life of several decades can be achieved. Many ancient buildings that have come down to our time are built on this type of foundation. In some areas, on a foundation of this type, it is possible to build a house with several floors.
Note! Other types of blocks can be used as the basis for a brick foundation. In this case, the strength and stability of the base will depend entirely on the quality and strength of the material used.

A buton-filled columnar foundation is laid using brick or stone from old structures. This solution is suitable for stable soils and for areas where there are no level differences, since the stability of such a foundation is much lower than that of the previous options. The base of the rubble concrete structure is also built using the materials mentioned above, but in this case cement mortar acts as a link. The result is a monolithic but non-reinforced structure.

The wooden base of the structure is now practically not used, but still remains relevant for areas where it is necessary to raise the structure to a considerable height in order to avoid flooding. This applies to warm parts of the world. A similar method has been used in other areas, but for proper implementation, special processing of wood is required to prevent rotting and drying out. A wooden column foundation is an excellent solution for additional buildings near the house. This, for example, applies to terraces. In addition to antiseptic impregnation, wood is also covered with waterproofing material. Bituminous mastics are often used as the latter.

Another interesting design option is the foundation of asbestos pipes. Most often it is made in a manner similar to a monolithic columnar solution. In this case, the pipes act as formwork, into which reinforcing rods are inserted and concrete mortar is poured. Usually, a pipe with a diameter of 20 cm or more is used. The column-pile foundation is made using screw or other types of piles. In the first case, no special equipment is needed to build the foundation, except for a concrete mixer. Screw piles can be installed in their place by a small team of three people.

The advantage of this solution is the greater stability of the base of the structure. This is due to the fact that the pile plunges to a considerable depth, which passes the level of freezing and reaches the dense layers of soil, where fixation is carried out. The design with screw piles can be used under a log house or under a frame. If we are talking about bored piles, which are intertwined with a concrete grillage with a metal frame, then such a foundation is used in the construction of houses from blocks.
Varieties by depth

The difference between the foundations is carried out not only by the materials that are used to lay them, but also by the depth at which the base is mounted. Simply put, as with strip foundations, there are two types:
- shallow;
- buried.

In the first case, the immersion is usually 50 or 80 cm, which somewhat reduces the cost of equipping the base itself. Such a supporting structure is used for buildings that are light in weight. The recessed design involves the use of supports that go into the ground by 150 or 200 cm. Which depends on the level of freezing. This design is more preferable for areas where the presence of heaving soils or high instability of the upper layers is observed. In addition to the depth of the foundation, the height at which the grillage is located also differs. In this regard, there are:
- elevated;
- ground;
- buried.

Above ground foundation design options are great for those cases where the upper layers of the soil are characterized by a high degree of heaving. If the grillage is laid directly on the ground, then there is a possibility of distortion or damage. In the case of the construction of an above-ground version of the design, the pillars are made higher in order to raise the grillage to a certain height. The disadvantage of this solution can be considered the need for additional floor insulation. This is due to the free ventilation of the space under the house. Usually the sidewalls are closed and leave only small vents for ventilation.

The ground version of the structure is built on a prepared bed of sand and gravel. It is placed in such a way as to be flush with the surface. On the one hand, this eliminates strong blowing, as is the case with the above-ground version of the design, but on the other hand, for such a design, the need arises for the correct approach to waterproofing. The shallow version of the column foundation is very similar to the similar strip foundation, but in addition, supporting elements are prepared in the trench in the form of pillars or piles, which are recessed to a considerable depth. The second and third options are often implemented using a concrete grillage.
Basic concepts
Almost all types of columnar foundations have one principle according to which they are arranged. Certain nuances are important to consider in order to succeed. Among them:
- pillow under the posts;
- heel support;
- column design;
- the location of the columns;
- grillage device.
If we are not talking about pile supports, then preliminary backfilling is necessarily done under the posts. For these purposes, medium-grained sand is usually used. The thickness of the pillow itself depends on the amount of moisture in the soil, as well as the estimated weight. It can reach 30 cm, and the minimum allowable value is within 10 cm. If additional drainage is required, then an additional layer of rubble is laid under the posts, which passes water faster than sand. The functional purpose of such a pillow is a uniform distribution of pressure, as well as a decrease in the level of humidity under the posts.
For monolithic columns, which are made by pouring, soles are made, which are a small concrete slab with a thickness of up to 50 cm. It exceeds the support column in width and length in order to increase the interaction area. The next nuance of such a foundation is the need for reinforcement. If we talk about a monolithic foundation, then there are no questions regarding reinforcement, but this also applies to other options. Only in this case, external reinforcement is carried out, which eliminates the deformation of the columns. To prevent moisture from rising to the grillage and the building, it is necessary to properly approach the issue of waterproofing.
It is important to correctly determine the number of columns in the foundation and distribute them throughout the territory. This will determine how the load will be distributed. The departure of the columns above ground level will depend on how the grillage is laid, as well as what the relief of the site is. In some cases, the owners of houses on columnar foundations prefer to make a pick-up. This is an additional concrete structure, which is arranged between the posts to cover the underground space. Reinforcement is also required for it. A fence for a columnar foundation additionally strengthens the entire structure.
Note! In areas where flooding is possible, the height of the pillars can reach up to 2.5 meters above ground level. The calculation is based on the maximum level the water in the area rose to.
Self-calculation

The key to the successful completion of the construction of the structure is the calculation of the columnar foundation and the preparation of the project. They begin even before the process of preparing and planning the site for the foundation. It is better if a professional in his field provides assistance in drafting the project. Thanks to this, it will be possible to take into account all the nuances that relate to the soil and the expected load. The wishes of the customer are also taken into account. The main initial parameter for drawing up a design project is the area that is allocated for the building. The next important indicator is the mass of the structure. For the correct preparation of all documents, geodetic surveys on the ground and the binding of the future structure to a specific site will be required.

During the design, the following points will also be taken into account:
- soil specifics;
- proximity to aquifers;
- soil freezing level;
- number of floors;
- building materials;
- possible additional loads.

The first and second factors will determine the required depth of the columns or piles for the foundation structure, as well as their level above the ground. The third factor is necessary to determine below what depth the supporting elements of the foundation should be located. The number of floors affects the number of supporting elements, as well as the choice of material for construction. Additional loads are taken into account, which may be caused by wind, changes in the ground or precipitation. All these factors give a clear understanding of the quantity and parameters for the pillars of the future foundation.

With sufficient experience, you can try to perform the design work for the structure yourself. To do this, you will need to collect all the data related to a particular area. You can find them on the official websites of various services or get them directly from the services. During the derivation of readings, knowledge of many formulas will be required. But even using online assistants may not help, because important factors will be missed that can only be assessed when staying in a particular area. If you turn to specialists who have already performed more than a dozen calculations for a particular region, then you can be sure that they are well aware of all the nuances of the soil in the area. In addition, professional services involve the issuance of specific documents that will be required when obtaining the necessary permits for construction.
Construction process
Each foundation design option has its own construction nuances, so it’s worth considering step-by-step instructions for several options. The first of these will be a monolithic columnar foundation.
Monolithic option
After drawing up a design project, the turn comes to practical work. The first step is the preparation and marking of the site for a monolithic columnar foundation.

As you can see in the photo above, it is necessary to pre-mark the area where the structure will be located. To do this, the corners of the building are marked with pegs. A well-marked rope or twine is stretched between the latter. Special accuracy of the corners is not required, since the marking of the structure is carried out for the preliminary preparation of the territory for construction.

The next step is to remove the top layer of soil along with the vegetation that is located on it. For ease of operation, you can tamp the area to make it easier to move around.

When the preliminary stage is over, you can proceed to a more accurate layout of the foundation structure. To do this, the corner pegs are set exactly in their places, the distance between them is checked. It is also necessary to determine whether the diagonals of the resulting figure of the future foundation structure are equal. If they do not match, then it is worth finding out which of the corners has the wrong angle and move one or more columns.

In accordance with the developed project, the marking of the columns is applied, which will be mounted later. For these purposes, additional stakes and ropes are used. The latter are stretched in places where rows of columns will pass. The photo shows that the twine, which is stretched in the middle, marks the edge of the pillars of the foundation structure. Simultaneously with this procedure, notes are made of where exactly the columns under the foundation will be located.
If you pay attention to the photo above, you can see that the master specifically marks the limits of the pit for the column. To do this, four pieces of reinforcement are driven in along its edges, which facilitates orientation during digging. It can be started immediately after marking a specific element of the foundation structure. This can be done mechanically or manually. Everything will depend on the quality of the soil that is in a particular area. A square heel with a side size of 40 cm is considered standard, but in certain cases it can be increased to 80 cm. It is this size, plus the gap to the formwork, that the foundation pit should be under the column.

The distance between the individual columns of the structure can vary from one to three meters. When the pit for the foundation column is ready, it is necessary to waterproof the lower part, where the heel of the supporting element will be poured. The photo above shows that for this, a polyethylene oilcloth is laid on the bottom. The density of the oilcloth should be 200 microns. It is located with a twist on the walls. Additional waterproofing and at the same time formwork of the structure is bikrost, roofing material or similar material that does not have powder. Waterproofing to the wall can be fixed with nails or other fasteners. Subsequently, it will be pressed down with concrete. The height of such formwork should be equal to the height of the heel, which will be filled under the column.

The next step in the construction of the column foundation structure is the preparation of reinforcing elements that will be poured with concrete. For these purposes, rods with ribs are used that have a diameter of 10 mm or more. It is necessary to calculate the elements in such a way that the heel is larger in size, and the vertical reinforcement matches the column. The height of the reinforcement should be sufficient to unite the posts with the monolithic foundation grillage, which will be poured later.

To make it easier to bend the reinforcement, you can make a similar fixture to the one shown in the photo above. For this, two metal corners are used, which are screwed to the wall. Moreover, their length is equal to the length of the element that will bend. The distance between the two strips is equal to the diameter of the reinforcement that is used for the foundation. To make it easier to bend the rods, you can use a metal pipe as a lever.

To make the crate easier to assemble, stands are made, as shown in the photo above. A support is screwed to the vertical plane, in which notches are made at a distance of reinforcement bars that will be embedded in the column. Additionally, a stand is made, which can be rearranged depending on the length of the reinforcement. It can be seen on the right.

After that, the horizontal structural elements are distributed at an equal distance. To do this, use a tape measure or other device. The next step is to lay two more vertical racks, as seen in the photo above. To fix the modules of the structure together, it is necessary to use a tie wire that securely clamps them in place. For knitting, you can make a small hook yourself, which will simplify the task.

Reinforcement under the heel is performed separately and is represented by a small square in which the bars are laid perpendicularly, as shown in the photo above. They are tied at all intersection points to ensure a secure fit.

Next, the preparation of the supporting supports of the structure is carried out, which will raise the reinforcement under the heel and under the column not a small distance from the ground. This is necessary so that the element is filled with concrete mortar and from below.

Reinforcement for the heel structure is installed on plastic legs, and reinforcement for posts is fixed on top. All elements are tied together with knitting wire. So that it turns out as shown in the photo below.

When the reinforcing elements are ready for the construction of the columnar foundation, formwork is made for each column. For this, an OBS plate with a thickness of more than 12 mm is excellent. If you take a material with a smaller thickness, then it will bend under the pressure of the concrete solution. For proper reinforcement of the columnar foundation, the concrete must cover the mesh by at least 5 cm on each side. This means that the length and width must be 10 cm more than the reinforcing elements. The height can be 5 cm greater.

To fasten the walls of the formwork under the posts to each other, hangers for a plasterboard profile are suitable. In this case, the middle part of the structure is cut out and only perforated planks remain, which are bent into corners, as shown in the photo below. They are screwed to the walls and combine them into the required structure.

When all the elements are ready, they are assembled into a common structure, which will ensure high-quality pouring of the foundation.

In order for the OSB structure under the foundation columns to have a sufficient water-repellent effect and not swell under the influence of moisture from the solution, it must be covered with cold-prepared bituminous mastic. This is done both outside and inside.

The next step is the installation of the armored belt under the foundation structure in the prepared pits.

It is necessary to place the frame exactly in the middle of the prepared pit so that the concrete solution can freely and evenly fill the space around the structure. In addition, the structure must be set exactly vertically in level. To achieve this, you can resort to the trick, which is shown in the photo below.

A regular bubble level is used to achieve a vertical position of the structure. After that, the reinforcing base is tied to an additionally laid beam so that there is no displacement during pouring. The beam is fixed with weights in the form of bricks or other devices.

In this way, the installation of all elements that are responsible for the stability of the structure of the columnar foundation is carried out.

Next, concrete is mixed for the foundation structure. Filling columns will be done in stages. The first step is to fix the heel of the column under the foundation. It is enough to knead for each heel. The mortar for the foundation structure can be laid with a shovel. Its level will be equal to the height of the prepared waterproofing. To evenly distribute the concrete in the heel under the foundation, you will need an electric vibrator. It is lowered into the mortar to fill any voids and remove air that can weaken the structure of the foundation post.

It remains to wait for the time during which the heel under the foundation column will gain strength. As soon as this happens, you can proceed with the installation of the formwork for the column, which was prepared from OSB sheets. The formwork is set in such a way that the reinforcement is located in the middle.

If you pour concrete into the formwork without fixing it, this will lead to displacement of the formwork and a violation of the foundation structure. Therefore, it is necessary to perform backfilling, which will fix the formwork under the foundation column. During the backfilling of the foundation structure, earth may enter the post formwork. To prevent this from happening, the upper part of the formwork structure for the foundation is covered with a dense film, as shown in the photo above.
Additionally, it is fixed to the formwork by means of a construction stapler so that the oilcloth does not move during operation.

For backfilling, you can use the soil that was taken out during the digging of foundation pits. It is carefully poured between the wall of the pit and the formwork under the foundation column. After that, compaction can be done using a hand rammer, which is easy to make from a log and a small crossbar in the form of a handle.
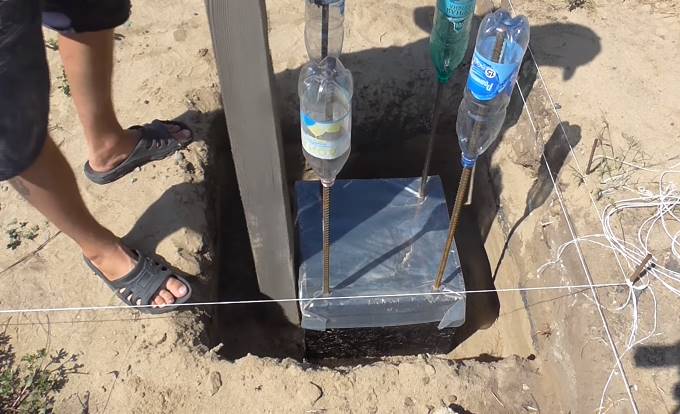
To protect everyone who will move around the construction site, it is necessary to close the protruding rods with plastic bottles. The latter are easy to find and will do the job just fine.

To make the backfill dense, you can additionally compact it with water, which will allow the soil to sink under its own weight.

The protective film is removed from the formwork under the foundation column. Small stones remained at the bottom of the structure, as well as other debris that could interfere with good adhesion. To eliminate this, you can remove them using a conventional or industrial vacuum cleaner, the tube of which will be tied to a pole, as shown in the photo above.

Before pouring the next portion of concrete under the foundation, it is necessary to moisten the heel under the foundation, as well as the formwork. This is done for better interaction between the components of the foundation structure. After that, you can fill the column into the prepared formwork. The solution must be compacted with a vibrator to exclude the presence of air in the structure. So that in the process of gaining strength, the column under the foundation does not lose too much moisture, it is necessary to put oilcloth on the reinforcement of the foundation, which prevented the ingress of earth into the column.

After pouring the columns under the foundation, you can begin to dig a trench between the foundation columns. In this case, a trench will be needed for the construction of a grillage under the foundation. Its depth is calculated in such a way as to place a pillow of gravel and sand in it. The second in this case will be 30 cm, and the first will be enough at 15 cm. In this case, it is also necessary to decide at what level the foundation grillage will be. If it is a little deeper, then it is necessary to go deeper to this level.

First, a sand cushion is laid under the foundation structure, which is well rammed. Next, the second pillow is backfilled under the foundation in the form of crushed stone of a fine fraction. It also needs to be well compacted in order to achieve an even distribution of the load from the foundation to the ground. For this, a gasoline or electric vibrator is used. It is best to work with it perpendicular to the foundation trench so as not to collect rubble around the edges.

When the bedding for the foundation structure is ready, you can proceed to the construction of the formwork for the columnar foundation. It will require trimming of a wooden beam. The length of such a beam for the foundation formwork should be such that it can be immersed in the ground by 45 cm and protrude to the full height of the foundation grillage. To make it easier to drive the timber into the ground, it must be sharpened from below with an ax, as shown in the photo.

After that, the element is leveled and hammered with a sledgehammer to the required depth. Periodically it is necessary to check the level of the structure, as it may go astray. In addition, this will be the key to the correct installation of the formwork under the foundation.

A board is nailed to the installed supports under the formwork. It is necessary to arrange individual elements for the foundation formwork in such a way that there are no gaps between them.

From exposure to moisture, the foundation formwork board will deform, so it must be protected. The easiest way to do this is using plastic wrap. It is fixed to the boards with a construction stapler.

To strengthen the formwork structure, jibs are installed, which abut against another rack. Elements are mounted through one rack. Free racks are connected to each other by means of a knitting wire, as can be seen in the photo below.

Additionally, transverse elements are nailed on top of the structure, which tighten the foundation formwork walls together. It is first necessary to lay reinforcement inside, because then it will be problematic to do this.

Note! For reinforcing the foundation, reinforcement with a diameter of 14 mm is used. In this case, the clamps can be made from rods with a diameter of 8 or 10 mm.
The reinforcement that remained sticking out of the foundation columns must be bent in order to intertwine it with the reinforcement for the grillage. It is tied to the rods, which are laid in the formwork by means of a knitting wire.

When everything is ready, you can fill the foundation with concrete. This is easier to do with a concrete pump that can be directed around the perimeter of the foundation. After pouring, the foundation grillage is processed with a vibrator and leveled with a trowel.

When the foundation has gained a sufficient measure of strength, the formwork can be dismantled and the foundation cleaned of soil residues. You can clearly see the installation process of the construction of this foundation in the video below.
With brick pillars
This design option is constructed somewhat simpler than the previous one, but it should be understood that a columnar foundation made of blocks cannot be used for serious buildings. It is perfect for sheds or arbors, where the weight will be minimal. Marking for this type of foundation construction is carried out in a similar way as for the previous option.
Foundation pits are constructed with a small margin so that the support cushion is slightly larger than the area required to support the blocks. Crushed stone is laid on the bottom of the prepared pit. Its layer can reach 20 cm. It is important to compact the material well. It not only ensures the correct distribution of the load, but is also responsible for drainage, which will eliminate the effect of liquid on the stacked blocks.

After laying the rubble, sand is poured. Its layer will be ten or more centimeters. It is important to tamp it well and level it in a horizontal plane.

After that, you can proceed to laying blocks. They are leveled and fastened with cement mortar. The second row is laid out perpendicular to the first to ensure the dressing of the seams for greater structural strength. On top of the blocks, waterproofing of the foundation is laid in the form of roofing material. It is necessary to prevent moisture from entering the grillage, which can rot from it. As a grillage for such foundation structures, a wooden beam with a cross section of 15 cm is most often used. It is laid around the entire perimeter of the foundation.
At the intersections of the structure, interlacing is carried out by means of a spiked connection. The photo shows that two beams can also be connected by a half method. In this case, in each of the elements for the foundation grillage, a cut is made for half the thickness and the width of the log. After that, the two elements of the foundation are fixed to each other by means of a stud or a self-tapping screw with a hex head.
Pile option
The next option for the design of the foundation, which can also be classified as columnar, is a pile foundation with a grillage. For self-construction of the structure, screw piles are suitable, which are easiest to install without additional equipment. Such a foundation has sufficient reliability and allows you to gain a foothold in strong layers of soil. This is done quite simply, because piles for such a foundation can be selected in a wide variety of lengths. The question will be only in the convenience of screwing them. In some cases, additional platforms will be required during the start of work. But most often such a foundation is established without them.

The issue of marking for the construction of the foundation based on screw piles at the initial stage is relative. This is due to the fact that it is worth starting from the first pile during work. Its installation for the foundation is determined by the plan, which indicates exactly how the house should be located on the site. It is necessary to choose any corner of the foundation from which it will be convenient to start work. This pile will be the starting point from which it will be easy to make the rest of the measurements for the foundation.

It will be easier to install the pile if you prepare a small pit for it. Usually, a depth of 30 cm is enough for these purposes. The diameter of the pit is made somewhat larger than the diameter of the pile under the foundation. You can dig it out with a garden drill, if its diameter allows it, or with an ordinary shovel.

It will be easier to install such a foundation if you do not just screw the pile using a lever that is inserted into the hole, but with a special device. It is possible to rent a pile sleeve, as shown in the photo above. Thanks to the arcs that are located on the sides of the clutch, it is easier to transfer force from the lever, which is in any position. At the same time, the pile is immersed under the foundation smoothly. It is not always convenient to rotate the pile under the foundation through the hole located on top, since there may be restrictions on the area of movement around the pile.

One pipe will not be enough as a lever that will be used to drive the pile into the ground, since the direction of the force that will be applied with its help can change the position of the foundation pile, which is very inconvenient. For the construction of the structure, at least two levers are required. Each one is three meters long. In some cases, to properly install the structure, longer levers will be required if the pile must lie quite deep.

To make the installation of the structure easier, you will need at least three people. Two of them act on the levers. The task of the third at the initial stage is to keep the pile in a vertical position. As long as the main part of the pile is on the surface, it makes no sense to use a bubble level for the structure. This is due to the fact that the pile still has a significant amplitude of movement.
Note! The wall thickness of the lever must be at least 3 mm in order to provide the required force for screwing the pile.

Screwing occurs clockwise. This can be determined by the direction of the screw at the end of the pile structure. As you can see in the photo, the main load during the screwing of the structure for the one who holds it in a vertical position falls not on the hands, but on the shoulder. Hands act as assistants, since it is almost impossible to wrap a pile of such a diameter well. The emphasis is supported by half-bent legs with legs wide apart.

As soon as most of the pile structure is in the ground, it is necessary to increase the force, since screwing in will be more difficult. To do this, the levers are extended to their maximum distance so that only a small part clings to the coupling arcs.

As soon as it becomes clear that the pile has taken a good position and is firmly held by the ground, you can proceed to the exact positioning of the structure vertically. This will require a level that can be fixed on the pile body with a magnet. The photo shows that the level is located on a pile for a reason. It is placed perpendicular to the two support arms. This is the only way to correctly track the position of the pile. For ease of tracking, you can use another level, which is installed directly under the lever.

When the level is in place, you need to position the structure in a slightly different way. If in the previous version the pile was held by the shoulders, now it must be leveled by the weight of the body, directing it in the opposite direction from the one in which the pile is tilted. The support is also carried out on the legs widely spaced and bent at the knees.

The deeper the pile goes, the more effort will have to be made to guide and rotate it. You may have to enlist the support of a few more people, as you can see in the photo.

When the installation of the first element of the foundation structure is completed, it is necessary to determine the point at which the second corner pile will be located, which is in line with the first. Measurements are best taken at the centers of the circles. This means that the end of the tape measure is installed on the central part of the pipe. The distance to the center of the second pile for the foundation is measured. It will be equal to the total length or width of the house, from which the width of one wall is subtracted. Once the distance is determined, it is necessary to arrange the piles for the foundation in one line. The easiest way for these purposes is to find a common landmark, for example, a fence and place the foundation structure at the same distance from it.

The second pile is screwed in in the same way as the first. But now it is necessary to monitor not only the vertical level of the pile for the foundation, but also the distance at which it is located from the first pile. If in the process it becomes necessary to adjust the position of the structure, then it is worth acting not by simply tilting in the intended direction. The photo shows that the pile must be tilted in the opposite direction to the one in which it is necessary to align the pile. After that, two turns of the pile under the foundation are made, and it is leveled to a vertical position. If this did not achieve the desired effect, then the operation must be repeated.

When two piles are already in place, you can proceed to the installation of the third. The point of its installation is calculated somewhat more complicated than in the first and second cases. For the installation of the third pile of the columnar foundation structure, it is necessary to be guided by the Pythagorean theorem. The width of the building is known, the length is also known, now it is necessary to calculate the diagonal or hypotenuse of a right triangle. To do this, the thickness of the wall is subtracted from the width and length, since the measurement is centered, and each figure is squared. The sum of the resulting numbers will be the size of the diagonal. The photo shows that one of the ways to mark the third point of the foundation structure is to use two tape measures. At the intersection of the required values is the location of the third pile.
Note! If there are no two long length tapes available, then you can use twine, on which the required size is marked.

After determining the location of the third pile under the columnar foundation, the pile is pre-installed in the pit prepared for it. When it is securely in place, it is necessary to re-measure to make sure that the foundation pile is in place. If there are certain errors, then it is necessary to align the foundation pile in the way that was given above.

When the installation of the pile in its place is completed, it is necessary to additionally fix it. For this, the pit that was dug earlier is covered with soil. It is important to compact the latter well so that the upper part of the foundation pile does not loosen.

The fourth pile under the foundation is also mounted using the size of the diagonal and the wall. In this case, all indicators are known, so you can use tape measures or twine and screw the pile under the foundation into place. Periodically, while screwing the pile into place, it is necessary to check whether the distances at which it should be in relation to other piles are observed.

The support of the entire structure is ready, now it will be easier to install the remaining piles under the foundation. For these purposes, a twine is stretched between all the risers. It must be located as close to the ground as possible. It will be easier to act if two strings are stretched between the foundation piles, which will indicate the corridor in which the piles should be located. Each wall is divided into two halves. The resulting size is marked on a stretched string and a pit is dug under it for the pile of the future foundation. Thus, it is necessary to act on all four sides of the house.

During screwing, it is necessary to ensure that the marked point is on the center of the pile tube. All foundation piles are driven to the required level.

Piles under the foundation will also be required for internal walls. For their marking, you can use the intersection points between the lines of existing piles. For this, ropes are stretched between the piles, which are clearly visible. At the intersection points, where necessary, a pit is prepared and the pile is screwed in. At the same time, it should be located in such a way as not to pull the rope and not deflect it. It is important to monitor the level of the foundation pile throughout the screwing process.

The pile should be located at the intersection of the stretched ropes as shown in the photo above. The ropes are tangent, so the center of the foundation pile is not the same as the center of the pile that will be screwed in.

As soon as all the piles are installed in their places, it is necessary to trim them to a horizontal level. This will allow you to properly position the foundation even on an inclined site. For this purpose, two tools can be used. One of them is the laser level. They are easier to use. It is enough to position the beam at the required height and project it onto the pile body. After that, markings are applied to the piles for the foundation and trimmed with a grinder.

Another option is to use a water level. Before use, it must be well aligned to eliminate any bends. Further, the container in which the water for the hydraulic level is located is installed on one of the piles. One of the masters lowers part of the tube into the container, and the second creates a vacuum so that water under its own pressure begins to fill the tube.

Next, the performance of the hydraulic level is checked. Its two ends are connected together and a certain time is waited. After it has passed, the liquid in the two nozzles should reach the same general level. If this happens, then you can proceed to the process of measuring the height for the foundation piles. If not, then you should carefully examine it and identify kinks or places where airing has occurred.
Note! The longer the hydraulic level, the more time it takes for the liquid inside it to calm down.

On one of the corner piles of the foundation, a point is displayed where all foundation piles should be located. One part of the hydraulic level is applied to it, and the second is brought to the next corner pile. As soon as the water level calms down, you can make a mark on the pile, along which cutting will be performed. Thus, the label is transferred to all corner piles of the foundation.

To mark the line over the entire area of the foundation pile, it is necessary to make a pattern from a plastic pipe, which will be cut on one side for ease of installation on the pipe. A circle is drawn with a marker.

To transfer the marking line to the rest of the piles, which are in the middle of the foundation structure, it is necessary to pull a strong fishing line along the marks on the extreme piles. It will be the pointer to the required line. After that, marking is performed with a marker at the selected point. With the help of the prepared pattern, the line is drawn over the entire area of the piles.

As soon as the marking of the piles for the foundation is completed, you can proceed to trimming all the elements along the drawn lines.

The next step is to fill the installed screw piles for the foundation. This is done not with concrete, but with an ordinary cement-sand mortar in a ratio of three to one. The mortar must be thin enough to fill the pile cavity. The purpose of this procedure is not to give additional rigidity to the foundation, but to prevent oxygen from attacking the internal walls of the pile, which could lead to corrosion and destruction of the foundation. Filling is not done to the very top. It is necessary to leave a gap of 10 cm. It is filled with a dry mixture, which can be purchased ready-made.

The next step is the installation of the head on the pile. It must be on a horizontal surface. The purpose of the cap is to hold the grillage on which the walls will be fixed. The head is welded to the pile so that the fixation is as reliable as possible.

Welding seams are cleaned and covered with paint, which will protect them from corrosion. A video of the complete construction process of this type of foundation is below.
Summary
As you can see, the columnar foundation is a fairly common design. It is an indispensable option when it is planned to build a small lightweight building. The last can be a rounded log or frame. When laying the foundation, it is important to take into account all the features of the soil, as well as other parameters that were described in the article.
The foundation for the house can be tape or made of blocks. But for small buildings, the best option is a base erected using a columnar technology. How to make a columnar type of foundation that has long been popular in folk construction with your own hands?
When building a gazebo, garage, outbuilding, greenhouse or other structure that does not provide for a large load from the structure, it would be more appropriate to use columnar technology in the construction of the base.
The main advantage of columnar foundations is that their use can significantly save money on materials and construction time.
Definition
The columnar foundation consists of pillars buried in the soil and protruding outwards. The material for manufacturing can be:
- concrete mixture;
- various types of bricks;
- wood;
- natural stone;
- pipes made of metal or asbestos cement as fixed formwork.
You can install both ready-made piles, and pour them yourself into various types of formwork. The most common and cheapest option is to pour concrete into a wooden or fixed columnar formwork in the form of pipes of various diameters. Brick is also quite actively used.
The use of wooden poles is becoming a thing of the past, since wood requires additional processing from decay and cannot boast of such a lifespan as concrete. Oak decks are best for this option, and oak is now worth a lot of money. Despite all the processing, wood is unlikely to last as long as a concrete pile.
The depth of the entire column foundation structure depends on many factors, such as:
- soil freezing level;
- soil type;
- groundwater level;
- building type.
If 40-50 cm is enough for a garden gazebo, then for a more serious structure it is better to make the depth 20-30 cm below the level of soil freezing.
Technology and stages of the device
The first step is to mark the area. If the installation of the columnar foundation will be carried out using a fixed columnar formwork in the form of an asbestos or metal pipe, then you can use a hand drill to dig holes or dig holes of the required depth manually.
Columnar bases must be placed at all angles of the future structure and at the intersection of the walls where there will be the greatest loads. The distance between the pillars should not be more than 3 m. The top of the pillars is leveled at the same height using a level. About 20 cm of sand is poured into the bottom of the pit, pipes or formwork made of boards, plywood or OSB boards are installed. Inside the pipe or formwork, you need to install a reinforcing frame made of reinforcement.
Depending on the diameter of the pillar, it is made of several rods with a diameter of 10-14 mm with a mandatory horizontal tying with 6 mm wire, the rods should protrude from the formwork by 10-20 cm for the subsequent pouring of the grillage. The resulting frame is inserted into the pipe or formwork. Then you can start pouring concrete into the formwork of the columnar base.
(Video: columnar foundation formwork, manufacturing process)
Pouring concrete
For pouring, a concrete mixer of such a volume is required to pour one pile without allowing the solution to solidify. You can mix the solution with your hands, but then you can’t do without assistants. It is poured in layers of 20-30 cm in order to remove air from the solution as efficiently as possible. An internal vibrator should be used to remove air and voids in concrete.
If this tool is not available, you can use a metal rod. To do this, with frequent movements, it must be stuck into the solution, achieving the removal of voids and air.
Waterproofing
After the concrete has been poured and dried, it is required to waterproof the columnar base. A fixed columnar formwork made of pipes can be wrapped in a couple of layers of roofing material, and the joints can be treated with resin or tape.
grillage device
A grillage is called the upper part of the structure, which connects the piles to each other. It is made from concrete beams or poured with concrete into the formwork. There is only one meaning - to tie the protruding ends of the piles from above. The grillage can be high (from 50 cm above the ground) or low (lying on the ground). For light buildings such as gazebos can be made from wooden beams.
For the installation of the grillage, a reinforcing belt is made of reinforcement, which is connected to the ends of the rods protruding from the piles, the formwork is installed and poured with concrete. Often a brick wall is placed between the soil and the grillage - a pick-up.
This is done to protect the space under the building from snow, debris, water and other things. In this case, it is necessary to provide holes in it for ventilation of the space under the building and installation of communications. To prevent cracks during settlement, the pick-up is not connected to the piles.
Do-it-yourself columnar foundation is quite easy and economical, but also reliable and of high quality. A good result can be achieved only if all building codes and requirements are met, since any violation can lead to the building being skewed or damaged. The most important ban on the construction of a construction site is the impossibility of installation work on heaving soil. There are many videos and literature describing the installation process, but today, we will discuss the easiest scheme with you and find out how to get the job done right.
Advantages and disadvantages
The main advantage of such a foundation is, first of all, its versatility. This quality is manifested in the ability to install a foundation on any type of site with minor preparatory processes and waterproofing. Bookmarking it is quite simple and does not require special skills, so the process can be done by hand. In addition to all this, the device has a number of other advantages:
- A very simple way to build a building that does not require building skills and watching thousands of videos in order to complete it;
- Installation does not require the presence of specialized equipment and craftsmen on the site;
- The design is compatible with all types of soil, except for heaving soil;
- It is possible to perform construction work on a hilly area;
- No need for preparatory work with the land area;
- Relatively low cost of materials, compared with other types;
- The speed of construction of the object - no more than two weeks;
- Minimum waterproofing performance;
- Good level of foundation strength;
- Long service life. If all the standards are met, then the building can withstand about 50 years.
Attention! Of course, this is not the whole list of the advantages of the functioning of the foundation, there are about twice as many of them.
To that huge list of advantages, you need to add the real disadvantages that the installation has. So, they appear in the following characteristics:
- Very low ability to endure loading pressure;
- With such a foundation, the construction of a basement becomes unrealistic.
As you can see, the list of cons is quite short, if your project does not plan to build a basement, and the building itself is a light building, then you can easily build a columnar foundation with your own hands.
Work materials

Another huge advantage of such bases is the possibility of choosing different materials. Based on video recommendations and literature, we have identified for you the most popular variations of such a building:
- asbestos pipes. Such material has a sufficiently high strength, cost-effectiveness and comfort during installation.
- Brick . This is one of the most popular bookmark options. Although it is worth noting that only a long service life and durability can be distinguished from its advantages. At the same time, such a material has a number of disadvantages, such as the complexity of installation, the high price of materials and the susceptibility to heaving of the earth, which leads to the appearance of deformations.
- Wooden logs. This option is the most economical, and is used in construction projects for light types of buildings. Also, the ease of installation work of the object should be attributed to the pluses. Among the shortcomings, there are such negative characteristics as fragility and the mandatory need for waterproofing and treatment with a special septic tank.
- reinforced concrete material. Concrete has a very high level of strength, a long service life. It is worth noting that this is exactly the option when quality equates to price. But, there is also a drawback, which manifests itself in the complexity of installation work.
Attention! Looking at the above materials, we can say that a do-it-yourself columnar foundation can be made both from a monolith and a prefabricated structure.
It is worth noting that it is better to give your choice towards a monolithic base, since the kit includes it and reinforcement, which increases the ability of the foundation to withstand the load. If you choose a prefabricated type of construction, then poles may be pushed out during the winter season, which will lead to numerous repairs. It is for this reason that we still recommend choosing a monolith.
Design features

It is very easy to make a columnar foundation with your own hands, but in order to do the installation correctly, we need to know the design features. This section is dedicated to this information. The base of the anchor points is tamped with a 20 cm sand cushion, which helps to remove precipitation. After that, they need to be poured with a solution of concrete - this will create a base monolith. The structure also includes a columnar support with reinforcing reinforcement. The pillars should rise above the ground by half a meter. It is worth considering that they are connected to each other by a grillage.
Attention! A very important and necessary detail of the integrity of the structure is waterproofing, which can be made with roofing material.
We carry out calculations for construction

A lot of citizens who plan to erect a building are concerned about the question of how to make a columnar foundation. It is for this reason that this article was written. First. What you need to do is to make accurate calculations. For this process, it is better to use the services of professionals, as this is a rather complicated and responsible process.
If we consider elementary data, then they include the area of \u200b\u200bthe building and its weight. You should also perform a geodetic analysis of the site. In addition to these data, the settlement information should also contain the following list of descriptions:
- Possible amount of additional load on each support;
- Materials that are necessary for work;
- Number of floors in the building;
- The depth of soil freezing and the level of protrusion at the same time;
- Data on the course of surface waters;
- Features of the land in the construction project area.
The information obtained will allow you to determine the number of pillars, the depth of the bookmark, the necessary installation technology, the type of grillage and many other data. If you wish, you can do the calculation yourself on a calculator.
Attention! If you have professional-level documentation, then registering a project will become much easier.
Stages of construction work for different types of materials

Even at the design stage, we determine the choice of the necessary material. As we have already found out, the most polar of them are the following types of pillars:
- Concrete;
- Brick;
- Rubble concrete;
- Brick;
- A rock.
After studying the literature and videos on this topic, we have identified the easiest way to build a foundation. Before starting, you need to clear the area and level the surface. If you have clay soil on your site, then you need to add crushed stone, which will add rigidity to the soil. After that, you can start marking up. This action should mark the location points for all structural details. To summarize everything, we offer you an option on how to make a columnar foundation with your own hands step by step instructions:
- Site clearing;
- Territory marking;
- Earthworks that can be done with your own hands or with the help of special equipment;
- If you are installing short pillars up to a meter, then you can not strengthen the wells;
- Otherwise, you need to expand the hole and install a spacer. You can also create a reinforced concrete pillow at the bottom, which will make it possible to avoid subsidence of the room.
- Next, formwork should be done. For such an action, wooden shields are best suited.
- We carry out the reinforcement of the pillars. In this process, rods with a cross section of 12 mm will help us. To create jumpers horizontally, you need to use wire. In order to avoid problems in the future with tying with a grillage, you need to leave a distance of 15 cm above the top of the post.
- When the reinforcement is already connected, you can start pouring with a solution. When performing this process, you should ensure that there are no voids left. If they appear, then you need to tamp the mixture.
- It is also worth performing waterproofing, which will protect your structure from excess moisture. You can accomplish this task with the help of mastic or roofing material.
- After carrying out all the work, you need to start making grillage. This element is mounted from reinforcement with jumpers, with the help of which a frame is created and formwork is installed. Now we pour concrete into this form and let it dry.
- The last stage of construction work is the picking up of the base, which is mainly made of bricks. It is worth considering that it is imperative to leave an entrance for ventilation and communication.
As we found out, the columnar base is a fairly simple bookmarking process that does not require any skills or hours of studying video instructions.
Among all the varieties of concrete foundations used today, the columnar-strip foundation deserves special attention. Most often, this design is used in the arrangement of heavy and massive construction projects.
Subject to competent construction, the column-and-strip structure will have the highest performance. At the same time, relatively little time and money are spent on arranging such a foundation, and all the required work can be done on its own.

Read the general information about the column-strip bases, study the guide for arranging such structures and get to work.
The use of such a design will be justified when performing construction work in areas with a large depth of soil freezing.
In such situations, the construction of an ordinary buried strip foundation will require irrational financial investments, and a shallow structure simply cannot cope with the tasks assigned to it.
In such conditions, a column-strip foundation is an excellent option. Even a beginner can cope with the arrangement of such a design.

An additional advantage of the base under consideration is the possibility of its arrangement on inclined sections. But if the underground aquifer is located too close to the soil surface, it is recommended to refrain from such a decision.
In the considered design, the largest part of the load falls on the base of the pillars. In this case, the pillars must be placed in the ground at least 200 mm below the freezing point of the soil. Thanks to this, maximum indicators of durability and reliability of the structure will be ensured.

So that in the future the tape does not rise under the influence of natural changes in the structure of the soil, its lower part must be made somewhat expanded.
In the construction of the column-tape type, the tape performs the functions of only the upper grillage, which is necessary for connecting the pillars into a single structure and additionally increasing the strength of the base. In this case, the tape does not exert any load on the ground.

With the help of the tape, the most even distribution of the load on the main foundation pillars is ensured.
The foundation must be designed so that after the construction is completed, at least 150-200 mm of free space remains between the lower edge of the grillage and the top layer of soil. Due to the presence of such a gap, the foundation will not receive any significant damage even with strong swelling of the earth.
What are the poles made of?
Before proceeding with the independent arrangement of the column-strip base, you must choose the optimal material for the manufacture of supports. Available solutions include: wood, concrete blocks, bricks, as well as pipes made of asbestos cement and metal. Check out the features of each option and choose the solution that best suits your situation.

They are rarely used due to their relatively low durability. Pillars made of wood are only suitable for arranging a foundation intended for installing a terrace or other similar structure.
The optimal diameter of wooden poles is 150-200 cm.
Before deepening the pillars of the material in question into the ground, they must be treated with antiseptic and flame retardant impregnation. Thanks to this treatment, the resistance of the material to decay, pest damage and fire will be significantly increased.
For waterproofing wood, bitumen-based mastics are best suited.

Brick-iron ore is well suited for arranging a columnar-ribbon structure. With its use, shallow-depth columnar foundations are also erected.

Supports in the form of concrete pillars, additionally reinforced with reinforcement, are considered the most reliable. In view of this, it is these supports that are most popular.

Concrete pillars can have either a solid (monolithic) structure or consist of several blocks.
It is important that the width of the pillars is at least 40 cm.

Pipes made of asbestos cement or metal are very easy to install. Installation is reduced to the placement of hollow pipes in pre-prepared recesses, the installation of reinforcement bars inside the pipes and the final filling of the cavity with concrete mortar.
The work is done extremely quickly and simply. The optimal pipe diameter is selected individually, taking into account the expected load on the base being built.
Stages of arranging the foundation
The construction of the foundation of this type is carried out in two stages. First you will need to create the base of the structure from the pillars, and then equip the shallow concrete strip.
pillars
Before starting work, determine the optimal depth of the column-strip base. At this stage, consider the following options:
- type and features of the soil structure;
- ground freezing level;
- depth of groundwater passage.
There are shallow and deep foundation structures. When arranging a shallow foundation, the pillars are usually immersed in the ground by 40 cm, while in the case of building a buried foundation, the supports are deepened 10-50 cm below the freezing point of the soil.

Keep the installation step of the supports within 100-250 cm in accordance with the future load. The higher the loads on the base, the smaller the space between the installed supports. Professional builders strongly do not recommend placing supports with a step of more than 250 cm, because. this will lead to a significant decrease in the strength of the finished structure.
Proceed with the installation of support pillars. This is a fairly simple job done in a few steps.
First step. Prepare the site for upcoming events. To do this, remove the fertile ball of soil and level the site. If the top layer of soil in your area is clayey, remove a larger volume of it and cover the resulting base with a small layer of sand.

Second step. Perform site marking. For this, any suitable pegs and a noticeable rope will do. Pull the thread at a distance corresponding to the width of the future concrete tape.
Watch the angle of intersection of the cords. It is important that the threads intersect strictly perpendicular.
Mark the intersections and junctions of the internal partitions and external walls of the building, the corners of the future structure and the areas that will be subjected to the most serious loads.


Third step. Dig a trench in the place where the strip part of the foundation is arranged. A hole with a depth of about 400 mm will suffice. The width of the trench should be 70-100 mm greater than the width of the tape. Such a gap is necessary for the installation of formwork boards.

Fourth step. Make recesses in the places of future installation of support pillars. A drill or other suitable device will help you with this. Select the diameter of the recesses individually in accordance with the expected loads on the foundation. The higher the load, the larger the diameter of the support pillars should be.

If, according to the project, the pillars will lie more than 100 cm, be sure to install supports made of durable boards. They will prevent soil erosion. If the pits have a depth of up to 100 cm, the installation of props can be abandoned.
Fifth step. Backfill the bottom of each recess with a 100mm layer of sifted sand.
Sixth step. Start arranging the pillars. In this example, the supports are made of asbestos-cement pipes.

Preliminary perform waterproofing of the supports. To do this, paste over them with a double layer of roofing material or other similar material. Insert the waterproofing pipe into the recess until it stops.
Tie a reinforcing frame of steel bars and tie wire. Use rods with a diameter of 12-14 mm. The fittings should have such a length that its upper ends protrude from the pipes by 150-250 mm.

Start filling. First you need to pour concrete in the free space in the pits around the supports to about 20 cm of the height of the recesses, and then pour the pipes directly.
Leave the finished posts to dry and gain strength.


Ribbon
Proceed to the arrangement of the tape part of the structure.
First step. Tie a frame of reinforcing bars and steel tie wire. Weld the structure and screw it to the rebars protruding from the concreted support posts.
Second step. Perform the installation of the formwork for pouring the tape. Collect the formwork from boards 40 mm thick and about 150 mm wide. Boards can be replaced with chipboard, plywood or sheet metal.

Third step. Cover the inner surface of the formwork with moisture-proof material. Polyethylene is suitable for waterproofing, and more modern membrane materials can also be used.
Fourth step. Fill the formwork with concrete mortar. To save time and effort, you can order ready-made concrete. If desired, the solution can be prepared by hand. Fill in one pass. Pour the solution horizontally. Vertical joints are strictly prohibited - they will crack even before the concrete has completely hardened.

Treat the poured concrete with a special vibrator. This treatment will eliminate voids and excess air. If you don't have a vibrator, at least pierce the concrete with rebar in several places, and then carefully seal the holes with concrete.
The fill will dry for a month. It is recommended to dismantle the formwork only after the casting has completely hardened. For some time (usually 1-1.5 weeks), the poured concrete must be additionally moistened, otherwise it will crack.
Determine the frequency and duration of dampening individually in accordance with the "behavior" of concrete and weather conditions.

Waterproof the hardened and cured concrete, backfill the remaining trenches with earth, and proceed with the planned construction activities.
Successful work!
Video - Do-it-yourself column-strip foundation