
How to make a scarecrow-match! The easiest way to make this device. Yard How to make a scarecrow out of wood
A match-shooter from a clothespin was invented back in the days of the Soviet Union. He was also called "scarecrow" among the common people. School boys were happy to use this "weapon" in their battles. Due to the simplicity of the design and components that are always available, the crossbow was very popular among high and low school students. Everyone knew how to make a scarecrow. This device is compact and can be fired with both conventional and incendiary ammunition. It depends on the individual desire. Although shooting with fire shells had more psychological impact, as it also caused physical harm. The effectiveness of such a charge is negligible. Now this weapon has lost its former popularity. To a certain extent, this was influenced by the fact that now clothespins are mainly made of plastic, and wooden ones have a very weak spring. Plus, the kids are lazy and not particularly hardworking these days. But still there are still real connoisseurs of this simple weapon who would like to know the process of its manufacture. Here for them further it will be told about how to make a scarecrow with your own hands. In the hope that they will pass this secret on to others, as a result, it will not be lost.
The base of the fixture
How to make a scarecrow from a clothespin - a child's weapon from the times of the Soviet Union? The answer to this question is pretty simple. Some people still use wooden clothespins.
One of them can be taken as a basis in the manufacture of this throwing weapon, which can shoot lighted matches like a real combat weapon.
Materials at hand
In this case, the following is necessary:
- Clothespin made of wood.
- Elastic.
Instruments
Here you will need:
- Penknife.
- Protective glasses.
Ammunition
In this regard, you can use:
Manufacturing process
Now let's move on directly to the question of how to make a homemade scarecrow.
This requires:
Disassemble the clothespin itself into three parts. Namely: two halves of wood and a spring of metal.

With the help, you need to finalize both halves. This is not difficult to do. To get started, you just need to cut a small groove on one of the wooden halves. Take your time, your fingers are much more valuable than any clothespin. Then divide the other half into two.

Then the spring must be pulled back to the indicated groove. This must be done carefully. So that its protrusion goes into this very gutter.
Then attach the short piece to the long one. So that you do not make mistakes when assembling, before making a scarecrow, be guided by the factory grooves. After everything has fallen into place, you need to fasten the elements with an elastic band. That's all. The bogeyman from the clothespin is ready.
Remember that the specified wood pieces that have been tightened with the rubber band should still move slightly apart. That is, so that the upper part makes it possible to charge the spring.

Check for "combat readiness"
In the question of how to make a scarecrow, it should be borne in mind that this device must be ready to fire. That is, it is necessary to carry out a check. To do this, you need to do the following:
- Pull the top forward. Until the spring protrusion is in the factory groove on its surface. When you have achieved this, then pull this part back. Until the protrusion of the clothespin is in the groove you made at the bottom of the matchstick.
- Then select the projectile and load it by lifting the top part of this device. In this case, ordinary matches or metal clips are ideal.
- Then pull back the spring so that the starter bar is released. This will result in a shot. That is, the device works.
Cause of malfunction
It may be that the match-shooter will not fire. This may be due to the fact that another part of the spring jumps out of place. Then you will have to further deepen the groove into which it enters. This malfunction arises from the fact that the depth of the groove is not the same size.
Upgrading the fixture
In the future, you can improve your scarecrow. To do this, you need to glue a fragment of a matchbox with sulfur to its bottom. This is not difficult to do. After such an upgrade, matches will light up when fired. This will add additional effectiveness to this device. Also, part of the matchbox can be completely replaced with a piece of sandpaper. However, in this case, you will have to insert matches into the scarecrow backwards. It will not be very convenient. This problem is much easier to solve by lighting the matches before firing. In this case, one should not neglect the danger posed by burning shells. Never use them indoors, do not shoot at flammable objects and it is advisable to wear them at the same time And of course, in no case do not aim at people and animals. The match-shooter is capable of shooting at a distance of up to five meters, and sometimes even further.
Conclusion
After reading the above, everyone will be able to understand the question of how to make a scarecrow - a match-shooter. Only in this case, desire, scrupulousness and hard work are necessary.
Pugach- a simple invention that is capable of making a loud sound. Often these things are done by the guys in the yard to drive away the dogs or just laugh at someone. The design of the scarecrow is very simple, even a school-age child can handle it.
How to make a scarecrow from a pipe with your own hands?
For the scarecrow, we need:
Tube (metal), size: length 10cm, diameter - 3-4cm;
- nail, 7-9 cm;
- a piece of a bicycle camera;
- foil.
Scarecrow scheme.

1. First of all, you need to bend the tube into an L-shape. Having measured 7 cm, we bend it. A hammer can flatten the end of the smaller part.
2. We take the foil and hammer it tightly into the tube. Approximately 2cm. the pipes must be clogged.
3. Now we will bend the nail. We insert the nail into the tube, measure another 1 cm and bend it.
4. We chop sulfur from 2-3 matches into a tube and tamp it with a nail.
5. We leave the nail in the tube and insert the rubber band. It should be pulled between the folded edge of the nail and the tube.
That's it, our bogeyman is loaded and ready to fire!
To put it into action, throw it on the floor, just to hit the nail, or simply press on the rubber band.
VIDEO. How to make a scarecrow?
In those distant times, when our parents did not have so many toys that today's children have, it was a very relevant topic to make toys with their own hands. This article will consider a way to create the legendary "Pugach", which shoots just like a real pistol, though without bullets. As a charge, sulfur from matches is used here, which detonates when a special striker strikes it. Despite the fact that this is a children's pistol, it looks quite impressive and original, moreover, quite weighty, just like a real one.
Such toys were very fashionable in the 80s and 70s.
The indisputable advantage of such a toy is that it is almost impossible to break it, since everything here is made of metal. The only thing that is required for the pistol to work is matches. The pistol is safe to use with care and very easy to create.
Materials and tools for assembling the pistol:
- old bicycle chain;
- strong steel wire;
- soldering iron (or welding);
- a couple of rubber bands;
- nuts from bicycle spokes;
- bicycle spoke;
- hammer;
- screws with nuts and washers;
- pliers.


How the pistol works:
There is an elastic band on the pistol, it activates the firing pin. Sulfur from ordinary matches is used as a charge. When fired from the barrel of the pistol, flames and smoke are emitted, and a very loud sound of the shot is heard. Do not shoot a pistol at animals and people if they are at a distance of less than 8 meters, as you can easily cause injury in the form of burns or stun.

Pistol manufacturing process:
Step one. How to create the body of the pistol
The main part of the pistol is made of strong steel wire, some authors also practice making such pistols from thick aluminum wire. As you can see in the photo, here the author used welding in some places, and a soldering iron can also be used for connection. What needs to be connected is the axle that holds the barrel and the body of the pistol itself.
You can use pliers and a vice to work with the wire.
First, it is advisable to bend the frame of the pistol with your hands from a soft wire, and then use it to make the pistol itself.


Step two. Making a "muzzle" for a pistol
The muzzle, interestingly, is made of several links of a bicycle chain and consists of two parts. The nose part can deviate on the axis to the right or left, this is necessary in order to load the pistol with gray from a match. First you need to disassemble the chain and get eight links from it (you can also have another number). To do this, you need to grind off the caps on one side of the chain, and then knock out the axles from them.


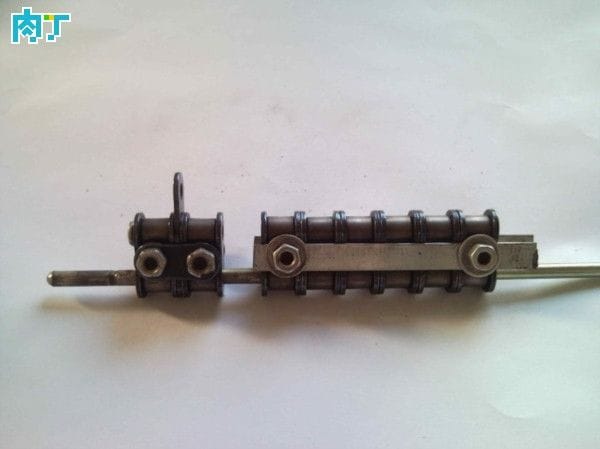
After that, you need to create two blocks from the chain links, the water block should have six links, and the other two. The nose part will be the most important, it consists of two links, sulfur will be charged into it. A bicycle spoke nut is driven into the front to provide support for the striker. As a result, the hole in the chain link will narrow and the sulfur will detonate when the striker strikes. An explosion will also emit fire and smoke from the muzzle of the pistol.


The front two links are connected to each other using bolts and nuts, as well as two parts from the same bicycle links. For the long part, you will need two pieces of metal with holes, they are also connected with bolts and nuts.
Also, in the front part, you need to fasten a loop to which the elastic will cling. This loop is also made from part of a chain link.
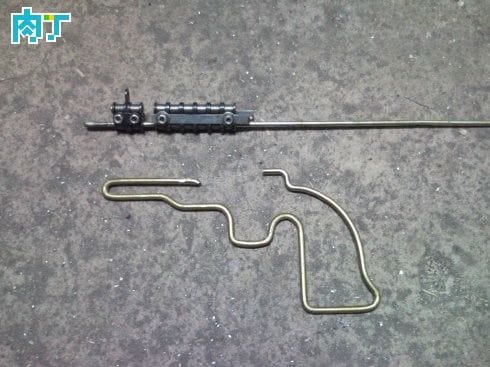
Step three. Creating a hammer at the drummer
The trigger is also made of wire, it is a hook with a loop at the end. When the trigger is pressed, the striker loop is removed from the axis and a shot occurs. As for the striker, you will need either welding or a soldering iron. What the drummer looks like can be seen in the photo. It is an axle with a loop at the end, with this loop the drummer is put on the axle when loading the pistol. Also on the drummer there is a special hook for which the rubber band clings. Well, in the very front part, a special handle is welded, which makes it easy to retract the drummer and thereby load the pistol.


Step four. Assembling the pistol
Assembling the pistol is very simple. The manufactured link blocks must be mounted on the axle and attached to the gun. The long block can be welded to the axle or soldered. As for the front one, it must be movable in order to load the pistol. To do this, a thread will be needed at the end of the axis, but the block will be fixed with nuts and washers.


The hammer and hammer can now be installed. The trigger can be tied to the pistol axis with an elastic band, this is the easiest way to attach. Well, the firing pin is inserted into the link block, and its loop is put on over the trigger loop. And finally, it remains to pull the elastic band, with one end it is attached to the nose of the pistol, and the other to the striker. The rubber band must be strong enough to detonate.
Difficulty level: Easy
Step 1
1 We take a tube, measure 70 mm and bend it at an angle of 90 degrees (get an L-shaped workpiece), ivy the short end with a hammer.
Step 2
2. Into the tube we tightly hammer the foil (shot) about 2 cm, ie. there should be 5 cm of free hollow space.
Step 3
3. We take the nail, measure the length by one cm more than the length of the hollow space (the nail will serve as a striker for the charge, piston method) and bend it at an angle of 90 degrees (L-shaped).
Step 4
4. We charge. We take 2-3 matches, and cut the heads on the edge of the tube into the hole, ram with our nail. We put an elastic band on the short edge of the tube and nail closer to the edge. We pull back the nail so that it would catch on the break with the tube (the rubber band will press it). All is ready.
Step 5
5. You can activate it by throwing the scarecrow on the floor, hitting the surface with a nail head, or simply by pressing the rubber band. There will be a BOOM! :-)
- Most importantly, observe the safety measures as with pyrotechnic devices: 1. Do not use near flammable objects. 2. Do not bring close to people. 3. Do not allow minors. 4. Do not exceed the charge of the match heads. 5. Do not use other flammable substances (gunpowder, etc.) 6. Observe etiquette. Where and how and with whom to use.