
DIY winter greenhouse project. How to build an autonomous winter greenhouse. Frame and glazing. What materials will be needed for work
A greenhouse or even a small greenhouse on a personal plot allows you to get vitamins to the table earlier, to grow a crop of plants with a long growing season. The winter greenhouse opens up much more opportunities for vegetable growers (or flower growers). A capital winter greenhouse, built with our own hands in the country, can provide a family with the necessary vitamins all year round, or it can become an additional source of income. It is quite possible to build a capital greenhouse yourself for growing not only annual vegetables, but to settle perennials there - flowers and fruits will delight the owners, and will also be in demand in the market.
A do-it-yourself winter greenhouse is a very relevant topic for everyone who wants to eat fresh vegetables instead of canned ones in winter. If you approach this issue thoroughly, study the best projects from the existing ones, consider different ways of organizing heating and additional lighting, building materials from which greenhouses are erected, then it is quite possible to build a greenhouse yourself, without resorting to the help of professionals.
The greenhouse frame is most often assembled from a metal profile or a wooden beam, although metal pipes or a plastic profile are also used. Metal is stronger and more durable, but wood creates the right microclimate and is easier to work with. Before deciding on the material, it is advisable to know which plants you need to build this greenhouse to grow. Cucumbers, for example, require very high humidity, which will shorten the life of the timber frame.
For walls and roofs, use film, glass or polycarbonate. Considering the possible very low temperatures, the weight of snow, which can fall a lot in winter, then with the film there is more trouble than saving. Glass has proven itself perfectly in any weather, but its weight, increased by the weight of snow falling in winter, must be taken into account when erecting the frame so that it does not collapse under the weight of a snow-covered roof.
Light and transparent multilayer polycarbonate shows itself well, it must be taken with a thickness of 10 - 16 mm. When choosing polycarbonate, it should be remembered that if the thickness is 10 mm, it is necessary to take sheets no wider than 105 cm, and if 16 mm - no wider than 140 cm in order to ensure sufficient strength.
It is imperative that a solid foundation is made for a winter greenhouse, then a frame is erected. After the installation is completed, the heating system is installed. If you build a lean-to greenhouse adjacent to a residential building, then its heating can be done simply by continuing the heating system of the house.
To calculate the required amount of heat, you need to find the difference between the coefficient of thermal conductivity and the glazing area. The difference between heating a house and a greenhouse is significant - in a greenhouse, not only air temperature is important, but soil temperature. Biofuel polycarbonate greenhouses are considered very reliable. When choosing heating devices, aluminum convectors are usually preferred; it is believed that they are able to distribute heat evenly throughout the greenhouse.
A layer of sand is laid at the bottom of the pit, then a layer of sod earth (or just sod, laid with the roots up), then humus. After laying all the elements of the heat accumulator and installing pipes for its ventilation, it is necessary to lay a polyvinyl chloride film so that the soil does not interfere with its work. Slits are made in the film for pipes, and the film itself is attached to the walls using a construction stapler. After that, fertile soil for the beds and infertile soil is poured into the greenhouses, which can then be covered with tiles - for paths. So that the backfilled soil does not push the boundaries of the beds, they are pulled together every meter with a special wire with a cross section of at least 8 mm. This wire must be wrapped with plastic tape (or better yet, hidden in plastic pipes) so that it does not rot in the damp earth.
Video "How to build a heated greenhouse with your own hands"
Gable greenhouse
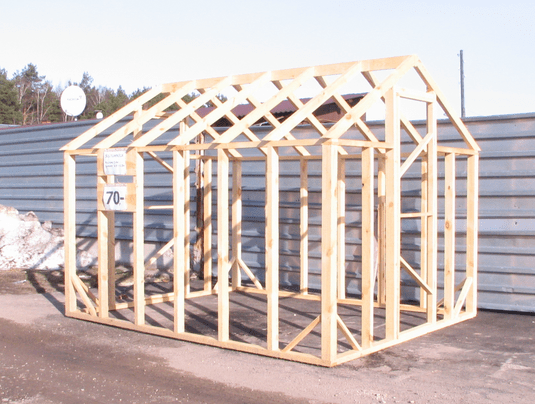
Gable greenhouses are very often erected from a metal corner or shaped pipe. The angle of inclination of the rafter system is made from 20 to 30 degrees - this slope allows the snow to roll off the roof under its own weight. At the same time, this roof will not be too high to be strengthened by the wind.
But you can build such a greenhouse by erecting a frame from a wooden bar. It is advisable to arrange the foundation with a cross section of 40 cm - by 40 cm. The walls must be taken out with a thickness of one brick, in them beams should be placed, having previously made special grooves for greenhouse frames down. The beam must be taken with a cross-section of at least 15 cm - by 15 cm.The rafter part can be made of beams with a smaller section, 10 cm is suitable - by 10 cm.The rafters must be connected with beams that are laid on the walls, it is better to take a bar for a ridge with a cross-section 12 cm - by 12 cm. Gaps will inevitably arise between the frames, it is better to sew them up immediately with slats.
The covering for such a greenhouse can be combined - the walls can be covered with polycarbonate, and the roof can be glazed. It is not difficult to build such a greenhouse yourself. It can be useful for growing perennial plants or for obtaining several annual crops in one year. But you will definitely have to arrange heating in it. You can lay a warm floor and limit yourself to air heaters when the temperature column drops - this will depend on the climate and the degree of temperature drop outside.
With earthen backfill
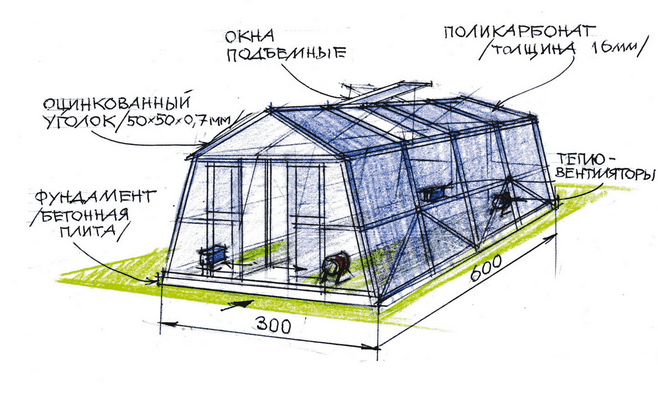
A very interesting option is a winter greenhouse with earthen filling. It can be built with a gable or pitched roof facing south. In fact, this is a greenhouse completely buried in the ground, the sun enters it only through the roof. Of course, there will be little light in winter, especially given the cloudy weather, additional lighting will have to be organized. The roof can be covered with polycarbonate.
If we want to build a greenhouse with a useful area of 15 square meters, we need to dig a pit 80 cm deep with dimensions of 12 m - by 3.5 m.At 60 cm from each wall, it is advisable to clearly mark the outlines of the greenhouse with pegs and a rope - we get a width of 2.27 m with a length of 10.60 m.If we leave 80 cm for the path, we get beds with a width of 1.47 m. This is the optimal width of the bed, if you make it larger, it will be difficult to care for the plants.
Now we need to dig half-meter holes in which the pillars will be installed, with a distance of 2.12 m between them. In total, 18 pillars will be needed: 6 on the south side (1.65 m each), 6 on the north (2.10 m) and 6 medium ones (2.30 m). The roof slope should be 20 - 25 degrees. The diameter of the pillars should be in the range of 10 to 20 cm. To prevent the pillars from rotting, they must be treated with an antiseptic, some advise to simply cover the lower parts with resin. Special thorns are made on the pillars, and on the harness of the bars - the corresponding nests, into which these thorns will enter. On the inner side of the harness, grooves are made into which the frames will then lay.
Then they make a slope - logs are stuffed onto the racks and covered with earth. The planned length of 10.6 m is designed for 10 window frames. The entrance to such a greenhouse is planned from the end, the roof over the corridor (path) can be covered with boards, the ceiling can be hemmed with a plank, and a warming material can be placed between them. The path can be deepened by another 30 cm, then it will be more convenient to walk (you do not have to bend over) and take care of the landings.
You can cover such a greenhouse with glass or polycarbonate. Cellular polycarbonate is used at least 8 mm thick; for it, a crate is assembled from bars with a cross section of 5 cm - by 5 cm. The bars are laid at least 1 m. And the glass is suitable for at least 4 mm thick, insert it into the frames, after having lubricated the ends of the glasses and the grooves of the frames with liquid grease. The wooden part of the structure must be painted with oil paint, usually white or just light is used. Stove heating is done in such greenhouses.
Budget greenhouse
A winter greenhouse cannot be a cheap project just because it requires heating and, very often, additional lighting. Heating will be the most expensive part of the greenhouse; everything else can be saved. The most economical option would be to build a greenhouse from a wooden beam with a film coating.
The foundation must be made of expanded clay and concrete, with the help of formwork, make it so that it rises 30-50 cm above the ground, the frame is assembled from a wooden bar treated with an antiseptic. It is possible to sheathe it with two layers of film (from the inner and outer sides of the timber), an air layer between them will help preserve heat. And the roof can be covered with a hydrophilic film, from which condensation will not drain, and the walls are usually double. In the coldest time of winter, almost all windows should be closed with planks, and then gradually opened, increasing natural light.
It is good to arrange high warm beds. It all depends on how severe the winter will be. If the thermometer does not fall too much, there will be enough warm beds and heating air for growing vegetables in winter. And if in Siberia the frosts are strong, and the ground freezes up to more than 2 meters, then warm beds are not arranged for plants, but in order to help the heating system laid under fertile soil.
Video "Super greenhouse with your own hands: cheap and simple"
The video will explain to you how to make a greenhouse with your own hands from scrap materials with minimal investment.
The place for the greenhouse is chosen even, preferably windless, so that it is not shaded by large trees or buildings, where groundwater does not come close to the surface. It is best to construct rectangular rooms, oriented so that more sunlight gets on the wide side.
Usually, a small vestibule is made in the greenhouse, where garden tools, dishes, and all sorts of useful little things are kept. This small room is also necessary because it protects the plants from the ingress of cold air when opening the outer doors.
Whichever material you choose for construction, always monitor the tightness of the room.
Plants need to be watered with exceptionally warm water; it is best to establish a sprinkler system, not drip irrigation.
To protect the greenhouse from freezing of the soil, you need to insulate it from the inside with foam plastic, it can be wrapped in polyethylene for greater safety. For the foundation, it is good to use adobe or foam blocks, which, together with cement and polymer mastic, keep heat well. Better than them can only be thick (twice as thick as foam blocks) brickwork, which will become significantly more expensive.
Plants require different temperature regimes, so you first need to determine which plants the greenhouse is being built to grow, and then install a heating system.
We invite you to familiarize yourself with greenhouse projects from the most advanced vegetable growers.
The construction of a winter greenhouse on a personal plot is a certain milestone in the practice of a gardener, when knowledge and experience in growing a variety of crops allow harvesting not only in the summer season. However, you need to understand that the construction of a winter greenhouse is an event that requires knowledge, skills in work, careful preparation of materials and a place for the future structure. Therefore, it will not be superfluous to get acquainted with some of the options for projects of winter greenhouses and useful advice from experts who will make such a difficult but very exciting activity as easy as possible.
Determining the type of building
Today, there are so many different options for the construction of winter greenhouses that in order to carefully describe the features and advantages of each of them, one should write a multivolume essay. Therefore, to make it easier for an ordinary person to understand the features of the construction of winter greenhouses, we note the most important differences between the main types of these structures.
The classic version of the construction of winter greenhouses have the following differences.
Functional features
A large number of a wide variety of crops are grown in winter-type greenhouses. It can be not only traditional vegetables, fruits, flowers and mushrooms. It will be quite interesting to harvest exotic fruits and citrus crops in winter. It is from what is planned to be grown in the greenhouse that the sequence in the construction and arrangement of the inner space of the greenhouse will depend.
Location of the building
The construction of winter heated greenhouses is divided into three types: built into the soil, built on the ground level, mounted on specially equipped elevations (for example, the roof of a garage or barn).

Selection of building materials
Depending on the type of building materials used. All winter greenhouses can be divided into several groups:
- built of bricks;
- built of wood;
- mounted from a metal or PVC profile;
- glazed or sheathed with polycarbonate;
- combined options.
Features of planting
The construction of a winter greenhouse should take place in such a place that the future construction is in direct sunlight for most of the day. After all, it is they that are so necessary for the normal growth and development of plants. Also, a good location for the construction of a greenhouse will help to save a fairly large amount of money that would have to be spent on additional lighting. The best location for building a greenhouse is from west to east. It is this approach that allows you to make the most of the beneficial properties of such a scarce winter sun in the bright light.
Advice ! It is not necessary to locate future greenhouses in lowlands with a sufficiently high level of groundwater. In such greenhouses, as a rule, there is a high level of humidity, which can be detrimental to a large number of plants.

Choosing the type of heating
Correctly selected and correctly installed heating in a winter greenhouse is the key to creating a favorable microclimate for the successful growth and development of plants. Installation of a heating system is a rather time-consuming and complex procedure, therefore, its implementation must be approached with knowledge of the matter.
A fairly large number of methods for heating a winter greenhouse are known. Each has both positive and negative characteristics. When choosing a heating system for your greenhouse, it is imperative to take into account the technological features of a particular structure, the climatic conditions of the area in which the greenhouse is located, as well as the amount of money available.

Let's consider in more detail the most common heating options in greenhouses:

The choice of material for the construction of a winter greenhouse
Greenhouse coating materials are selected according to the following criteria:
- individual design features of a winter greenhouse;
- good transmission of sunlight;
- resistance to atmospheric phenomena;
- the ability to maintain structure and integrity even with frequent temperature changes;
- ease and simplicity of installation;
- low cost;
- duration of operation.

Let's consider in more detail the most common options for the construction of winter greenhouses.
Glass
This material was previously used as the main type of greenhouse cover. Glass goes well with wood and metal. Glass surfaces have good light transmission and thermal insulation properties. However, today, glass as a covering for greenhouses is losing its relevance. A large number of more modern, lightweight, resistant to mechanical damage and, most importantly, inexpensive materials have appeared.
Polymer materials
This material is lightweight and has good sunlight transmission. However, polymer panels very quickly lose their original appearance and in the absence of ventilation inside the building, excess moisture forms on the surface of the greenhouse.

Cellular polycarbonate
This material is the best today for covering the structure of a winter greenhouse. He managed to combine the best qualities of glass and film.

We design a greenhouse
After the materials for construction have been selected and the dimensions of the structure are indicated, you can begin to develop a project for a future greenhouse. The easiest way to resolve the issue is to use a ready-made plan to correct it according to personal preferences and construction conditions.
If you decide to draw up a plan for the future greenhouse yourself, you should adhere to a certain algorithm of actions:
- schematically designate the site plan and determine the location of the future structure;
- we calculate the size of the winter greenhouse.
- we develop a scheme for laying engineering communications;
- separately designate the type and dimensions of the foundation on the plan;
- we calculate the required amount of materials for the construction of the roof of a winter greenhouse;
- we think over the ways of fastening all structural elements to each other.

We build a polycarbonate greenhouse
Polycarbonate is the best material for building winter greenhouses.
The list of advantages is quite wide:
- provides good transmission capacity and dispersion of sunlight;
- has high rates of heat preservation inside the room;
- the lightness, flexibility and strength of the material allows you to very quickly build a greenhouse that is capable of performing its main functions for a long time.
It is quite possible to build a winter polycarbonate greenhouse with your own hands. The location of the future building is determined in accordance with the basic rules for arranging greenhouses.
Laying the foundation
In order to lay the foundation for the future greenhouse, you can use a wide variety of building materials: timber, stone, brick. As practice shows, for winter greenhouses, the best type of foundation is strip.

The sequence of works for laying the foundation:
- It is necessary to designate the parameters of the future building on the ground.
- Dig a trench according to the markings. The depth of the ditch should not exceed 50 cm, and the width -20 cm.
- On the side walls of the trench, timber-panel formwork is mounted.
- The bottom of the trench is lined with sand, the layer of which does not exceed 30 cm.
- The prepared concrete mixture is poured.
Advice ! To strengthen the structure, it is necessary to reinforce the concrete screed.

We build a frame
After the foundation is completely frozen, the stage of construction of the frame begins.
Along the perimeter of the foundation, profiles are vertically attached, which, to strengthen the structure, are connected by ribs of cruelty.

The finished frame of the winter greenhouse is sheathed with polycarbonate sheets. They are very easy to cut with a saw or jigsaw. The panels are attached to the profile with self-tapping screws.
Important ! In order not to violate the thermal insulation and the tightness of the structure, all joints and joints of materials must be treated with perforated self-adhesive tape.
To create a healthy microclimate inside the greenhouse and prevent the formation of condensation, do not forget to equip vents, windows and doors.

Conclusion
Building a winter greenhouse with your own hands is a difficult task, but it is quite real for someone who approaches business responsibly and seriously. It is enough to make some effort and spend a certain amount of time to have fresh vegetables and fruits on your table all year round.
How to build a stove for heating a winter greenhouse, we will find out in the next video
The presence of a greenhouse allows you to grow greens and vegetables much earlier than in natural conditions. Despite the fact that the microclimate in it is warmer than in the open air, it is still impossible to use it in winter, because in the presence of frost, the plants will die.
To solve this problem, you can modernize the greenhouse and install heating for the winter, which will allow you to successfully grow vegetables all year round.
Since heating is quite energy-intensive, it is better that it retains heat as much as possible:
- Therefore, its overlap must have high thermal insulation properties.
- Glass also has such qualities.
- It should be noted that the glass is fixed in frames, which retain snow on their surface.
- This results in reduced transmission of natural light.
- Polycarbonate does not have such problems, since it is attached directly to the frame, and its outer side is completely smooth.
Note. It should be borne in mind that the device of a winter greenhouse should be as tight as possible.
If there is a source of warm air leakage, the installed heater may not cope with its duties and will consume too much energy or fuel:
- This will make it unprofitable to grow vegetables at home.
- Therefore, you need to take care of these technical requirements in advance before installing the heating.
- It also follows in which the plants will be planted, since with direct planting in the ground, it will not be possible to warm up the root part.
In addition, the installation of seedlings on a hill will improve the temperature conditions, since warm air is collected at the top.
Heating methods

Heating can be provided in two ways:
- With electric heaters.
- By burning fuel.
The variety of electrical appliances that can be used to heat a winter greenhouse is quite extensive.
It can be:
- Ordinary air heaters.
- Underfloor heating systems for the home.
So:
- Although such devices have a common source of energy, they operate with different efficiency and power consumption.
- to maintain constant parameters of optimal plant growth.
- Also, heating the greenhouse in winter can be carried out by burning fuel.
- Conventional wood-burning stoves can be used, as well as more technical long-term boilers or gas burners.
It all depends on the available fuel sources, for which the heating system in the greenhouse is adjusted.
Electrical appliances with heating elements

This is due to the fact that the air heater heats only the air, and the earth, in which the plant roots are located, remains cold:
- This effect occurs because warm air always accumulates under the ceiling and does not come into contact with the soil in which vegetables and herbs are planted.
- As a result, the main part of the plant is in relative warmth, but good development has not been observed.
- In addition, the air heater consumes too much energy at a low efficiency, which often makes the cultivation insufficiently profitable.
- If there is no alternative, you can install heaters under the racks with seedlings, then during their operation the roots will also warm up.
Note. Since the heater is small, the rack will not be heated entirely, but only in the immediate vicinity of the heating source.
The electric system of underfloor heating is more preferable for greenhouse conditions, as it helps to warm the soil and plant roots. As a result, the air in the greenhouse is warmed up from the ground. Such a system contributes to obtaining a high yield and at the same time significantly lower energy consumption.
Infrared heating
This is due to the principle of operation of infrared devices, in which infrared rays are converted into thermal energy only upon contact with solid objects such as soil and plant stems.
Since the transfer of infrared heat over a distance is practically lossless, heaters of this type are installed on the ceiling.
Note. There is also a special IR film, developed exclusively for arranging greenhouses, which is buried in the soil to a depth of 30-50 cm, thereby heating the ground more efficiently and at the same time, without interfering with the roots of proper development.
Heating by stove or boiler
In this version, a heated winter greenhouse is equipped with a conventional stove, or a more advanced long-burning boiler that runs on solid fuel:
- The most convenient and easy to use is a gas boiler, since it does not require constant monitoring of its operation.
- For more efficient heat transfer, the chimney system passes directly inside the greenhouse, thereby additionally warming up the air.
Note. Direct heating of the greenhouse occurs in two ways: by heating the air or by a battery system.
With air heating, a winter greenhouse with heating receives heat from the surface of the furnace or boiler:
- In this case, the soil does not heat up. therefore, having a racking system is a must for a good harvest.
- Depending on the type of stove, the need to toss fuel occurs every few hours, or less often in more advanced boilers.... With such heating, it is difficult to maintain the set temperature, which leads to constant fluctuations.
- It also requires constant attention from the owner. to add fuel in time.
Note. For maximum heat transfer, the stove or boiler must be inside the greenhouse, resulting in a loss of usable growing space.
This allows for more efficient use of heat, and maximizes plant growth:
- An additional advantage of steam heating is that you can connect the circulation system to your home.
- This allows heating the house and the greenhouse with one source, which significantly reduces labor costs, because there will be no need to ensure combustion in two stoves or boilers.
- It is advisable to use plastic pipes, since, unlike metal pipes, they do not corrode, which will increase the life of the greenhouse.
Thus, the arrangement and maintenance of a winter greenhouse is a rather laborious process.
When using electric or gas heating, all worries are greatly simplified, but the cost of these resources makes the maintenance of a small greenhouse not as profitable as when heating with solid fuel combustion. Therefore, you should first calculate the approximate costs of maintaining a greenhouse for each source in order to choose the most profitable option for yourself.


Almost every summer resident has an ordinary greenhouse on the site. But to build a winter (with heating and ventilation), in which you can get crops all year round, few decide. The hero of our story, together with his wife, decided, in addition to the usual greenhouse, to put another one - all-season, with heating.
Pouring the foundation and arranging the beds
I started by pouring it into a fixed formwork. made of polystyrene - good thermal insulation for the foundation. The formwork was dug into the trench one block down (250 mm). Then a layer of earth was removed to the block in order to make insulation. First, it was necessary to put gravel, and on it - a soil heating system.
He took out the soil - and made a leveling bed of sand. After leveling with sand, I walked along the walls with a coating waterproofing. Installed a water pipe and laid an electrical cable for the soil temperature sensor.

Then he laid the expanded polystyrene and started to manufacture the heat exchanger.

The heat exchanger is made of ordinary sewer pipes with a diameter of 110 mm.

When installing the pipes, I used silicone grease. When applied to the joint, it is very convenient to connect the pipes.

Marble chips were poured onto expanded polystyrene, which will work both as drainage and as a heat accumulator. I put two heat exchangers on the marble chips on the right and left. I covered them with marble chips and installed a temperature sensor.

The next stage of work has been completed. Now on the future beds I put out sheets of DSP. They also sheathed the inner walls with them, just in case, in order to fill the concrete path in the middle. I poured a 5 cm layer of marble chips onto the beds.

After filling the paths, I sheathed the inner side of the DSP with clapboard. I put spacers so that the sides of the beds did not warp. He fell asleep on the beds of crushed foliage, and on it - the earth.

The lining boards are painted, a zero bar is installed on the foundation. The first stage is complete - the greenhouse frame can be installed. About 15,500 rubles were spent on foundation materials (cement, pipes, etc.).

Making a frame for a greenhouse
At this stage, I realized that I was doing not a greenhouse, but a year-round winter garden. For the frame of the building, a mini is prepared. I made the drawings and ordered parts for the frame at the factory, which I planned to assemble in a couple of days.The boards are sawn and numbered according to the project. First, we set the zero semi-profile.

We put the first crowns on it. We catch the diagonals and set them on the foundation.

We fasten the zero board with a screw to the base. 
After that, we insert the gasket and upset the board with a mallet. The starting first level is ready.
Now we collect the columns. We draw out the walls and form the openings. A quarter has been cut out under the windows.

The frame is installed, now we need to cut the roof.

The building is oriented sideways strictly to the south.

Using a manual router, select a groove 2 × 2 cm from above - and from below the openings for double-glazed windows. 
The cost of the construction turned out to be 18,000 rubles. including delivery.

The frame was treated with an antiseptic.

I chose white paint for the frame. The paint will mix with the solvent as it will be applied with a spray gun. To protect the respiratory tract, it is imperative to wear a respirator: the smell of the paint is strong enough.

Before painting, I measured the moisture content of the wood. A figure of about 15% is normal for painting. 
The frame is painted with the first layer at -10 ° C. On the second day, a second coat of paint was applied.

Making a roof and inserting windows
Polygal brands will be installed on the greenhouse roof. According to the reviews that I read, it seems to be one of the best on the Russian market. I bought 12-meter polycarbonate sheets before the price increase. He spread the sheet out in the yard - and made the markings.
Here is my set of cutting tools for cutting a polycarbonate sheet. Basically, it can be cut with a clerical knife, a flooring knife. But as for me, the thickness of the sheet is quite large, and it is better to cut it with a grinder with the thinnest disc (1.6 mm).

When installing the roof, polycarbonate honeycombs can get clogged with snow, so they need to be glued. The end is sealed with tape, then the end plastic profile will be installed.

Now we install the ridge profile, which will connect the two sheets of polycarbonate. 
The profile is secured with bolted connections. The greenhouse roof is ready - you can throw it over the frame.

Before installing the roof, a heat insulator must be laid between the polycarbonate and the wood.

We make a gasket - and already we will already lay polycarbonate on it.

The roof sheets are laid, later I will put a metal ridge. Thermal washers will be used to attach the polycarbonate to the frame.

The washer consists of a polyethylene foam gasket, a plastic cover, a plastic plug. After the construction of the house, there were many such washers and screws left.

First we make a hole in the polycarbonate. The drill must be sharp so that the plastic does not crack.

We assemble the washer on the self-tapping screw and tighten the self-tapping screw. It turns out neatly and without cracks. 
We close the screw head with a plug.

Here came the double-glazed windows and the door. Single-chamber double-glazed windows.

For the transportation of double-glazed windows, I will use two glass jacks, which I recently bought for 300 rubles. Pre-screwed plywood rectangles, they will hold the glass unit so that it does not fall.

With the help of glass jacks, we put the glass unit in the opening and fix it.

Now we foam the gaps between the frame and the glass unit with polyurethane glue.

All double-glazed windows are installed, the slots are foamed.

A one-component acrylic sealant will be used to seal the joints. It is vapor-permeable and can be operated at temperatures down to -25 ° C. I fill the gun with sealant, and then I will grind the sealant with a spatula. 
The seam is sealed.

I cut out the beads from plywood. I fasten them with self-tapping screws, and then paint them in the color of the frame. 
The greenhouse is glazed.

Apd The next stage of work will be the installation of heating and ventilation,
Do you think it is difficult to equip a winter greenhouse? I will not deceive you, it really is. First you need to prepare the foundation, mount a reliable frame, sheathe it with a double layer of polycarbonate. And that is not all. Next, you should equip heating, irrigation and additional lighting systems. If you are still full of enthusiasm, I will tell you how to start building a winter greenhouse, what nuances to take into account, what to look for. Here is everything I know from my experience, as well as examples of other gardeners and agronomists.
What is a winter greenhouse?
It is clear that a winter greenhouse is fundamentally different from a summer one, although its essence remains the same - it should be warm and even hot in the greenhouse.
The very principle of arranging a winter greenhouse is different, it is a much more complex structure, often even equipped with electronics, and you certainly will not manage to build a primitive frame and cover it with a film, although something seems to have to be done.
A winter greenhouse is necessarily a capital structure with a foundation that can withstand powerful wind and snow loads. A winter greenhouse can be a full-fledged separate structure or an extension to the wall of a house or other structure.
What to grow?
In fact, you can grow anything in a heated winter greenhouse. It can be not only traditional vegetable crops, but also green, berry, decorative and all kinds of exotic crops, and, of course, flowers.
It is clear that certain cultures also need different conditions.
- For example, lettuce, green crops will require a minimum of heating, a minimum of light, but if we are talking about cultivating a tomato, then heating needs a more reliable and maximum light.
- Do not forget about the proximity of crops, for example, tomatoes and cucumbers are not good neighbors, they have different requirements for moisture, light and temperature, so it is permissible to grow them only in large greenhouses, where their placement can be delimited.
Read my article on
________________________________________________
Video review of a winter greenhouse for growing flowers
Foundation for a winter greenhouse
Usually a winter greenhouse is placed on one of two types of foundations - on strip foundation on either a foundation of separate blocks ... You can install the greenhouse on a columnar foundation or on slabs, but this is not so often.
On the north side, it is advisable to insulate the foundation.
Foundation preparation
Usually the foundation is prepared like this:
- To begin with, in the area around it, sod is removed to a width of about 0.5 m and formwork is made of boards.
- Next, a layer of sand is poured, which acts as an equalizer.
- After that, the insulation is laid (polystyrene will perfectly cope with this role).
- And, finally, the blind area is poured with concrete over the laid out reinforcing mesh, or the second option is to lay the paving stones on a layer of laid sand.
Video on how to make a foundation for a greenhouse
Winter greenhouse frame
On the frame, there are no particular discrepancies with the usual summer greenhouse. Often two types of frame are used for the construction of a winter greenhouse - either metal or wooden.
What kind of frame to make?
The shape of a winter greenhouse largely depends on what the frame itself is made of, on the climate conditions of your region, and on your preferences too, because someone likes one shape, someone is completely different.
Typically, winter greenhouses are:
- arched,
- lean-to,
- gable.
Arched greenhouses, of course, cannot be made of wood, or rather, they can, but it is extremely difficult and costly to make such greenhouses.
Usually arched greenhouses are metal, but single-slope or gable greenhouses are often wooden, although, of course, there may be exceptions.
Wooden frame
Oddly enough, but wooden frames are sometimes more preferable. Why?
- Wood is cheaper and in terms of strength it practically does not yield to much more expensive and more difficult metal to install.
- The wooden frame heats up much less strongly than the metal one, and in winter the wood practically does not give off heat, which cannot be said about the metal.
- In favor of the wooden frame is the fact that since we put the winter greenhouse on a full-fledged foundation, therefore, the tree will not have direct contact with the moist soil and will last much longer, so if it makes sense to pay more?
It is clear that during the construction of a greenhouse, snow and rain loads must be taken into account, here a lot depends on the length and width of the greenhouse.
Plastic frame
As for the frame made of low-pressure polyethylene (HDPE, polypropylene pipes), such structures can be erected only for the warm season. But in winter, especially in regions characterized by an abundance of precipitation, it is impractical to use such greenhouses - it will simply break under the weight of snow.
How to install the frame?
- First, you need to fix the bottom lining to the foundation using anchor bolts.
- Next, install the vertical posts on the lining using bolts and welding.
- Then connect the vertical profiles with a horizontal strip along the top.
- Finally, install the frame on a pitched or other type of roof.
How to make a wooden frame for a winter greenhouse with your own hands
Winter greenhouse material
In the past, even winter greenhouses were actively sheathed with plastic wrap. Glass was also used, of course, but film was more readily available and cheaper and was used quite often. Now both film and glass are actively becoming a thing of the past, and they are being seriously and permanently replaced by cellular polycarbonate.
It is interesting that even glass, which for a very long time was considered almost an ideal shelter for a greenhouse, is very much inferior in thermal conductivity to cellular polycarbonate, although, of course, glass wins from cellular polycarbonate in durability, but it is more dangerous, and the price of glass over the years only growing.
Winter greenhouse "Thermos"
As for the cold regions, winter greenhouses, which the locals call "thermos" ... The essence of this greenhouse is simple: it is not one layer of cellular polycarbonate, but two, between which there is air. It turns out a kind of window "plastic bag", only made of polycarbonate.
- Typically, the outer layer is about 0.6 cm thick and the inner layer is about 0.4 cm thick.
- You should know that the thicker the sheets of cellular polycarbonate, the less thermal conductivity will be, which means that there will be less heat outflow if the ends are isolated from the entry of cold air.
- In the case of arched greenhouses, however, you should not lay too thick sheets of polycarbonate, it can simply break or the bending force will be critical and it will break much earlier than its service life.
- Of course, the price also plays a role, thick sheets of polycarbonate, say, thicker than 1.5 cm, are already very serious money. So you shouldn't risk and overpay - 1 cm, no more.
Construction of a gable polycarbonate greenhouse on a foundation
Heating a winter greenhouse
To begin with, the greenhouse must be made as tight as possible so as not to heat the street.
- Isolate all cracks, make vents and doors hermetically closed!
Thermal insulation of soil
Requires such a structure and thermal insulation of the soil, they do it as follows:
- To begin with, mark the areas where the beds will be located in the future.
- There it is necessary to make a pit about 60-70 cm deep, river sand (7-8 cm) should be laid at the base of each pit.
- On top you need to lay insulation plates, pour expanded clay (12-15 cm) on them - expanded clay is at the same time drainage and will save polystyrene from a sharp shovel when you dig up the beds.
- The last layer is laid with fertile soil or a composition for a warm bed.
Types of heating a winter greenhouse
Heating is of 4 types:
- air,
- contour,
- subsoil,
- combined.
Air heating
This heating option is simple and straightforward - air is supplied through ducts located at different heights and heated by a heater located in the greenhouse itself.
Circuit (water) heating
Its essence is to create a thermal circuit located at the edges of the structure, but with a large area in the middle of the structure. Typically, this method involves the use of water.
- To build loop heating, radiator systems with pipes should be installed.
- The boiler itself, heating the structure, can be installed both in the greenhouse itself and outside it.
The whole configuration consists of
- heating boiler,
- a heating circuit made of pipes,
- radiators,
- registers,
- expansion tank,
- and a circulation pump.
This configuration is very complex in terms of layout and costly. Therefore, it is often installed only in large-area and free-standing greenhouses.
Subsoil heating
It is usually used in areas with mild climates that do not have overly harsh winters. If you combine subsoil heating and a "thermos" construction, then such a greenhouse will need minimal heating.
Typically, such a greenhouse is equipped with a water floor heating circuit, or electric heating using heating mats.
Combined heating
Typically, this option combines the use of air and circuit heating with subsoil heating. This option is suitable specifically for crops that make demands on the temperature of the soil.
An example of loop heating of a greenhouse using water
How to heat?
What to use as an energy carrier? Usually, electricity is in the first place - a fairly cheap and affordable energy carrier, heat loss during its use is minimal, including when there are nightly tariffs.
The next in frequency of use is main gas, it is even less expensive, but its disadvantage is that gas is not available in all regions.
The choice of heating option itself depends on both the region and the crops that you plan to cultivate.
- For example, when the structure is intended for the cultivation of green crops, then heating the soil will be enough.
- But if you plan to grow tomatoes, peppers, cucumbers, then you need to provide for a stable microclimate, constant heating and lighting.
Electricity
This type of heating is realized in two ways, for example,
- using a heating cable that needs to be laid in the soil,
- or use electric heaters or convectors for heating, as well as infrared heaters or lamps, and of course an electric boiler.
The heating cable is placed directly in the ridges, this provides heating of the soil and protects it from freezing.
Conventional systems or radiator systems are placed along the main walls of the greenhouse, they protect the room, preventing the penetration of cold air masses.
Heaters of infrared type, they are curious in that they do not heat the air, they heat the surfaces on which the rays fall.
- Their influence warms up the soil and plants, as well as paths, fences, equipment, irrigation systems.
- Such heaters are usually placed clinging to the greenhouse frame.
- The spectral composition emitted by them practically corresponds to the spectrum of sunlight, and therefore it is very useful for plants.
Stove
Stoves that are solid in terms of what is burned are also in demand, because the need for regular loading has practically disappeared, because they produce long-acting boilers.
- The stove is as accessible as possible, in which logs or other are burned.
- The stove is placed from the coldest part of the building and, thanks to natural convection or using air ducts, the greenhouse is heated.
- Air masses should be distributed in different ways, for example by natural convection, using fans or using air ducts. You can heat with logs, brushwood or various wastes from the woodworking industry.
- It is appropriate to warm the greenhouse in the evening or when it gets cold outside.
The advantages of heating with a stove:
- quick start of the stove and its warming up,
- affordable fuel,
- elementary installation and simple operation,
- the ability to manufacture various furnaces from bricks or metal by welding.
Minuses:
- impossibility of automating this type of heating,
- the presence of a person in the process of heating the greenhouse.
Greenhouse infrared heating video
Lighting in a winter greenhouse
Speaking of lighting, in winter the days are as short as possible, in the north it is critical. Therefore, additional lighting with lamps is strictly required.
It is better to use lamps that generate the spectrum of light that plants need:
- arc tube sodium lamps,
- or LED lamps.
Supplementary lighting in a winter greenhouse video
Watering in a winter greenhouse
Watering should be regular, there should be enough moisture for the plants, there should not be excessive watering.
So that the soil is not oversaturated with moisture, it is imperative to provide for the presence of vents in the greenhouse. They are best placed in the roof of the building, or even better, to build forced ventilation with a recuperator. It's expensive, of course, but pretty reliable.
Watering can be done directly:
- from a watering can,
- by installing sprayers on booms or hanging tubes,
- by placing an insulated underground water supply system,
- by laying out the dropper tapes.
An example of an irrigation system in a winter greenhouse for growing flowers