
Swing doors with hands. Drawings. Automatic gate with self-made drive: we build it yourself. How to make the gate with your own hands - installation nuances
Acquaintance with the house begins with a gate. In essence, this is a business card of the owners. Therefore, their appearance must be solid and beautiful. But, at the same time, their main purpose is to ensure the safety and safety of private country houses and cottages.
How to connect these two destinations together? How to make a swing gate for giving beautiful, reliable and functional. What types of swing gates are and what better to choose. How to make and install. All this is a detailed step-by-step instruction in our article.
Before proceeding to the description of the process of the gate device, we will focus on their pluses and minuses.
Advantages of swing gates:
- simple design;
- relatively low price;
- undemanding in service;
- long service life;
- strength;
- ease of operation;
- unlimited possibility of choosing designer solutions and forms;
- no need for platformation platform. For example, under the rollers for;
- ability to install automation.
Disadvantages:
- the need to provide for quite a lot of space for opening-closing;
- the need to take into account the wind load in the region.
Simple arithmetic shows that the benefits at the swollen gate are much larger. And the disadvantages are eliminated or not critical. The long history of their existence only confirms the reliability of the system.
Design of swollen gate
Whatever materials appear, no matter how the fashion is not changed, the basic principle of their arrangement remains unchanged. Constructive device:
- poles (racks). In fact, the gates are not, but are supports for their attachment;
- rama for swing gates. When it is made, a tree or metal can be used. The latter is more popular, because gives the frame greater rigidity;
- finishing (facing) material for the trim;
- loops;
- printing and locks.
So, we decided that they were a swollen gate and what features they differ.
Production of swing gates - tool and material
Making sure that we can make them with your own hands, proceed to construction.
Required tool for making swing gates and consumables for it.
Tool
Mandatory for making framework and arrangement of racks:
- bulgarian. Designed for cutting and grinding of metal blanks;
- cutting discs;
- grinding discs;
- welding machine;
- electrodes;
- roulette;
- building level;
- corner;
- a hammer;
- shovel;
- master OK.
Auxiliary:
- compressor, paintopult or tassels for staining racks and / or gate;
- drill. If you need to fasten the collar of the gate;
- rivet, as well as rivets to it.
Material
- pipe for frame manufacturing. It is preferable to use a profile tube 60x40x1.5. Suitable and 40x20x1.5. The final choice depends on the finishing material and the wind load accounting;
- pipe for the manufacture of racks. Here you should also be guided by the weight of the finished gate.
- the weight of the gate is within 150 kg. and below. 50x80x4 pipe is suitable;
- the weight of the gate from 150 kg to 300 kg. Pipe - 10x100x5;
- the weight of the gate exceeds 300 kg. Pipe -140x104x5.
Tip: For the racks can be used brick, concrete or even a tree. In any case, relate the properties of the material with the intended load.
- loops for swing gates. Can be adjustable and unregulated. Must be made of high-quality material and have the ability to withstand a significant cargo;
- locks. There may be mechanical and electromechanical. Selection at discretion;
- paint. Need for painting racks and / or trim;
- cleaning. There is also complete freedom of choice. The main thing is to make you like and on the pocket;
- automation for swing gates. To be able to make an automatic gate. You can not install at all or set later. But if its installation is assumed, albeit in the distant future - the frame of the swollen gate is better to do more durable.
How to make swing gates with your own hands
Do not think that homemade, it is synonymous with the words "ugly" and "unreliable." Just the opposite - homemade swing gates - mean creative, individuality and care for their own security.
Sequence of work.
- stage - installation of racks for hanging the gate.
- stage - making swing gates.
Stages naturally can be changed. But the installed racks (pillars for swing gates) must stand at least a week. To, not stretch pleasure, waiting time can be taken by welding the gate.
1 stage - installation of poles of swollen gates
As a rack can be used:
- profile pipe. The selection of the pipe section is based higher in the section "Materials";
- concrete pillar - acquired or flooded in place;
- brick or natural stone. The latter is used more for cladding due to its non-standard sizes;
- wooden bar (100x100).
Methods for installing poles / racks:
The pipe can be scored on a depth of about one and a half meters
This method of installation is the fastest, profitable (no costs for concrete), it is possible to replace the rack. The main thing, when the column device, this method - to withstand the level. This will avoid the skew of the gate.
Material prepared for WWW.Site site
 The reference column is to strengthen with concrete (concrete), i.e. Make a kind, foundation for the base of the gate.
We describe the second, because For the first needed coarse force and suitable primer.
Installation of portal pillar
Sequence of execution:
- Drop or dried by an earthen brown with a depth of at least 1 meter. The diameter of the drill must be at least 200 mm, when the pipe is 100x100.
Depth depends on the depth of the primer of the soil in the installation region. The width of the parties is determined by the quality of the soil and the dimensions of the supports (pipes, wood, concrete).
- We arrange a sandy-gravel pillow under concrete. Its height is 150-200 mm. Assignment is to prevent the rack to deepen and create the basis for concreting.
- We establish a pillar and flatter it using a building level.
- We cook concrete and pour a rack.
Standing slaining pillars must take 7 days, no less. Concrete should be well frozen. During the pouring of the concrete, periodically wipe it with water. Of course, cracks on such a slight area are not so dangerous as, for example, when cracked in the foundation of the house. But it is better to avoid them.
Tip: If you do not use a pipe, and brick or concrete - the depth of the recess will also be 1 m.

For reliability, the rack must be reinforced. And also, in advance to withdraw two or three reinforcing mortgages for fastening the loops.
2 stage - making swing gates
Sequence of an independent device.
Installation site and appearance of swollen gates
This is the starting point with which all the work begins. Often the installation site has a direct impact on the appearance of the design.
For example, you need to put the gate to the backyard, to enter the garden or to upset the future construction site. Then the material and the design will be as simplified as possible.
If it is the front door or in the garage - then the costs will be higher.
Dimensions of swollen gates
In the ideal case, the gate makes together with the fence. However, if you, for example, a live fence or you extend the passage and need new gates - should accurately measure the dimensions.
Tip: Try to make swing gates in one stylistic solution with a fence.
It is important to measure the height and width of the opening at the gate. Measuring the height, note that the bottom of the gate is usually leaving the technical clearance. Its value depends on covering driveways. If you have an asphalt, tile or concrete area in the gate area - then 5-7 cm lumen is enough. If the ground is not strengthened (the grass grows), and the surface is not flat - then about 10 cm. Technical clearance is needed even in order to reduce the wind load, in fact, if future gates are solid, without ventilation gaps.
It is also necessary to provide for a sufficient gap between the sash. This will limit the slight shift of the racks.
Drawing of swing gates
Having at its disposal a drawing and a circuit of the disintegration gate, it is easy to calculate the amount of the required material.
Try to make such a frame for the gate so that its dimensions correspond to the size of the alleged finishing material. So you facilitate the installation process and avoid connecting seams on the front surface of the gate. For example, the standard width of the PS-10 1 100 mm brastic.
Council. By calculating, use the working, and not the overall width of the finishing material.
The figure shows the frame diagram for the swollen gate, which we take as a basis.

Using this drawing, like the basis, you can calculate the amount of material, fastening sites and pipe parameters and finishing materials.
In our example - frame, it is a welded design. It will be made of a pipe or metal profile. But you can use a tree. If, for example, you have a fully wooden gate.
The figure shows that the frame has a square appearance and internal jumpers. They are needed to give the frame rigidity.
Consider this scheme is shown for swing gates that are not equipped with a gate. The wicket is located separately. If you decide to save place and cut into a gate to the gate - Provide this need creating, the drawing of the frame for swing gates.
Calculation of swing gates
For a frame that is shown in the diagram will need the following material:
- the profile pipe is 60x40 - 22 meters - for the perimeter of the frame and jumpers. This pipe will be attached to the racks and keep the entire design;
- the profile pipe is 40x20 - 15 meters - for the inner frame (perimeter amplification). It is that this pipe will be attached to the material of the collar of the gate.
Usually pipes are sold by route, so it's better to immediately take those sizes that you need. Among other things, it will simplify shipping.
Cutting and grinding pipes
At this stage, the components of the frame occurs. Pipes are cut off the desired length and grind.
Grinding is needed in order to clean the pipes from rust. If the metal is lubricated with oil - it needs to be eliminated using a solvent (most often gasoline).
Welding swollen gate
When carrying out welding, remember the smelled of safety equipment. Better when this type of work is performed by a specialist. So the quality of the welded connections will be higher. Yes, and the appearance is more beautiful.
When welding, it is important to carry out joints so as to protect the pipe from the waterproof. Otherwise, it will fall into it or snow. In winter, it will freeze, and with warming will begin to expand. This will inevitably lead to the expansion of the pipe walls. And, as a result, the deformation of the whole structure.
On our example, the internal pipes are welded in the form of squares. But it has no fundamental importance.
The step of the welding attachment of the external and internal frame (pipe 60x40 and pipes 40x20) is 250-300 mm. Observe a chess order. So the pipes, with heat expansion, welding seam will not be pushed.
Some drawings frames for swing gates are shown below.


The more rigid ribs, the greater wind load will be able to withstand your gate.
If you sew the fence with finishing material, then weld the pipe in the middle of the outside. So, it is easier to designate the place of fastening the trim.
Primer
It does not matter which material was used for the manufacture of a frame - a metal or tree - it needs to be pricked. The primer will extend the life of the paintwork and make the process of applying it more enjoyable.
Welding places are especially thoroughly ground.
Latch and hinges for swing gates

The loops are welded to the frame and to the racks (columns). If the rack is made of brick, and the removal of the reinforcement was not provided, then you must first attach a schwell to the brick, and then welcome the loop.
Motion varieties are presented in the photo


The valve mechanism is selected by the one that you like more. The most common and easy-to-manufacture is such as presented in the photo.

FINISH WORKING GATE
- Painting Karcas
Previously the framework needs to wipe from dust. Any paint is suitable for staining. It is better to apply paint to the paint, so it will fall evenly, and the work will pass faster. Use a brush, too. In this case, the process will slightly delay, and the paint consumption will be less.
Apply paint better in several layers.
- Fastening finishing material
The shocking of the gate is possible before and after installing the frame on the racks. To do this, on the inner tube (40x20, in our example), fasten the trim. The method of attachment and fasteners depend on the finishing material.
Than to strip the swing gate
The following materials are used:
Professor
Advantages - low price, wide range of colors, low weight. The disadvantages include: the complexity of the replacement (it is difficult to choose a color, because the sheet flashes slightly, plus, the shade depends on the party and manufacturer). And also, the ability to damage when mounting and high sailboat.

Wood
Advantages - accessibility, beautiful appearance of natural wood, ease of replacement. Disadvantages - demandingness in care. Over time, the tree can disappear, which will lead to the appearance of cracks.

A metal sheet
Dignity - durability. Disadvantage - considerable weight.

Forging
Advantages are unlimited designs. The disadvantage is that to make forged gates with their own hands only by specialists.

Steel grid
Advantage - Low cost, high speed, low weight. The disadvantage is low aesthetic properties, the transparency of the fence makes the entire territory of the courtyard available for review.

Rabitz
Characteristics are the same. More suitable for installing technical gates.

Combined
The basis of such a combination is most often forging, which allows the goal to go any shape. And the clossiness gives them the trim from the inside with wood, metal, professional flooring or polycarbonate. Examples of such gates in the photo

Installing swing gates
So, the racks are ready, the frame is welded, the finishing material is fixed. It's time to hang the gate.
Conclusion
We hope you were convinced that installing a swing gate with your own hands, a simple occupation. In the presence of material and tools - the device of the gate will not take more than a week. From the moment of installing the columns, before mounting the gate. And if you consider that 7 days you need, so that the concreted pillars are settled, then the day. I wish you success!
Swing gates - photos of different options for the device


Swing gates - no rural courtyard of Russia, no country house will no longer cost them. It does not matter what their design is: deaf metal or wooden, openwork forging or simple welding of rods, corners, pipes.
You can make your own hands
Their design is the simplest of all known: retractable, lifting, one or two-dimensional. They are letting and produce a car owners, a cargo scooter "ant" or a motor-block with a trailer. It can be with a signal yellow lamp or antenna remote control "Close-Open" mechanism. With a gate for adults and children in one part of the unincuff or separately.

Who has not yet borrowed similar, read our recommendations for creating limiters for entry, consider photos of the drawings of the gate, assemble the necessary tools, purchase materials and proceed to work personally.

And if they decided to build a garage in the courtyard, the experience gained at the assembly of the dispenser on the estate is suitable for mounting entry into it.

Also on the site can download the drawing of the garage gate. The design of these gates is simple and understandable, installation is simple, ease in opening / closing, reliability.


Principle of device
The design of such fences remains unchanged century. Only materials for disassembling are replaced. Elegant profiles and polycarbonate are added to traditional variants (from simple metal or wood).

The advantages of unincuffs are:
- easy assembly, mounting
- minimum cost when assembling do it yourself
- durability
- convenience service
- suitable for office territories, technical complexes, garage cooperatives
- variation width of sash up to fifteen meters

Pay attention to the installation
Gates are attached on lateral racks from pipes with a diameter of 10 cm, welded pairs of corners or finished profiles. They are concreted to a depth of at least a meter so that the frost does not "led" the gate.

Heights are enough two meters, as much width of each sash. They swallow or immediately, or each other, inside the yard or out. This must be thought out immediately. Hung on a loop, well blurred graphite mixture so as not to creak.

In the closed state, if there is no opening mechanism, they are fixed in several ways. Either transversely mounted inch tube on a pair of hooks on each sprinkle or fastener at the junction of the zinc, mounted in concrete. The bottom mount will be needed in the case of simple fixation of each disinteg.

Facing, painted professional flooring or polycarbonate, attached to Ramam on bolts or self-tapping screws. The last hardware for the square meter of fastening should be eight - ten pieces.

The last material leaves it in its transparency or color your taste color. Successfully looks professional flooring, which is continuing in the form of a fence from the gate along the entire length of the front of the estate.

Minus gate format - the big turn. This is a special drawback for winters when you need a lot of snow to clean up to open the gate.

Mechanization
This convenience will have to acquire as a finished product, the same for a long time will have to make. The mechanism is similar to the door closer in the entrances, only much massive and more powerful.

It is possible to install closer to Earth, if the winter is minor, and better in the middle of each side of the gate. For the middle, less bulky closers are sold.

In both cases, it is necessary to weld the designs to fastening the spindles. Our descriptions are minimal, you can see all the procedures on the video drawings of the gate.


Alternative to a swollen gate
If you are not satisfied with you because of the opening area of \u200b\u200bthe gate, look at the possible drawings of the retractable gate. Perhaps build them at home. Only such a gate will be doubly harder. Since instead of the area of \u200b\u200btwo sutures of swing, here they will be cooked together. A cone is added at one end of such a design.

It is necessary to completely close the space of entry. Therefore, moving such a gate on one line along the fence manually problematic.

Therefore, we need a mechanism in the form of a gearbox or worm transmission to the sled teeth. For winter use, it is necessary to consider protection from snow and rain.

Their length for standard gates on the estate is equal to four meters. The driving angle adds at least 1.6 meters. Fastening is radically different from swinging.


On the length of the gate at the bottom of the profile sled to promote the design on them. From the two sides, rectangles are rectified in concrete with a slightly higher than the gate with a distance between verticals 10-15 cm. The frame moves through them, and when closing they hold it. On the one hand, two meters are concreted the platform, it strengthens the continuation of the profile and the entire mechanism of movement.


On the site you can also download the drawing of the garage gate. Below we will talk about one garage design.

Garage lifting gates
There are two more types of gates - lifting and garage. Actually lifting are mounted in the garage separately and built into some kind of building. They are not suitable for outdoor air, because they have a complicated design for the street. When lifting, it will create sailboat in the wind, which will lead to the deformation of the frame.

The drawing of the lifting gates for the built-in garage shows that it can be opened in the winter even at a snowdrift in front of the engine compartment.

The end of the entrance simply goes along the lower salads upwards, and the two top wheels in the same guide lead the design almost horizontally.

If the gate is not made of too thick metal, but from the profile, then lift and empty can be manually. Provide on the outline of the gate soft seal from wind, snow, rain.


Photo of the drawings of the gate


Gate and gate - necessary addition to the fear of their professional leaf. The gate provide travel to the section of cars and special equipment, and the wicket is intended for those who have come on foot. In contrast to the fence, the design of the gate and gate is more complex, so a separate drawing is developed for them and a special calculation of materials is performed.
We want to offer you several ready-made drawings of the gate and wickets from the professional flooring, which you can adjust to your conditions. The height of the fence and wicket must correspond to the height of the fence.
Main types of gates for summer cottages and country houses
- swing - are two swinging flaps that open inward or out. Simple and cheap installation, however, at the entrance can damage the car, especially if there is a strong wind. Also, they need to clear the considerable space.
- slip or sliding gates with rail guides - the door moves on the roller mechanism along the fence line. Complex design, special expensive accessories makes such a gate not the most accessible. But they provide a higher level of comfort: the automated drive makes it possible to open them without leaving the car.
Drawings of swollen gates and wickets
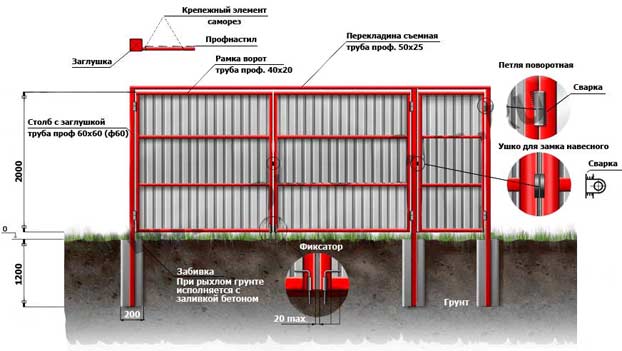
When drawing up the drawing, it is important to determine the width of the gateway and the wicket, height, as well as the frame model. Do not forget that when designing the gate, you need to properly distribute the load on the sash, because it is attached to the side loops and their weight completely falls on the pillars of the supports. For this reason, the columns of the gate are often made from a thicker profile pipe or laid out of the brick.
The metal thickness of the profile pipe should be at least 3-4 mm. Accordingly, the foundation under the supports of the gate should be quite reliable. Weak support will lead to the saflifts and deformation of the design from wind loads and gravity of the sash. For a frame, it is necessary to use a easier profile pipe to prevent overload on the sash, however, too thin frames will not stand in front of wind loads.
Pay attention to the choice of the width of the gate. Optimal is the width of 4 meters it allows you to safely enter both cars and trucks even with a narrow street. Remember, the wider the sash, the greater the load it creates on supports (in accordance with the law of the lever).
Schemes of the gate and wickets from a professional flooring with a parallel frame
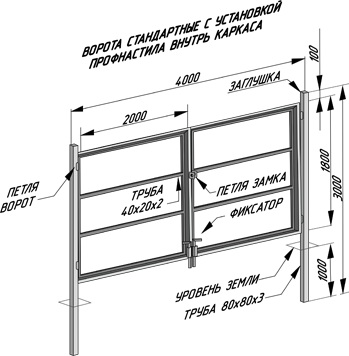
1. Before us "Classic" and a well-balanced gate drawing with a gate. The height of 2 meters corresponds to the traditional height of the fence from the proflist. The 60x60 pillars should cope with the 40x20 tube frame. The frame itself is not overloaded, simple in the calculations, does not require many materials. He has only one drawback - the lack of diagonal stiffness. It compensates for the presence of two horizontal profile pipes at once, which form three sections with a width of 60-70 cm on the sash.
Also a characteristic feature is the presence of an upper crossbar. It gives a more balanced load distribution, prevents the column offset towards each other however, to successfully enter the site of high cars you need to make it removable.
2. Another drawing option. This time without crossbar. Please note that the reference pillars due to the absence of the crossbar have a larger diameter.
3. Swing gates with a built-in wicket. Such a scheme is perfect for those who have a limited space for entry / entry into the territory. On a width of 4 meters, the gate is placed and wicket. However, it is worth understanding that the presence of a wicket increases the mass of the sash, which means the cross section of the side pillar should be at least 10x10 cm and it is better to place a gate closer to the post (according to the law of the lever it will give a smaller load of the league of the gate).

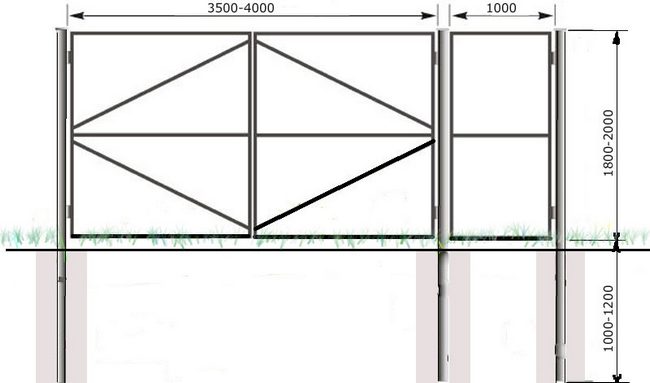
Gate and gate schemes with diagonals
The presence of the diagonal frame elements increases the rigidity of the structure and makes it resistant to various kinds of deformations, but it should be remembered that additional lines are an additional load and here it is important to choose correctly. So instead of two horizontal slats it is better to use one. The options for the arrangement of diagonal planks are given in the drawings below. The cross section of the support pillars for the fence with diagonals should be at least 80x80.
1. Diagonal from extreme corners to the middle or vice versa. Such schemes look quite beautiful. One looks like a snowflake, the other forms a diamond pattern.

Length of hypotenuses: where butand b. - The sides of the rectangular triangle.
2. Diagonal from one corner of the sash to another. The scheme allows you to minimize the load on the sash and at the same time to give the necessary rigidity, but it is not very convenient to welding such a diagonal.

3. Small diagonal at the corners of the sash. It looks quite beautifully creates a minimum of load, however, such flaps have high sailboats, and, it means, they can suffer from wind loads.

In the next video, you will receive valuable advice, how to prevent the fastening of the support pillars under the weight of the sash:
Drawings of the retractable gate from the professional flooring
The most optimal option for a sliding fence that can be undertaken by its own, is a design with a rail guide. It is enough to simply choose the sets of fittings and automation systems. The gate includes a retractable sash with a lower rail, which moves along a special roller system. In order for the design to be balancing in a closed form to the frame side, an additional triangular console is welded.

As you can see the gate frame consists of a frame and console, which are made of a thicker profile tube (60x40). Internal console elements are also better made from this pipe. Inside the gate frame, the frame pattern can be made in different versions (with rectangles or triangles. The main thing is that the pipe is easier pipe (for example, 40x20). It is also not worth making a lattice too frequent. The order of installation of a rollback fence is presented in the following video:
We hope that the presented drawings will help you make your own gate and a gate from the professional flooring, which will be convenient, reliable and durable.
Classic swollen gates can have symmetrical or asymmetric sash, as well as an additional gate for the entrance. Regardless of the type of construction, their manufacture is made in the same principle.
Installation of support
When the soil is bent in winter, the load on the support poles of the gate can reach up to 10 tons per 1 square meter. M. In addition, they are experiencing a significant dynamic load of several hundred kilograms during their opening and closing. Therefore, to increase the service life of such a design, a reliable support is required, in-depth in a sufficient depth.Procedure for installing portal pillar:
1. The pipes or a profile of 2.5 mm with a diameter of 60 mm and above can be used as reference structures. Using the corner is not recommended: It is not capable of providing design necessary stiffness. For transverse crossbars, the profile may be a little: up to 30 mm.
Council. Too massive frame Create too much load on the support poles, so when choosing a thick-walled profile, they are respectively enhanced.
Support poles
1. To install them, it is prepared to the depth of freezing of the soil (its depth cannot be less than 1 m). For example, in the Moscow region it will be 1.4 m. It is possible to dig the pit with an earth drum or manually. In this case, its diameter should at least twice the cross section of the pipe.

Drive for pouring support pillars
2. Before the fill of the concrete at the bottom of the pit, a sand-gravel pillow is arranged 20 cm high.
3. Poles are fixed in the pitchers, aligned with the level and flooded with a sandy cement mixture. Installation of the gate is made at least one week after its complete grip.
Council. To prevent concoction from cracking before the fill of the earth, it is necessary to shed water and tamper. To prevent from premature bruises, the top of the foundation should be covered with a film and periodically wateted with water.
The main stages of making flaps for the gate
2. The metal profile is cut according to the specified dimensions.3. From each edge of the band, the carbon is carried out at an angle of 45 °, and then it takes a cut with a grinder. To improve the strength of welded seams, the slice is thoroughly cleaned to pure metal.

Marking of the joints of the profile
4. Profiles are laid out on a flat surface and sniffer at the corners. Corner clamps can be used to secure the structure (clamps for fixation). So that the grief is not "led", before welding it should be checked galnik The correct position of profiles inside the design, and then outside. The horizontal surface of the surface is evapted using level.


Check horizontal and corners
5. With roulette Also controls the height and width of the grief. In case of an error, the correctness of the cuts of the angles and the location of each of the parts are checked.
Council. If the channel or profile is barely fastened, it can be aligned with a hammer, pre-warmed the metal above the gas burner.

Height Check and Design Width
6. After fitting all the nodes of the seams at the corners first grabbed, and then brewed with a solid seam. All welding places are cleaned with a grinder with a petal nozzle. In the future, before painting, small shells (emptiness), formed in the seams, can be treated with automotive putty.
7. Next are dirty transverse The crossbar at an angle of 90 °. So that the gate does not "twist", in addition to the transverse, to enhance the stiffness in them should be arranged at least one diagonal jumper. It is possible to determine the angle of its pairing with the profile of the grief only by experimental way: it depends only on the design of the gate.


Crossbars walking across breasts and diagonally
8. For the gate sides, one of the sides must be enhanced with a small segment made of metal corner.

Strengthening of the metal strip for swelling
Welding of carrier loops
The simplest device is pin, which is put on the cap. To weld the loops, you should set a grid in one plane with the post with a gap Not less than 5 mm. From the top and bottom of the grief, 20 or 25 cm retreats and marked with a pencil or chalk. Then the lower part of the loop is welded to the frame (the door of the gate), and the bottom - to the base.

Punching hinge
Usually loops are welded through plates (ears): Small metal strips are attached to both parts of the loop, and then these plates are welded to the gate and frame. This method allows to deteriorate and loop, and a plate on both sides, and then attach it from above, on the side and bottom with the help of three seams.

In order for with the welding of the loop, all moving parts should be thoroughly wedged with solidol before starting work. The welding seam is paved below.
Since the supports with the slightest movement of the soil will always shift, between the sash, it is also necessary to leave a small gap of several millimeters.
Saving framework
The lifting of the gate can be any: wooden, made of metal sheets or sheets, etc. It is attached to the tins with self-tapping screws. If the welding iron welding is planned, you should choose a more even cold-rolled metal.
Tree casing
Below are several provided drawings of swing gatesFrom which you can choose the most suitable. Your own scheme can be developed independently. The optimal width of the gate for entry both passenger cars and a truck - 3 m, height - from 2 m and above. To save materials, you can combine the gate with the gate for the entrance.
Important! When creating your own drawing, you should consider the gaps of several millimeters between the sash and the pillars, as well as between the drawing and soil.
If further automation of the swollen gate is envisaged, it should be noted that it should be mounted only after the ideal adjustment of the movement of the sash. If when they open, it is necessary to apply some efforts, the causes are detected and eliminated.

Scheme 1.

Scheme 2.

Scheme 3.

Scheme 4.

Scheme 5.

Scheme 6.
In modern conditions, the gate is not only an element of security, partially reduced the likelihood of hijacking or damage to the machine, as well as penetration into a plot or in the garage of foreign, but also part of the overall interior of the garage, at home or plot. In this article we will talk about various types of gates, the features of their installation and operation, advantages and disadvantages, as well as tell me how to install them yourself.
What are the gate there
Despite the fact that most types of gates are universal, that is, they can be applied to the home, garage or fence, there are gates that are only suitable for one one. Therefore, we list the main types of the gate, as well as point out why they are best suited.
- Swing.
- Skump.
- Folding.
- Retractable.
- Sectional.
- Swing doors

This is the most common and universal type of gate that does not change its design for thousands of years and consisting of two vertical supports, several canopies (loops) and two sash. Depending on the material of the sash, they can be conditionally divided into:
- solid;
- with lumens;
- wooden;
- metal:
- from sheet metal;
- worn.

The main advantages of the swollen gate are the simplicity of installation and maintenance, the main minus - the sensitivity to the size of the snow cover and the dependence on the free space in front of them. If the snow rose above the bottom edge of the gate or there is any obstacle (the car, a bunch of garbage, the FS block), then open them will be problematic, the remaining types of gates are deprived of this shortage.
- Return gate - drawing

The second is the popularity of the gate, which can be installed only where there is enough free space, that is, the 1.5-2 widths of the portal opening. Because of this, they are installed only in fences and garages located in the basement or lower floor of a residential building. Despite the fact that there are a rollback gate, made partially from wood, they did not receive widespread, so almost all the sliding gates are made of metal. At the same time, the gate of the sheet, pipes and rods use the same demand. The main advantage of these gates - they do not require the presence of free space, but much more often require maintenance than swinging due to the heavier mode of operation of rollers and carriages that ensure the movement of the gate.
- Folding gates

This type of gate got widespread in various enterprises, because it is deprived of the main flaws of the gate of other species and is located on a protected area. Due to the fact that the lower guide is closed by a gate, even during heavy snow, it is not clogged with snow, so there is no problems with the opening of the gate. Therefore, only two disadvantages are inherent in this goal - the high cost of the installation kit and installation, as well as a weak security action, because they perform only a decorative and logistic function. However, with proper execution, these gates will look very nice on the garage under the house. Nevertheless, this gate has not received widespread in residential buildings.
- Cleaning gates

Cleaning or lifting-turning gates are very in demand in garages located inside protected areas. The gate does not depend on the level of snow and relatively inexpensive, but they occupy a lot of space under the ceiling, where they are cleaned during the opening of the garage. Due to the fact that the gate is made in the form of one huge sash, which completely closes the glowing opening, their opening looks very beautiful - the gate rise, unfold and leave somewhere inside the garage. In addition, such a gate require regular professional services, so they are put on only those who can conduct all regulatory and repair work independently or have sufficient finances to conclude a service contract with a serious firm.
- Sectional doors

Sectional, they also rolling gates are the optimal choice for a garage located inside the protected area. They do not depend on the magnitude of the snow cover, do not require a large space under the ceiling (with the exception of the large-scale gate), are simple in service. Thanks to the use of modern materials, they provide good garage insulation without any additional events, because the insulation is inside the metal (less plastic) framework from which the sections are made. Such the gate is very in demand, but to establish them on their own difficult due to complex design, high requirements for accuracy and configuration.
Which gate can be made independently
If you are an experienced builder, have access to the necessary equipment, components and you have the necessary assistants, you can make independently any of the gates described above. If you are an ordinary person whose talents and abilities lie in other areas and have minimal construction, plumbing and welding skills, then you can create only swing and sliding gates. We recommend to do the swollen gate - despite the serious shortcomings, they are easy to install, look beautiful, and the search for materials for them does not cause difficulties. Below we describe the main stages of creating and installing swinging and retracting gates, it will help you better understand the process, evaluate your strength and independently create a beautiful and functional gate.

How to create and install swing gates
To create a gate with dimensions of 2.2x2.2 meters you will need:
- steel profile (square) cross section of 30 mm 20-30 meters;
- steel profile (square) cross section 100x100 mm or steel pipe with a diameter of 100-120 mm 6-7 meters (two segments of 3-3.5 meters);
- garage loops 4-6 pieces;
- door loops 2 pieces;
- door lock;
- professional flooring 6-7 square meters;
- steel armature with a diameter of 10-14 mm 3-6 meters;
- manual or mechanized car with a diameter of 300-400 mm;
- manual traaming (you can use log suitable length and thickness) to which handles attached for ease of use;
- bulgarian;
- welding machine;
- drill with a set of different drills;
- self-tapping screw;
- screwdriver;
- roulette;
- acute core;
- corolnic;
- plumb and level;
- sand, crushed stone, cement and water;
- shovels;
- several helpers.
Creating sash
When creating sash, you must determine in advance how they will be attached to support, their width depends on it. If from the inside, then the width will be equal to the width of the pass, if in front (outside) is equal to the width of the opening + dual width or diameter of the supports. It is also necessary to determine in advance, whether you will embed to one of the leaf of the wicket, because the location of the framework of the framework depends on it. After that, it is necessary to determine the number of vertical frame racks - in the regions with weak winds on the gate of such a width to optimally put 3 vertical racks on each sash. If the wind blows strongly and often, then you need to put 4 racks.
Place vertical and horizontal elements in length and cut with a grinder, then weld from their frame. Be sure to use the square when markup, and also check the shapes of the flaps during welding, it will avoid the skew of the gate and their alterations. When the flaps are made, hang them on the supports. Consider that from the quality of welded seams that you connect the loops with supports and sash will depend on the strength of the gate. Some wizards who have to install the gate in the mountainous terrain, first install the supports, and then the sash will be made under them and hang them. This approach allows you to adjust the gap between the goal sash.
If you decide to make a gate with a gate, then take into account the size and shape of the canopies, because the wicket must be freely open and closed, but there should be no big slots between it and the sash frame. You can hang a wicket and cut the lock as before the gate sink and after.
Installation of support

Using a drill, drill the hole under the support. If there is no boraar, you can dig through the shovel, but at the same time the diameter of the hole will be several times more, and therefore it will have to either start with a support with stones or pour much more concrete. The depth of the holes for the support should be 30 cm more of their shuffle. This is necessary to create a sandy-crushed stone pillow, which will protect the gate from groundwater. This pillow must be carefully sealing the rubbing or log.
If it rains in the fall in the fall, and in the winter the temperature drops below 15 degrees of frost, the depth of the hole under support should be greater than the depth of the soil.
In addition, the hole must be made with a diameter of at least 40 cm and insulate it at the level of the depth of freezing by foam. You can also install (if free space allows) screw piles that will play the role of supports. When installing supports, pay special attention to the distance between them and their verticality, for this use the roulette and level or plumb. Check the level or plumb to spend from 2-3 sides. Placing supports, lock them and fill with concrete. You can hang the gate in 20-25 days.
Snack and sheathing
There are two technologies for the mood and trimming of the sash at the gate of this size - the first implies the trim first, then the scene, the second, on the contrary, first the hitch, then the trim. The first technology is used when you can attract a sufficient amount of assistants and, it is not possible to raise the sash, the second is used if you work together or even alone. The gate hitch is made in the same way as conventional doors or windows - the sash lift, top and bottom combine the pins of the canopy on the support and the hole of the loop on the sash, then lowered. This operation can be performed alone, but only on flaps without a trim. For sash, there are at least 2 people (better 3).
Profile cut with an accuracy of a millimeter, observing direct angles, otherwise the whole design will look like closer and ridiculous. For fastening, use screws for metal, consider that self-tapping screws, these are not bolts, so too strong tightening will only lead to breaking the thread.
Installation of constipation and locks
Unified standard of locks or constipation for swing gates does not exist. Some are limited to the chain and mounted lock, others install a mortise lock or goas, the third install automation. Therefore, experiment, based on the materials available to you.