
Installing mods for Minecraft, instructions on how to install mods for Minecraft. How to install mods on minecraft using ModLoader and MC Forge
In this article I will tell you in great detail how to install mods on Minecraft game
, so if you want to diversify your minecraft with mods, but do not know how to install them into the game, then here is an excellent installation guide.
The guide is suitable for both the licensed version of minecraft and the pirated version, there is no difference.
What is needed to install mods on Minecraft?
Minecraft game of one of the versions.Arms.
99% of modern mods are installed by copying the mod file into the Mods folder, but let's get it in order:
On the this moment 98% of mods use a special mod loader called, and about 2% use.
Therefore, in this article it will be shown using the example of Minecraft Forge, it is installed completely in the same way.
Let's start installing the mod:
Step 1.
Let's find out what version of the game you have, start the game and in the game menu you will see the version:Step 2.
Great, let's say we have Minecraft 1.12.2, now we need (link), download it for minecraft 1.12.2.
There are 2 types of automatic installer, file installer as program .exe and the installer file .jar, there is no difference between them at all, but for many players the .jar file opens as an archive, or stupidly does not start, because download the .exe installer and run it.
Installation example:
Step 3.
Now open your minecraft launcher (the program that launches the game). A new version of Minecraft with the forge postscript should appear in it:
Here's an example from two launchers:

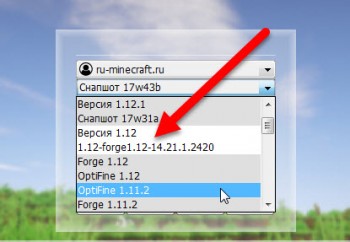
We select the version of Minecraft with the Forge postscript, run it, if it starts, great, close the game immediately.
If it does not start, you probably already have mods or mod files in the game folder that prevent the game from starting, you need to look at the error. Read the news below about the reasons for not launching the game.
Step 4.
Now we need to select the desired mod for minecraft, the version of the mod must match the version of the game, that is, mods for 1.12.2 are only suitable for 1.12.2, rarely (or if indicated) mods from 1.12 can be suitable for version 1.12.1 or 1.12.2, try it.
Downloaded the desired mod, also read the brief installation for each mod, in some cases there may be some additional steps.
Step 5.
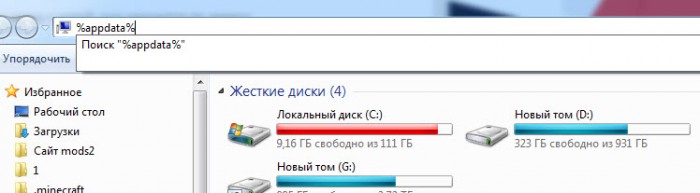
Just in any folder, enter% appdata% in the address bar and press Enter:
Installing the mod into the game, first we need to get into the folder with the game, it is located at:
C: \ Users \ Your_User\ AppData \ Roaming \ .minecraft
If you cannot find the folder
Appdata:
You need to enable showing hidden folders and files.
Or press start - in the find field, enter this:% APPDATA% and press enter, there you will find the .minecraft folder.
Or you can enter the Win + R combination on the keyboard (the Win button is a button between Ctrl and Alt on most keyboards, there is a Windows icon on it).
In the window that appears, enter% APPDATA% and press Enter there you will find the Roaming folder, and in it .minecraft.
Some launchers can change the name of this folder to something else, for example to .tlauncher
If you have Windows 10, then open Explorer go to the "View" tab. Then click on the "show or hide" area and check the "hidden items" option. 
Further, you can find this folder where it should be.
Inside the folder .minecraft you will find the folder mods if not, create it.
Copy the downloaded mod file to the mods folder, start the game - the version of the game with the Forge postscript.
Done, you are beautiful.
Possible problems and solutions:
Can't open Forge installer like forge-1.12.2-14.23.1.2556-installer.jarAnswer: download and install.
After installing some mods, the game does not start, crashes at startup without an error:
Answer:
It happens, there is a problematic mod, or one mod is not compatible with another mod, or some mod requires an additional mod to work. Look for incompatible mods by deleting mod files, update mods to more recent versions. (mod versions, not game versions).
Perhaps the mod requires additional libraries, usually the authors and those who post the news indicate the need to install additional mods, read the news with the mod in more detail.
It is extremely rare, but it happens that the version of the mod is not compatible with new version Forge, if the mod is old, you may have to find and install an older one. Forge version.
You will probably have to stop using the problematic mod.
The game starts, but the message is displayed, there is no game menu.
Answer: As a rule, if a critical error did not occur, then Minecraft Forge tries to report possible reason, For example:
1) Some mod requires a more recent version of Minecraft Forge. (For example forge-1.12.2-14.23.1.2556-installer.jar - where 1.12.2 is the version of the game, 14.23.1.1.2556 is the version of the bootloader itself), you may need to install a more recent minecraft forge bootloader.
2) Some mod requires an additional mod, it will be written there, the mod requires a name: name, you need to find this mod and drop it into mods.
3) You copied a mod in Mods for another version of the game, then usually writes that this mod requires a game version of this.
What to do if after installing Forge the game won't start, or won't start at all.
Answer:
Save your minecraft world, delete all content in the .minecraft folder, re-download the game version, and go through the Forge installation again.
Or find another launcher for minecraft, similarly delete everything from the .minecraft folder, install the game with another launcher,
We all know that installing mods on new versions of Minecraft 1.9 / 1.8.8 / 1.7.10 is different from installing mods on older versions. The new launcher has changed the instructions for installing mods on Minecraft. Many people experience discomfort when installing mods, and some have no idea how to do it. But this guide will help you!
You will need:
- Minecraft 1.8.4 (or another version, preferably fresh)
- Minecraft Forge that matches your version Minecraft client
- Risugami Modloader (optional, for easy installation of mods)
- WinRAR (for working with files such as JAR / ZIP / RAR)
The note: This manual is suitable for Minecraft version 1.6.4, as well as for Minecraft versions 1.9, 1.8.8 and 1.7.10.
Instructions for installing Forge mods:
Most mods require Minecraft installations Forge.

Download latest version Minecraft Forge. Run the installer, and click. Complete the Minecraft Forge installation.

Now you need to launch your Minecraft launcher and select "Forge" on the right side of your profile. Enter your username and password and click. After a small download of the files, you will be taken to Minecraft. Close the game after this procedure.

Go to "Start", then find the "Run" command, enter "% appdata% /. Minecraft" there and press Enter. You will see a folder called "Mods", open it. Move the archive with the mod here to .zip permission. Don't remove it!

Now, start Minecraft again using the same Forge profile. By clicking on the button, you will see all installed mods for your Minecraft client.
Installation instructions for regular mods:
Installing the so-called Vanilla mods is a little tricky, but still simple.

Download any "vanilla" mod that will work on your version of Minecraft. For example, I downloaded the X-Ray mod.

You should now open your installed Minecraft.
Go to Start> Run> enter "% appdata% /. Minecraft / versions"> press Enter.

We do not have permission to go directly to the 1.6.4 folder and put the files in 1.6.4.jar, because new launcher forbids us to do this. Therefore, we must create a new profile (duplicate) of the original files, and rename them so that the launcher would interpret them in its own way.

Now, from the version folder. Make a copy of the "1.6.4" folder, and paste into the same folder. Now rename the copy of the folder to whatever name you like. For example, I named it "xray".

Open the "xray" folder and you will see two files, 1.6.4.jar and 1.6.4.json. You need to change these names.
- Change 1.6.4.jar to xray.jar
- Change 1.6.4.json to xray.json

Now open xray.jar file with WinRAR including Xray mod zip file that you downloaded.

Move content from Xraymod.zip file to XRAY.jar file. Necessarily: remove the META-INF folder from the JAR.

Now it remains to run Minecraft launcher, click "NewProfile" and enter a name. In the "Use version" box, select "release xray". And click "Save Profile".
Select the profile you just created. Log into your account and start Minecraft. Create new world, and go to single player or multiplayer and test the mod.
Instructions for installing mods using ModLoader:
You need any modloader for Minecraft.
Go to Start> enter "% appdata% /. Minecraft"> press Enter. Open the "mods" folder, and transfer any mod there, in the archive, with the .zip resolution.
Warning:
1. Before starting any manipulation with Minecraft, make a backup (just in case).2. If you find any errors in the instructions, write in the comments.
You got bored in minecraft and you decided to diversify it with mods. But you are having difficulties with the installation so here you are. After updating minecraft 1.6, the structure of the client has changed, so there will be two instructions.
Most mods require a mod loader, most the best option this is minecraft forge since most developers use its API in mod development.
If the mod does not support (forge or modloader, etc.)
Versions up to 1.5 (inclusive)
1. Open minecraft.jar with any archiver (I recommend making a backup copy)
2. Open the archive with the mod in the same way
3. Drag the contents of the archive with the mod (.class files and if there are folders) into minecraft.jar
4. Run minecraft.jar
Versions 1.6+
5. Open 1.x.x.mod.jar, delete META-INF and copy the files from the mod archive.
6. Start the launcher, click "edit profile" (or create a new one) and change the version you are using to 1.x.x.mod
Mod supports Forge (and others like it)
Versions up to 1.5 (inclusive)
1. Download Minecraft Forge for your version
2.any minecraft.jar archiver
C: /Users/'UserName'/AppData/Roaming/.minecraft/bin/minecraft.jar (standard path)
3. Drag the contents of the archive from mod Forge(.class files and if there are folders) in minecraft.jar
4. Start Minecraft (it should start). The mods folder will appear in the .minecraft directory.
5. Move mod.zip or mod.jar to the mods folder (check the archive with the mod there should be files.class and folders in it)
6. If the mod requires third-party libraries, then download them and move them to the mods folder
7. Launch Minecraft. The number of loaded mods should increase on the main screen.
Versions 1.6+
1. Make a copy of .minecraft / versions / 1.x.x and rename to .minecraft / versions / 1.x.x.mod
C: /Users/'UserName'/AppData/Roaming/.minecraft/versions/1.x.x (standard path)
2. Go to the 1.x.x.mod folder and rename 1.x.x.jar to 1.x.x.mod.jar
3. Rename 1.x.x.json to 1.x.x.mod.json
4. Open 1.x.x.mod.json and change the id "1.x.x" to "1.x.x.mod"
5. Download Minecraft Forge
6. Run the downloaded file using the .jar. The installer will open.
7. Select "Install Client" and specify the path to the c minecraft folder (if the standard one, do not change anything) and click "ok"
8. Start the launcher and create a new profile and select Forge as the version to use.
9. Start minecraft. The mods folder will appear in the game directory
10. Move the mod.zip or mod.jar to the mods folder (check the archive with the mod there should be files.class and folders in it)
11. If the mod requires third-party libraries, then download them and move them to the mods folder
12. Launch Minecraft. The number of loaded mods should increase on the main screen.
For example, we downloaded the IndustrialCraft mod - file IC2.jar
- Copy the file (select, clamp Ctrl + C or right mouse button > copy)
- Go to the game folder (independently by% appdata% \ Minecraft, or "Open the game folder" in the launcher settings)
- Go to the folder mods and insert the desired (required) mods through Ctrl + V or PKM in folder> Insert

Now launch Forge of the required version and you're done - mod installed.
Installing mods on
To install mods and playing Minecraft with mods is required MinecraftForge... Forge is installed manually, or select Forge in the launcher.
1) Launch the launcher and create an account Set up accounts ...
2) Choose from the list account type: Mojang (license), Free (Free Minecraft) and others.
To play for free choose Regular (no password)
3) You write a nickname and press Add
4) Press to return "home". 
5) Select the version of Forge on which you are going to install mods ( 1.12.2
, 1.11.2
, 1.8.9
, 1.7.10
and others)
Better version 1.12.2
, 1.11.2
, 1.8.9
, 1.7.10
- there are a lot of mods on them. The rest of the versions are irrelevant.
If the versions are not displayed, click - Additionally and check the box Download from server 6) Click Install / Run
When the game loads and Minecraft starts, close the game.
Open the game folder and go to the folder mods 
7) To the folder mods you throw the downloaded mods (jar files). Fashion must be same version what u Forge version
8) Click Enter the game. Mods set 

How to install mods on TLauncher, MLauncher and others:
- Do everything according to the instructions above.
How to install mods on Minecraft if there is no Forge in the launcher / How to install mods on licensed Minecraft:
- Download and choose Login with license: on and do everything as per the instructions at the beginning of the article.
Where is the mods folder:
- First way:
- In Minecraft go to Settings> Texture Packs> Open folder with textures (Options> Resource Packs> Open Resource Pack Folder)
- A folder will open .minecraft \ resourcepacks, go to .minecraft, there is a folder mods
- Second way: C: \ Users \ Your_Name \ AppData \ Roaming \ .minecraft \ mods or enter % appdata% \. minecraft \
- In the launcher, click Edit> Open game folder