
How to make a house private in minecraft. How to secure territory on the server
Everyone, starting to play Minecraft on our Minecraft servers with a launcher and mods, wondered how to privatize a territory in Minecraft, and in our case, how to privatize a territory in Minecraft on a server? In this article, we will try to break it down and explain every aspect: you will learn how to create your first region, how to allocate territory for private, what flags are and how to use them, basic commands for working with regions and private territory in Minecraft.
Create a region
First, you need a wooden axe, which you can get with the //wand command.
Please note that a wooden ax does not cut wood!
The right mouse button is used to select the first private point, while the left mouse button is used to select the second private point. Also, to select positions, you can use the commands //hpos1 and //hpos2 (in this case, you need to look at the block that you want to mark) or //pos1 and //pos2 (you must stand on the block that you want to select as a position) .
The selection of the territory consists of a cuboid, that is, it is necessary to select diagonally.
After you enter the //wand command, you will receive the following message in the chat:
Let's start with the allocation of territory. We marked 2 points with a wooden axe:
The selected territory is indicated in the world green grid. If you have selected the territory incorrectly or have already selected, but the green grid remains, you can clear the selection with the //sel command. By the way, you can select an already created region with a green grid using the /region select command
And so, we have identified the territory, but in terms of height it occupies only 1 block. Now you need expand the territory in height (Y coordinate).
You can expand or reduce the region in the following directions:
- north- north.
- south- south.
- west- west.
- east- East
- up- up.
- down- down.
- Looking at one side of the world.
- To the sky and to the bedrock.
To indicate the direction, you can use the short names of the sides ( N, S, W, E, U, D).
To reduce the region, use the //contract command
You can determine the size of the region with the //size command
For clarity, examples of expanding and reducing the selected region:
The //expand 10 up command will expand the region up by 10 cubes
Using the command //contract 10 down the region will decrease from top to bottom by 10 cells
And so, we expanded the territory in height, for which we received the following messages:


As soon as we have allocated a territory, it is necessary to create a region and thereby seize territory.
To save the region, use the / rg claim command<название региона>. And so, I named my region DanchikMINER123, therefore, my command will look like this: / rg claim DanchikMINER123 .
If you did everything correctly, you will receive the following message:

Deleting a region
To remove a region, use the /region remove command.<название региона> . Only region owners can delete a region
If you made a mistake when selecting a territory, but the region has already been saved, you can select the points again and update it using the /region update command<название региона>
Checking the region
To check the territory for the presence of the region - take an ordinary stick and right-click on the territory:

Adding a Player to a Region
Also, you can add a player to your region with two commands: /rg addmember<ваш регион> <ник игрока>- in this case, the player is added to the region as a member. He can build on it, but he cannot govern the region itself.
/rg addon command<ваш регион> <имя игрока>should only be used if you trust the player! It gives you full power over the region: you can add/remove players from it, set flags and delete the region itself.
Flags
For greater security of your region were invented flags. The /region flag command is used to set the flag value.<название региона> <флаг> <значение флага>. Most of the flags available to players can have only three values - allow (allow), deny (prohibit), none (by default).
| Flag | Description | Meaning* | Rights |
|---|---|---|---|
| use | vanilla buttons, things, doors, gates, music blocks, etc. | deny | All players |
| pvp | Allows or disables PvP in your region. | deny | All players |
| chest access | Allows or denies the use vanilla chests. | deny | All players |
| fake-players | Allows or disables the use of certain special items from mods. | deny | All players |
| mods | Allows or denies the use of items from mods. | deny | All players |
| ic2 | Allows or denies the use of items from the mod industrial craft 2 . | deny | All players |
| lava flow | Enables or disables lava flow. | allow | All players |
| water flow | Allows or prohibits the flow of water. | allow | All players |
| vehicle-place | Enables or disables the installation of carts. | allow | All players |
* - default value.
For example, take the flag pvp(prohibits PvP in the region), thus, to enable PvP - you need to write the following command: / region flag<название регионе>pvp allow .
The flags are also divided into groups, of which there are only five:
Let's look at the example of the flag use:
- Create a new region, the default flag is use always set to deny
- We add a participant to the region, we see that he cannot open doors, workbenches, tables, etc.
- To avoid this, we need to enable the use flag for the group members, that is, participants
- We write the following command: / rg flag my_region -g members use allow
- Now participants can open doors, workbenches, tables, for all others, the flag will be the default, i.e. deny
1. Mark the territory you want to have in your possessions.
This must be done with pumpkins. The main thing is that these pumpkins do not stand on the same line, but are a little oblique.
2. An ax is a mandatory tool for privatizing a territory. You can either craft it or call the console - put two slashes and write " //wand".
3. With an ax in hand, you can mark your territory. On the first pumpkin, which is in your marking of the earth, you need to press the left mouse button - the console will write to you, they say the first position is set.
4. Click the right mouse button near the second pumpkin - the second part of your territory will be marked.
You have marked the territory itself on the surface, now you need to mark it in the air so that you are not flooded with lava from above, and underground so that no one can dig into you.
5. To capture the underground part of the territory and airspace - run the console and write
- "//expand 20 up"(this will mark your land 20 blocks up) and
- "//expand 20 down"(mark territory 20 blocks down).
6. With these actions, you marked the territory.
To make it private, turn on the console and type " /region claim ****"
Instead of asterisks, indicate the name of the territory.
Ready! This will now be your marked reserved region.
Today let's look at some of the nuances that arise in the process of studying and playing directly in this game. interesting world! More precisely, you will learn how to secure a territory in Minecraft from other players, and what commands are available for this. We hope that our advice will help you find answers to all the game questions that are too much for you, and you will be able to play calmly, not paying attention to the behavior of other users.
Introduction
Unfortunately, some players behave not quite adequately in online games, and therefore, sooner or later, all real-time crafters are wondering how to protect their playing area from attacks and encroachments of other amateurs. There is only one answer - to make your gaming territory private and play quietly on. But how to carry out the “privacy” procedure, and what will this gaming privilege give us?
Please note that some of the servers allow you to "lock" not only large gaming areas, but also individual elements of the game. For example, you can protect your chest with inventory or resources from "enemies". The good news is that the chest does not have to be in the territory that was "privatized" by you. This action is also possible on the territory of other users, or in the general area of the game.
You also have the opportunity to make a lock and private doors. This feature will allow you to restrict access to your home without resorting to "privatization" of the whole site, or in order to prevent access to the house of friends who already have the right to play in your private zone.

What is a private region?
First of all, remember that a private region, or "private" for short, is a crafter's personal playground, on which, according to the rules of the game, only the owner can carry out actions. This territory is freed from the encroachments of mobs, creepers, griefers and other "interesting" charms of the game. If desired, the owner of a private region has the opportunity to:
- modify the initial settings of the private;
- invite, give access and delete friends;
- change the game parameters by entering the appropriate commands in the chat.
As you can see, private is a rather interesting addition to the main game. Enabling this feature is fairly easy. In addition, you can always remove the private zone or simply reverse the procedure to give everyone access to this playground.

How to private in Minecraft?
We figured out why you need a private zone. Let's now look at how to privatize a territory in Minecraft. Let's start with the simplest - make your home personal (private).
In order to make the chosen dwelling a private zone, you will only need one tool - a wooden hatchet. With it, you can mark the coordinate points (corners) of your future personal territory. It is not necessary to create an ax: you will need the “//wand” command in the game chat. If someone does not know or forgot, for this you need to press the "T" key on the keyboard and open the chat. As a result, the ax will appear in stock in your inventory.

The next step is to determine the boundaries of the future personal zone. To do this, in the corners you need to put any block (cube). Pay attention to the size of the blocked zone you have chosen, because very often there is a limiter on the servers. If you select a zone larger than the limit, you will be shown a message about exceeding and an error.
So, the first block (dice) has been set, but it is desirable to make a strategic reserve - three more blocks at the upper and lower coordinate points are enough. In essence, you first select one lower point, and then diagonally opposite the upper point. For example, if the lower coordinate is placed in the right corner, then the second point will be the upper left corner.

Well, we figured out the basic rules, and now we move on to the direct private procedure. We select a wooden hatchet in the inventory, go to the first point we have chosen (the corner of the future private zone) and, by clicking the mouse button (left) on the block, we designate the first corner. You can also carry out and prescribe these actions directly in the game chat. To do this, stand on the initial block and type "/pos1" in the chat. A program message with the coordinates of the first point should appear on the computer monitor.

We carry out a similar procedure with the opposite coordinate point of the future private territory, only in this case you need to right-click. In chat, the command will look like this "/pos2". Recall that the chat is called on the screen using the "T" key. Do not be surprised that the program message in this case has two brackets. In the second bracket, you are shown the number of blocks that the private area will consist of.

Note! If the server has a limit on private zones, then exceeding this figure, you will most likely receive a software error message as a result.
Now the private area has been selected and marked - it remains to give it a name, as well as register a personal site. To do this, in the chat (key "T") type the command task "/ rg claim<название участка>". You can also use the more advanced option "/ region claim<название участка>". Remember that the name of the private zone in the directive is entered without brackets. As a result, you will receive a message in the chat about a successfully installed region with the selected name.

How to find out the name of a private region?
There are cases when a player or minor owner forgets the name of his private zone. In such a situation, the following steps must be taken:
- create a stick using a workbench;
- we get up in the privatized zone and take a stick in our hand;
- on one of the blocks included in the private, right-click: the chat will display the name for you.
There is also an alternative option, for this, in the same chat, you need to enter the "/rg list" directive.
How to add or block a friend in the private zone?
According to the rules of the Minecraft game, a private area is a player's personal playground. In order for your partner to still play in your private zone, you need to carry out an access procedure for him. Again we turn to the chat and enter the command task "/ region addmember [name of the private territory] [name (nick) of the player to be added]".

There are times when a friend who has gained access to your territory begins to interfere with your enjoyment of the game: breaks and steals your things. Then it is better to block such a "friend". To block an annoying user, enter the following directive: "/ region removemember [zone name] [nickname of the gamer to be removed]".
We remind you that all commands are entered in the chat. Please note that you can only delete friends individually, you cannot delete a group of users. For getting complete information about a private zone, you must specify the command "/ region info [private name]". The monitor will display information about the owner of the territory, the type and priority of the site, the list of allowed users.

Flags for private in Minecraft
Recall that a private region is the territory of a crafter who has the right to either use the set private parameters or change them at will. That's what flags are for. Note that flags can be used to either allow or prohibit certain activities on your territory. Keep in mind that the ban will apply not only to authorized users, but also partially to you, as the owner of the zone.
How to apply them? To apply the flag, you need to enter the following directive in the chat: "/region flag [private region name] [flag name] [option]". The parameter can be either "deny", in which case the action is prohibited, or "allow", in which case the action is allowed. The value "none" indicates that the effect of this flag is undefined.

The following flags exist in the Minecraft game:

Commands for private territory and other actions


We hope that our tips have helped you, and you will play the Minecraft computer game with even more enthusiasm!
Video
We are waiting for your comments, feel free to write!
Every day reminds us that someone hurt someone. And often “offended” is still very mildly said. And well, if not us. Minecraft is a small life. Here are the same troubles, only on a smaller scale.
There are normal crafters, there are not ah, but there is “there is a bad word here”. These third parties periodically force negligent players to tear their hair and recall the need they heard from someone to secure their territory. “Come on, evil fate is not up to me,” many say. We very much hope that our readers will not be reckless. Why, we believe that you are from a different test. That this article will serve you faithfully. Today you will learn what the words mean: privat, privatize, privatize. Believe me, these are super-important words.
To protect your territory in Minecraft, it is enough to privatize your site. Private territory in Minecraft- this is a restriction of access to it to other players, as well as restriction of them in performing certain actions on it. Before privatizing a region, of course, it must be selected. We’ll tell impatient readers right away that later you can easily privatize it.
Why you need to use private in minecraft

How to privatize a territory in minecraft? Some players are asking this question, and therefore, an article dedicated to this has appeared on our website especially for you. When playing on a minecraft server, you need to secure the territory, i.e. your house, in order to avoid adverse events. Private gives you protection from griefing in minecraft.
Grieving is the infliction of moral and material harm to players in computer games. If you do not protect the territory, then another player in your zone can dispose of all your property that you mined, built. In most cases, it turns out that the player who finds the player with unclaimed territory enters the door of the house and starts breaking everything and taking things.
In order to avoid such cases, a private was invented that will protect all your property, as well as things on certain territory that you have secured.
The locked house will stand in safety and tranquility.
Allocate territory for private
There are at least three ways to select a plot in Minecraft.
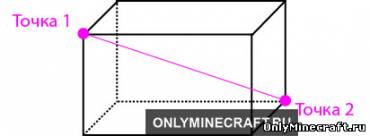
The most popular - with "axe" help. An ax does not have to be crafted, a command is enough //wand registered in the chat. The selection itself is achieved by two clicks: one with the left button at point 1, the other with the right button at point 2. As in the figure. This method is enough, but since Minecraft offers us others, we will tell about them.
So, number tou method . Stand at point 1 and write //pos 1. Then move your character's body to point 2. Chat entry again, this time //pos 2. Not difficult at all, right? You are almost close to securing your territory. But one step before "almost" to privatize her :)
Method number three . Aim at point 1 and again run to the chat to write a command - //hpos 1. You can't say more, I guess. But for some smart kids, let's say that then you need to aim at point 2 and write a similar command - //hpos 1.
Private commands
Once you have selected the region you have chosen, you urgently need to learn how to secure the territory in Minecraft. Well, privatizing it is generally indecently simple. Write "/rg claim [site name here]". Parentheses are for beauty, you don't need them. The name is up to you. This is the main command, but there are other necessary commands as well:
- /region define(/region redefine)- change of private.
- /region claim- allows you to assign a region to yourself.
- /region select- allows you to select a region.
- /region info- allows you to view information about the region. Only available when you already have a region.
- /region list- allows you to see a list of your regions.

Comment:
In order to fully privatize, you need to allocate not only superficially, but also in depth and height.
This can be done with the command // expand<кол-во кубов> <направление>
Direction can be selected by commands
- down - down
- up - up
Some additional useful commands
Here one could whisper: "Chao-cocoa!", Since the private territory has already been mastered by you. But there is no need to rush. Yes, you have learned to privatize, but there is still so much useful commands! And privatize, if that! And give other players the opportunity to chem on your site! In short, keep learning.
- So. If you suddenly get tired of your private property, you, as a decent crafter, will definitely need to take it away. And it turns out that a whole piece of the Minecraft world will be inaccessible to others. Team "/rg remove [site name here]"- this is what will allow the territory to be privatized.
- This and the following commands are from the category for, so to speak, advanced "privatizers". Remember the difference between owners and users of a region. The former can both move and delete the region, but the latter are only allowed to build and destroy. This is important to know. So. /rg addmember [site name here] [player nickname here]– with this command we add a crafter-user.
- /rg removemember [site name here] [player name here]– with this directive we evict the crafter-user.
- /rg addowner [here is the name of the lot] [here is the player's nickname]– add a crafter-owner.
- /rg removeowner [lot name here] [player nickname here]. There are suspicions, hurry to get rid of the co-owner, because he is also able to say goodbye to you. In the future, you will privatize alone.
Many players on Minecraft game servers are faced with such a problem as protecting their territory from other players. If this is not done - any other players can take it away and build what they want. There is a special team to secure their territory in Minecraft game. So how do you do it?
How to create a region in Minecraft on the server
First you need to highlight the boundaries of your region.
This is best done with red wool. Next, take a wooden ax in your hand (you can take it from your inventory or get it using the //wand command) and mark two private points with it. Mark one point with the right mouse button, and the second with the left. In this case, the second point should be high. In other words, the second point is the height of your private.


After you have marked two points, you need to register the following command for private territory: / rg claim REGION NAME. Then the inscription will come out: "The territory has been successfully secured."

Now no player except you can destroy anything in your region. You can also add your friends to private on minecraft server commands:
- /rg addowner REGION NAME PLAYER NAME - with this command you add the owner of the region. That is, he can add and exclude other participants in the private, including you.
- /rg addmember REGION NAME PLAYER NAME - with this command you add a member of the private. He cannot add people to private, but at the same time he can build whatever he wants on it.
Remember! To protect the territory, do not add anyone to private.