
Combining images in Photoshop with a stroke and blurry borders. How to merge two photos into one
For a long time I wanted to systematize the photos, and not just put them on the shelves, but make a selection on the topic “before and after”. When the situation around B remains the same, and the subject of photography, say, has grown or grown old. There are many similar photos on the Internet with people, and with animals, and joint ones. I didn’t try to use Photoshop, but in a simple and accessible way In Paint, this is what happened.
These are two photos a year apart. I already posted them.
Open the program
upload the first photo.

Stretch the size of the field with arrows so that there is room for the second picture.

Open the program in a new window, load the second photo, select it (a dotted frame appears) and copy it with the right mouse button or using the Ctrl + C combination.

Open the window with the first photo, put the cursor on the white field and press "paste" or Ctrl + V

We combine two drawings. I did it horizontally.


The Kholodov dental dynasty dates back to the middle of the last century. Newest technologies combined with the vast experience of generations is the best guarantee of quality customer service. Modern VV dentistry st.
Instruction
To stitch two photos together, you need Adobe Photoshop. Install this program - run it and add any 2 . It is desirable that the photos are of the same size, this will help to cope with the task. Click the menu "File" - "Open" or double-click on free space working . In the window that opens, select 2 files and click "Open".
Select any photo and click the menu "Select" - "All" (shortcut " Ctrl + A"). Then click the menu "Editing" - "Copy".

Now you need to create a blank canvas. To do this, click "File" - "New". A window will appear in front of you - in the "Settings" field, select "Clipboard". Notice the new canvas's width and height values. In order to fit 2 photos, you need to double the value of the smaller side by 2 times (). Add a few more pixels to the doubled value, this is done for a margin. Click OK.

After the new canvas appears, copy the contents of 2 photos one by one (“Ctrl + A” and “Ctrl + C”) and paste them onto our future photo (“Editing” - “Paste” or “Ctrl + V”). Move copied parts of photos for better composition. Then save the photo: click the "File" menu - "Save as" - in the "File type" field select "JPEG" - select the directory () to save - click "Save".

Related videos
Sources:
- how to combine 2 photos in photoshop
- Gluing scanned cards using PHOTOSHOP

You will need
- - Russified version of Adobe Photoshop CS5
Instruction
Run the program and open the necessary photos: click the menu item "File", then "Open" (or the keyboard shortcut Ctrl + O), if the files are in the same folder, hold Ctrl and click on each to select them and click the "Open" button. If photos are in different sections, the operation will have to be repeated.
Create new document: press Ctrl+N, in the fields "Width" and "Height" enter, for example, 1000, and then click the "Create" button. This document must be large enough to contain all three photos. If 1000 is not enough, enter more value.
Move all your photos. Activate the Move tool ( hot key V), click on photos and drag it to a new document. If arranged in a tab way, drag the photo first to the tab, and then to the document itself.
Make the new document active. It must contain all three photos. Perhaps they will be superimposed on each other, but this can be fixed. Find the "Layers" window, and then the "Layers" tab (if this window is not there, press F7). Each layer here (besides the background) is one of three photos. Select any of the layers by clicking the left mouse button. You should have the Move tool activated, but if not, select it. Hold the left mouse button in the working area of the document and move the active photo to the location you need. Do the same with the remaining two photos. If the location of the photos does not suit you, you can return to the "Layers" tab at any time, select the desired image and move it again.
If photos do not fit each other in size, select the layer with any photo and press Ctrl + T. Thus, you will call the command of free transformation of the object: on the sides and corners from photos square markers will appear. To resize the photo, hold Shift (so that the photo is out of proportion) and one of the handles, and then drag it in the direction you need. Hold Ctrl, select all three pictures in the "Layers" tab, right-click and select "Merge Layers" in the menu that appears.
Create another document and in the "Width" and "Height" fields, specify the dimensions that will match the dimensions of the layer based on the three photos you created in the fifth step of the instruction. It may not be possible to guess these sizes the first time, so you can try again. When you achieve the desired result, save this document: press Ctrl + Shift + S, select the path, specify Jpeg in the "File Type" field, write a name and click the "Save" button.
Related videos
Gluing photos- This is a kind of photomontage, which is often used by designers in their work. If the photos are the same size, it makes the job easier. With images different size you have to work a little longer, so using the program options it is better to make the image sizes the same.

Instruction
Install Adobe Photoshop on your computer. Run the program. Open the required images in it. From the File menu, choose Open. In the window that appears, find the files you need and click "Open".

If you've always wondered how to combine “two photos in one” - our new app has the answer!
This photo blender is the perfect “photo editor” for you and a great “photo montage app” where you can use your photos and add frames and effects to create extraordinary collages instantly by merging photos together. Just download our 📸Merge Two Photos into One Photo Editor📸, merge and overlay multiple images, gradually blend two photos, merge two photos in one and easily adjust the transparency effect. Choose the color, pattern and shape of your favorite photo frame and show your friends that image matching has never been easier. Take a transparent photo and then mix multiple photos into one amazing collage. Become a true picture manipulation pro and use our photo mix blender for free to create beautiful custom photos. Go and get it right now! Show your creativity, create a wonderful collage and have a great time with your friends!
🔸📷🤳📸🔹🔸📷🤳📸🔹🔸📷🤳📸🔹🔸📷🤳📸
🤳 One of the best easy-to-use photo editing apps;
🤳 Merge images, perform best image blending with transparency and mirror effect and various photo effects effects;
🤳 Take a picture with your camera or select an image from your phone gallery;
🤳 merge two photos together;
🤳 Add cute photo frames to decorate your montage;
🤳 Adjust photo blending and blending level and crop, resize, rotate and drag photos with the best image editing app;
🤳 Save photos to the gallery of your phone or tablet;
🤳 Merging two pictures has never been easier than now with our 📸Merge Two Photos into One: Photo Editor📸, try it out and share your photo with your friends on all social networks!
🔸📷🤳📸🔹🔸📷🤳📸🔹🔸📷🤳📸🔹🔸📷🤳📸🔹
Make your imagination free and enhance your pictures using the best photo blender collage maker!
You don't need complex blending programs to blend two photos, because now you can do great manipulations on your own phone.
If you have always wondered how to “blend two pictures together” - our new app has the answer!
This “photo blender” is the perfect “photo editor” for you and a great “photo montage” app where you can use your pics and add “picture frames and effects” to create unusual collages instantly with “blending photos” together. Just download our 📸Photo Blender - Mix Photos Editor📸, “merge and overlap multiple image”, “blend two photos” gradually, “combine two pictures in one” and adjust the transparency effect with ease.
Today's lesson in GIMP is about combining two photos (images) into one using elementary commands and graphics editor tools.
For example, very often when scanning, you get several different images of one whole fragment (drawing, page, large format drawing). And you need to get a digital analogue of this sketch in one file, but your A4 scanner cannot scan the full spread of your favorite magazine. Then after that you need to glue different parts of the photo into one, and here the free GIMP graphics editor will come to your aid.
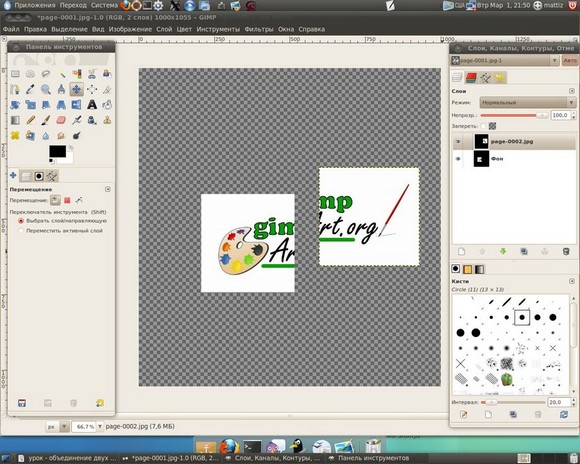
Step 1. Opening the images like layers, through the menu "File-Open as layers" and select our images one by one with the Ctrl key pressed.
Step 2 For freedom of action, we need to increase the working area, i.e. set new canvas size options. Thus, the images can freely fit unfolded on the "canvas". To do this, call the menu "Image - Canvas Size" and enter new height and width parameters.

Then with the help of the move tool we spread our layers apart on the canvas
Step 3 Select the top layer in the layer stack and reduce its opacity to 50%. In this way, we will ensure the visibility of the superimposition of the second layer on the first and achieve a better match between the elements in the image. In our case, it is necessary to get the matches of the captions on the photo, which we do with the help of the “Move” tool

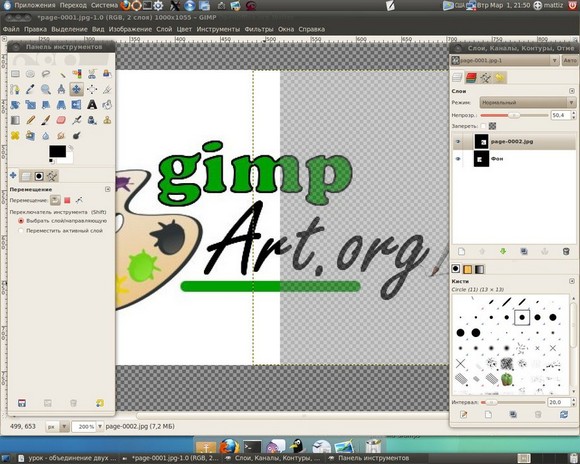
Step 4 Right-click on the active top layer and from the drop-down menu, click "Merge with Previous".

Step 5Using the tool "Image - Auto Crop Image" crop our photo.

Thus, in a simple lesson in Gimp, we learned how to quickly merge 2 photos into one. Remember, this is only an algorithm of possible actions that you will need to repeat when editing your images.

Thank you for your attention!
Gluing two or more photos into a single image is a fairly popular feature that is used in photo editors when processing pictures. You can combine images in, but this program is quite difficult to understand, in addition, it is demanding on computer resources.
If you need to combine photos on a weak computer or even on a mobile device, numerous online editors will come to the rescue.
Today we will talk about the most functional sites that will help you combine two photos. Gluing is useful in cases where it is necessary to create a single panoramic photo from several pictures. The considered resources are completely in Russian, so ordinary users will also be able to deal with them.
Method 1: IMGonline
The online editor for working with photos will delight users with its simplicity. You just need to upload photos to the site and specify the parameters for their combination. The imposition of one picture on another will occur automatically, the user can only download the result to the computer.
If you need to merge several photos, then initially we glue two pictures, then we attach the third photo to the result, and so on.

The site has many additional tools that will help you get the desired image at your disposal without having to install and understand the functionality of Photoshop. The main advantage of the resource is that all processing takes place automatically without user intervention, even with settings "Default" a decent result is obtained.
Method 2: Cropper
Another resource that will help you connect one image to another in just a few clicks. The advantages of the resource include a fully Russian-language interface and the availability additional features, which will help to carry out post-processing after gluing.
The site requires stable access to the network, especially if you are working with high quality photos.

Method 3: Create Сollage
Unlike previous resources, on the site you can glue up to 6 photos at the same time. Create Сollage works quickly and offers users many interesting templates for gluing.
The main drawback is the lack of advanced features. If you need to further process the photo after gluing, you will have to upload it to a third-party resource.

Joining a photo takes a few seconds, the time varies depending on the size of the pictures you are working with.
We talked about the most convenient sites for linking images. Which resource to work with depends only on your wishes and preferences. If you just need to connect two or more pictures without further processing, the Create Сollage site will be an excellent choice.