
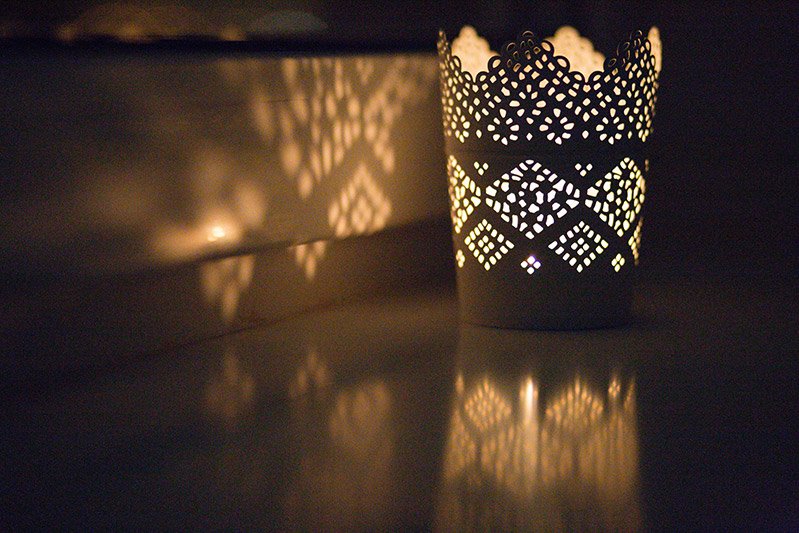
What is ISO in the chamber. Setting up ISO parameter in digital photo
Greetings to you, dear reader of my blog. With you in touch, Timur Mustaev. There are many disputes among photographers, how to configure the camera correctly, to obtain ideal photos and which parameters affect it in the first place. You probably think, here I bought a dear camera, and it is necessary to configure ISO correctly on it, and in general, what is it?
Setting is required for each shooting, and what it is and why it is needed, you will learn in the article. Yes, you do not bother so much, everyone will understand everything, you will understand everything by reading the article to the end. I really hope that you have already got acquainted with my articles about and, if not, it is better to get acquainted, since it depends on the other here, and in the amount this trinity is called exposure.
Our today's article will be interesting and useful not only to those who only bought a mirror photo appliance or is going to buy it, and those who have it has long been, and do not understand what Iso is in the camera and how affects the quality of photos with different lighting .
So, in front and with songs!
From the beginning to start with the decryption. ISO The camera is a parameter that determines the level of sensitivity of the pixel matrix to lighting. In other words, ISO is photosensitivity.
The indicator of the ISO above, the higher the sensitivity of the matrix or the film to artificial or natural lighting, the photo becomes lighter. But this leads to the emergence of noise or speaking by the professional language, the appearance of the so-called grain in the photo. Have you already probably met this? With an increase in the photo taken with poor lighting, points appear in the picture different colors, this is noise. Therefore, the correct understanding and configuration of ISO is very important.
Now about the main thing, how to set up photosensitivity?
ISO setup on camera
I want to immediately note that ISO or photosensitivity is one of the most important parameters on a row with an exposure and aperture. But now it's not about it!
The chamber may require the desired amount of light for high-quality photography with different values \u200b\u200bof the listed functions. An increase in ISO can be compensated by opening a diaphragm and / or decreased exposure.
To the picture quality remains as high as possible, it is recommended to install the lowest ISO, if possible. Well, of course, if necessary, the value can be increased, but the main thing is to remember the noise.
Sometimes, it is better to get a photo with a little noise than blurring.
I want to note that the result is an increase in the ISO parameter manages to increase photosensitivity, that is, the matrix needs less time to scan the image captured by the camera lens.
I will give some examples to help correctly perform the settings, given the time of day.
In the evening, with non-permanent lighting, you should set a high value, from 400 to 3200 ISO, this will reduce the exposure of the picture, improve the quality, provided that you are removed from the hands. Increased photosensitivity, often applies to shooting sports events in the room or in evening time day.
In the afternoon, especially with sunny weather, the parameter must be reduced to 100-200. Since there is no need for additional photosensitivity!
If the photography is carried out using the photo flash, it is not recommended to increase ISO. Shooting with low lighting with low sensitivity indicators, it is better to produce a fixed method, for example, to use a tripod or use some object, such as a windowsill or a fence for fixing the camera.

ISO installation on the camera
Now, let's look at how to install an ISO on the camera, and what you should not forget about. I will tell you immediately that it cannot be installed manually if you take pictures on automatic mode (AUTO mode). In this mode, the camera uses the automatic ISO mode. Manual installation Free sensitivity, can be installed only in modes:
- The aperture priority (A or AV);
- Exposure priority (S or TV);
- In software mode (P);
- In manual mode (M).
It is installed very easily. There are 2 ways.
- Setting on the camera itself itself. For example, in Nikon cameras, there is a Fn button. When you click on this button and not releasing it, screw the control disk. Thus, the ISO value will change.
- Settings in the camera menu. There you can set the appropriate parameter.
Automatic ISO.
It is convenient to use if you need that the camera would automatically install the parameter in the intervals you specify. It is very convenient when you take off in a poorly lit room, without using flash, such as sporting events. This parameter is easily installed in the camera's setup menu, where you can specify the minimum and maximum limit, for example, 100-1600 and before making other settings, the camera will only work within the specified framework.

Important. If used when shooting a flash, then it is better to turn off the ISO auto.
Automatic ISO is convenient for shooting sporting events. Exposure should begin from 1/1000 seconds and in short, so that the photos do not get lubricated. And without an increase in ISO values, it is impossible to achieve such an excerpt. Therefore, you can set the automatic value of photosensitivity, for example, up to 1600. Within the interval 100-1600, the camera itself will set the desired ISO value.
In conclusion, I want to add only one one. As soon as it appears to reduce the ISO indicator - do it! It is worth increasing, only when the shutter speed at a low mean sensitivity value becomes the length and the diaphragm is open to the maximum limit. It is also not worth using an overestimated indicator when shooting using flash.
On this, the article will finish. All I wanted to tell on this topic I told. If there are questions, wishes, write in the comments. If you like the article, tell your friends and acquaintances about it. Subscribe to my blog, and you can find out more useful informationwhich will fully use the camera and get high high-quality pictures.
Want to figure it out better in this parameter, and learn more about the foundations of the photo, then the video course " Digital Filler Diggle 2.0", It is for you. This course won much popular Among beginner photographers. After reviewing the course, I was struck by his quality of information. I recommend this video course.
And finally, I have a question for you. What is the ISO taking pictures and under what conditions?
All of your favor, Timur Mustaev.
Most cameras, with the exception of low-cost soapboxes, provide for manual ISO setup. And if professional photographers have this abbreviation for any questions, then not all lovers know about this important parameter in the photo. In what conditions the shooting can use the use of the manual ISO setup mode in the camera, we will tell below.
The ISO camera is a quantitative indicator of the sensitivity of the matrix to the light that corresponds to the specified manufacturer to generally accepted standards. Abbrevia is the following decoding: International Standards Organization. The sensitivity indicator is determined by the conditions of illumination and is indicated on the camera in integers 100, 200, etc. The range of available values \u200b\u200bin different models may differ. For manual tincture of exposure parameters - exposure and diaphragms - selection suitable meaning Sensitivity is an important point.
When installing small magnitudes of photosensitivity within 100, for example, to obtain a good frame good light is required. With small sensitivity parameter values \u200b\u200band proper choice Expolars snapshots are clear and clear.
Tip! Removing in a good light, you should follow the rule: a small ISO value \u003d high quality snapshot.
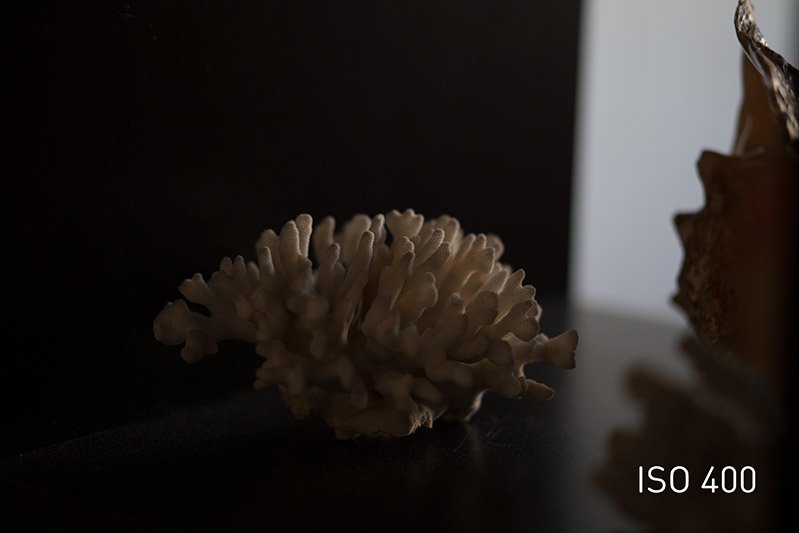
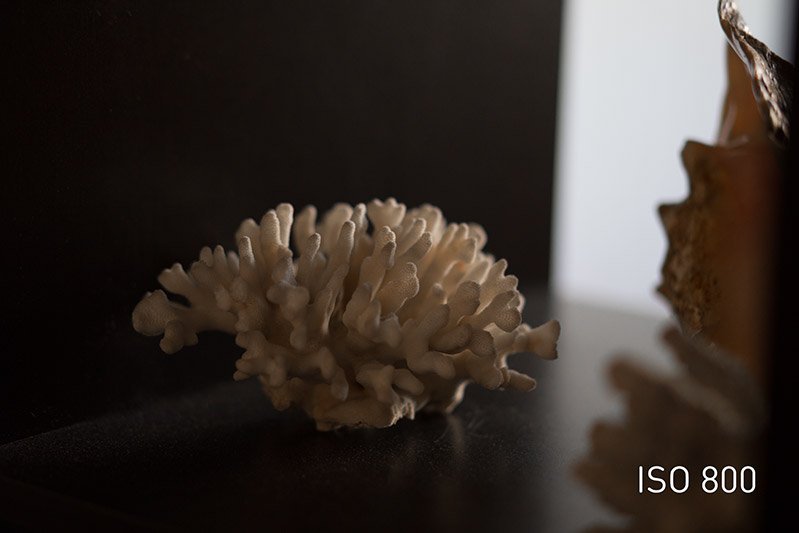
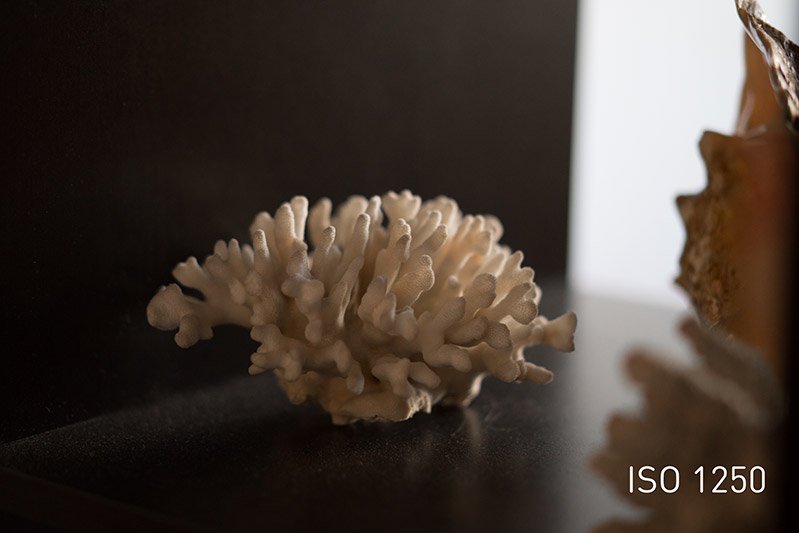
This rule clearly illustrates an example of images made with different sensitivity settings: 100 (left) and 3200 (right). On the frame on the right more noticeable graininess (digital noises).

Communication with other exposure parameters
ISO change directly affects exposure and diaphragm values. With automatic configuration, the camera itself selects the optimal exploratory. Manual setting assumes that this choice will make a user. Before setting the parameter, the following important points should be taken into account:
- the lighting level is whether the shooting object is sufficient;
- the dynamics of the frame (removed a fixed or moving object);
- to work out noise leveling options at low light, if the graininess in the frame is undesirable;
- the use of a tripod will help stabilize a frame with long exposure.
Examples of using different parameter values
For shooting in a clear sunny day Professionals are recommended to use the standard 100 or lower, but not higher than 200. Low sensitivity of the matrix with bright light provides good quality snapshot. The magnitude of the photosensitivity of the matrix 100-200 is usually used for studio filming.
When shooting outdoor B. cloudy days , as well as in the shade or indoors without additional lighting, the optimal values \u200b\u200bof the parameter will be ISO 200-400. Closely above, you can raise the setting when shooting at twilight time: Recommended limits 400 - 800.
Important! With the values \u200b\u200bof ISO 400 and the noises begin to appear in the pictures. And what they are more, the worse the image quality. Leveling the effects of noise can be selected aperture and exposure, use a tripod to stabilize the frame.

With higher ISO - 800 and higher values \u200b\u200b- you have to work in the following cases:
- shooting children on moving carousel and other moments with a dynamic movement of objects in the frame;
- on excursions to the museum, at a concert or in the theater, in other rooms, where it is forbidden to use the flash;
- when shooting memorable moments (blooming a candle on a cake, a kiss of newlyweds, a handshake and the like, when the use of the flash distracts);
- shooting sports competitions, demonstrations and marches;
- night shooting.

In the chamber of the phone and the camera is envisaged automatic setting of the sensitivity parameter of the matrix to lighting. This mode is convenient to use when there is no time to experiment with manual settings In order to obtain artistic pictures. Usually, automatic settings Enjoy lovers of Selfie.
Any digital photo equipment is marked with numerical measurement. Along with the resolution of the matrix, the zoom multipleness and other parameters the available range of sensitivity is indicated. This parameter only indirectly reflects the ability of the camera to remove under conditions with poor illumination.
Very high ISO, stated by the manufacturer on compact sizes with small photosensitive elements (matrices) - useless option in practice. Due to the large level of digital noise, with such values, the pictures will be represented by the red-blue masho points with a barely distinguishable image of the object. Figure illustrates the level of sensitivity of the matrix at different magnitudes of the sensitivity to the light.

In addition to the ISO range, it is important to pay attention to sensor size. All other things being equal in the noise level in the image will be below. But it is worth remembering that the better the matrix, the more expensive the camera.
Tip! For amateur shooting, the maximum sensitivity of the matrix 3200 is sufficient.
Most modern digital cameras offer users the ability to choose between the use of the ISO standard range and its advanced mode.
Experienced photographers understand well what functions of the camera are really useful, and which work is practically not used and added by the manufacturer as a marketing stroke. Newbies when choosing a camera can easily get easily confused in all the variety of options, for example, what iso is and how to choose the ISO's working range.
The choice between the regular and advanced ISO range

When changing the ISO value on a digital camera, the user regulates the signal strength, thereby changing the ratio of the forced enhancement to the readability of the light-crossing sensor. There are certain minimum and maximum ISO gain values \u200b\u200b- it is this range called regular. After decreasing or exceeding the standard indicators, the camera sensors cannot adequately read the data.

Until some time, the upper threshold of the mean sensitivity value was considered unshakable, but the rapid development of the hardware and the software of modern cameras made it possible to swall aside on incredible heights. The same applies to the lower value of the ISO range - modern machinery Allows you to significantly reduce it. In fact, photography using the extended ISO range resembles a post-processing of photographs in the computer, only this process occurs directly in the chamber itself.
As an enlarged ISO range can affect pictures
In cameras with a large ISO range, sensors are used with standard photosensitivity, the same as in conventional cameras. Extended ISO ranges, such as, for example, ISO 12800, ISO 25600, ISO 51200, ISO 102400 are obtained by using conventional sensors and electronic circuits whose light sensitivity is increased by software. It follows from this that the extended ISO range is nothing more than a marketing stroke.

Applications that the camera can take to ISO 102400 are impressive beginner photographers, but this does not mean that when buying cameras, they buy a sensor with such high photosensitivity. In fact, these values \u200b\u200bare achieved due to software, and often manifest in low quality pictures with large quantity Digital noise.

Photos obtained on extremely high ISO values \u200b\u200bwill look good only under the condition of black and white shooting, which reduces the advantage of cameras with an extended ISO range.
The attentive user will definitely notice that the camera in the extended ISO range makes frames in JPEG format, but not in RAW. This is due to the fact that when shooting in RAW mode, a digital negative is formed with minimal processing, as it expands the ability to post-converted frames using photo edits. (It is true that some manufacturers make it possible to use an extended ISO range when taking pictures in RAW-format.)

A certain benefit from the use of an increased range of ISO values \u200b\u200bcan be for photographers, shooting in JPEG format, who does not proceed later. It is still necessary to take into account that the quality will have to close the eyes.
To get the highest quality pictures that can allow the camera, it is necessary to figure it out in such a thing as sensitivity iso.. The article is intended for beginner photographers, so we will try to consider this topic visually and simply.
ISO sensitivity - what is it?
In the time of film photography, someone will remember how the film was selected for shooting in the room and for shooting on the street. The main selection criterion was the photosensitivity of the film. Film sensitivity 200 It was suitable for shooting on the street, with good lighting. But for the apartment needed a film with a sensitivity of 400.
Speaking simple language, ISO. - this is camera sensitivity level to lighting. Than less value ISO, the less sensitive camera to the light, and what mORE VALUE ISO, the greater the sensitivity of the camera. For changing the sensitivity of the camera, the sensor responds (that is, herself camera matrix). This is the main and expensive part in the chamber that collects the light and turns it into the image. At high ISO values, we can remove the image in low light conditions, without using the flash. But, depending on the level of the chamber, we get noise (grain in the image).
For clarity, look at the image below:
Consequently, noise is very noticeable at high values.
ISO values \u200b\u200bin modern chambers: 50 , 100 , 125 , 160 , 200 , 250, 320 , 400 , 500, 640, 800 , 1000, 1250, 1600 , 2000, 2500, 3200 , 4000, 5000, 6400 , 8000, 10000, 12800, 16000, 20000, 25600
ISO influence on exposure
As a diaphragm and exposure affect the exposure, we have already considered in previous articles. Now, in order to understand how sensitivity iso. It affects the exposure, consider photos taken with one value of the diaphragm and excerpt, the lighting during the shooting has not changed.

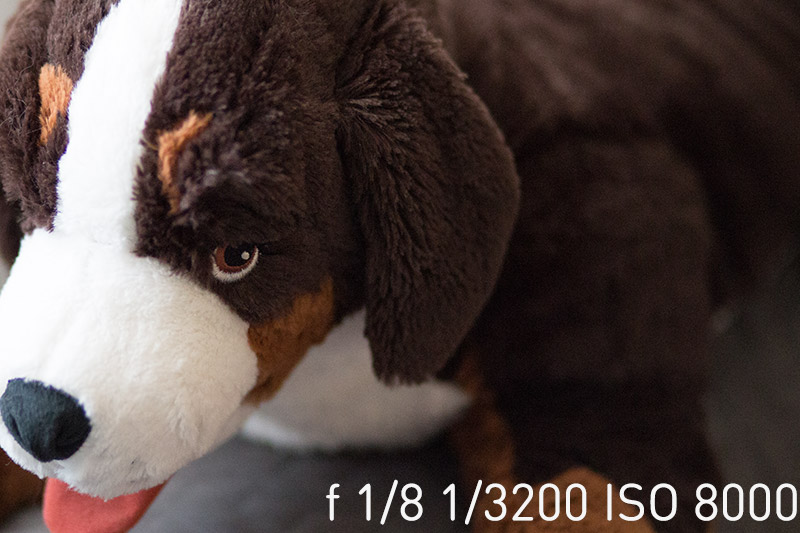
f 1/8 1/320 ISO 100 shot in the room


Increasing ISO value We help the camera sensor capture more light. With each ISO big value, the image becomes lighter.

ISO influence on image quality
As mentioned above, the greater the value of ISO, the more noise and artifacts are obtained in the photo. The detail is also reduced, the colors become dim. In the converters, you can always gently smooth the noise, but the quality will remain in a low level anyway.

ISO values \u200b\u200bfor different filming
The ISO parameter is usually the first thing to be configured in the chamber as soon as we are going to remove something.
ISO 50-200. Suitable for shooting on the street during the day. You can of course put and more, but do not forget about the quality.

f 2/8 1/500 ISO 200
ISO 400-800 It is already suitable for shooting in a well-lit room, either on the street in sunset lighting.

f 1/8 1/500 ISO 400
ISO 800-1600. For shooting in a dark room, where there is no possibility to use a flash
f 1/8 1/100 ISO 1600
ISO 3200. And above is suitable for shooting the starry sky or the Milky Way

Than guided by installing ISO
- Pay attention to the light, it is enough or not.
- Are you going to use an outbreak or not
- Will there be a shooting from a tripod
- Let's admit to the photo digital noise.
- There will be a dynamic or static scene.
Conclusion
Try to always shoot at the minimum ISO values. Open the diaphragm as much as the depth of field allows. If you use the flash, you do not need to put too much great importance Iso, average 800 more than enough.
And most importantly, experiment more!
What is ISO in the camera and how to configure it?The ISO value is one of the most important parameters when shooting, on a row with such as exposure values, aperture and white balance. ISO is often referred to as ISO sensitivity, ISO level, or simply sensitive matrix or film sensitivity.
Nevertheless, what is ISO in the camera settings?
ISO is a parameter indicating the level of sensitivity to the light of its light-capture element (matrix or film). Basically indicate ISO limits for cameras (cameras). Although, the same parameter can be found not only on the camera, but, for example, on the outbreak. For a flash, the master is usually indicated when using one of the ISO 100 values, or 200. ISO sensitivity is indicated in special ISO units. Self numerical expression ISO can take any integer expression from 1 to infinity. For example, on my SB-900 flash, you can set ISO from 1 (units) to 12,500, and on my camera Nikon D40 you can set the ISO value from 200 to 1.600.
Less - better!
The higher the value of the ISO, the more lifeline matrix. It is very important to understand that the higher the value of the ISO, the less time it is necessary that the matrix or film scanned the image from the lens. For clarity, I will give an example: we take off in the evening, there are few lights, the camera is set to ISO 100, while the camera in the aperture priority (either in any other mode) shows that the snapshot will be made with shutter speed 1 / 20c. This is a very long exposure, and at the same time we can get a blurred frame. Because to reduce the exposure you need to increase ISO. For example, we have increased ISO to 800, then the excerpt to decrease 8 times and will become 1 / 160c (one hundred and sixtieth second). If it were not for noises, it would always be possible to shoot at high ISO and never worry about the exposure, due to noises, it is necessary to reduce ISO and increase the shutter speed and in addition to worry about not to get a blurred frame.
Raise, close, reduce!
Exposure parameters, diaphragm values \u200b\u200band ISO are interchangeable. The number of the desired light chamber to build an image may be the same with different three exposure values, aperture and ISO. So, with values \u200b\u200bof 1 / 60c, F2.8, ISO 100 camera will receive as much light as the values \u200b\u200bof 1 / 30c, F2.8, ISO 50 or 1 / 60C, F5.6, ISO 400. In order to compensate Raising ISO, you need to close the diaphragm or reduce the shutter speed. On the contrary, it is also fair. You can increase the shutter speed, open the diaphragm and lower the ISO.
ISO affects noise

Super High and Super Low ISO
Multiple cameras have an extended range of ISO values \u200b\u200b- usually this is an ISO software, and they are referred to as Hi1, Hi2, etc. For example, for the Nikon D200 Hi1 camera is equivalent to the ISO 3200 value, and on the Nikon D90 HI1 chamber is equivalent to the ISO 6400 value. Remember that removing on such extended ISO values \u200b\u200bwill almost always be a very strong effect of noise pictures. I strongly recommend to shoot in the extended Upper ISO range on any chambers. Also, the range can be expanding to a smaller side, so the Nikon D90, D300, D700 camera has the values \u200b\u200bof LO 1, LO 0.3, LO 0.7 as equivalents for ISO 100, 160, 130.

What iso to choose a camera?
When choosing the camera, always look at the minimum and maximum ISO values, as well as remember that in 90% of cases you do not have to shoot at the highest ISO, since they often simply cannot provide normal image quality. Therefore, professional photographers have the concept of working ISO. Under the working ISO implies the maximum ISO values \u200b\u200bon which the camera can give an acceptable result. The cunning is that, unlike the aperture and excerpt, which in all cameras are fully given same values, the same ISO on different cameras can give miscellaneous noise. Therefore, in one camera, the working ISO will be 800, and in another working ISO will be 3200. For example, you can receive snapshots of acceptable quality on the ISO 3200, while on the Nikon D200 in ISO 3200 mode (HI1) is already obtained Not a photo, but complete nonsense. Very much the difference in the noise of ISO is felt on digital soaps, where the digital noise is often very very visible on ISO 400, and at the same time on mirror chambers ISO 400 is quite working.
What affects noise at high ISO?
The level of the camera's matrix is \u200b\u200bvery strongly affected at the level of noise at high ISO. The more the matrix, the less noise. Given that in compact cameras, the matrix is \u200b\u200bvery small, then the noise level it produces a huge one. You can explain very simply by pixel. On a large matrix, large pixels that can absorb much more light and thus make a strong electrical signal. It is logical that 12mm from soapboxes and 12MP with Nikon D3S will give different level Noise at high ISO. More information in my article The size of the matrix matters.
How is ISO measured?
ISO As well as the excerpt and the diaphragm is considered in the footsteps, for example, ISO 100, ISO 200, ISO 400, etc. The difference between ISO 800 and ISO 400 exactly twice or one stop, and between ISO 100 and ISO 1600 exactly 16 times or 4 stops. It is very bad that the Cameras are mostly available changes ISO only on the size of the foot. So, for Nikon D40 it is possible to manually set by ISO only 200, 400, 800, 1600, Hi1 and cannot be set an intermediate value, such as ISO 250, 320, 500, etc. On more advanced cameras, you can install intermediate values, but all The same ISO's fine control is practically no in any chamber. The most interesting thing is that in automatic ISO mode, ISO sensitivity can take any values \u200b\u200bsuch as 110, 230, 1400, etc.
Automatic ISO.
Almost all cameras are available automatic ISO. This means that the camera itself will select the optimal ISO value. Automatic ISO is very convenient when shooting with poor lighting, when it is used, the camera can squeeze the maximum quality. Basically, when using automatic ISO, you need to specify the maximum shutter speed and the maximum ISO value. Some cameras adjust the ISO under the focal length of the lens to prevent lubrication when shooting with hands.
An example of the operation of the car ISO
We decided to take a picture of the cat at home with a dim lamp lighting. We have a 60mm lens to avoid trembling hands, you need to shoot at an excerpt not longer than 1/60, because to be exhibited in the automatic ISO parameters of the maximum shutter speed equal to 1/60, as well as the maximum allowable ISO 800 in order to obtain the maximum image quality. When photographing the camera will try to lower the ISO, and adjust the excerpt. If the shutter speed is shorter than 1/60 and ISO is less than the minimum, then the camera will extend the shutter speed and reduce the ISO and will do it until it strives to the specified limit of 1/60 seconds, while we will get the most allowable exposure and the minimum possible ISO For photographing a cat. If the light is quite enough, then the camera will exhibit ISO 100 (or any minimum allowable) and any desired exposure is not longer than 1/60. If the light is catastrophically a little, the camera will maximize the possible ISO and will force the excerpt for the correct exposure. In general, I strongly reconcted to experiment with automatic ISO in the diaphragm priority mode, since the operation of automatic ISO is quite specific.
Little cunning
When using an automatic ISO and flash, it is better to disconnect the auto ISO, as very often the camera goes crazy and where you can actually lower the ISO, the camera puts the most specified and takes a picture with an outbreak. And in general, if there is a flash, you can safely use the lowest available ISO.
Another little trick
On a number of digital cameras in automatic ISO mode, you can set the maximum ISO, as well as the minimum. Sometimes, to set the minimum ISO, you just need to set the desired ISO value, for example 800. And then, with the maximum defined ISO 1600, the ISO 800-1600 operating range on which the camera will work is a very and very useful thing.
Gold Rule setting up ISO
Always remember about the golden rule - you need to shoot at the lowest possible ISO. As soon as it became possible to lower Iso - do it. Lift only when it is necessary. To lower the ISO lowest possible, open the aperture to the maximum. If there is a flash, do not use high ISO.
The ISO value is directly responsible for light sensitivity and no noise levels. The higher the ISO - the more noise and worse than the photo. The lower ISO - the better photography, But the longer excerpt.