Shooting in low light indoors. Secrets of night photography without a flash
How to work with flash on a reportage? Everything you need to know to shoot a beautiful reportage.
With the construction of the frame, everything is more or less clear - the laws of composition are the same for all genres, and the correct exposure can be set simply experimentally.
But with a flash, everything is somewhat more complicated - novice photographers do not understand what settings to set on the flash and in what mode to shoot.
This is exactly what we will talk about today - about working with a flash in a reportage shooting.
Many beginner photographers don't use flash at all for reporting. Just because they don't understand how to work with it. After all, it is much easier to use only natural light.
I will say right away: a flash on a report is a necessary thing. Just like without a camera and optics, without a flash, a reportage photographer simply cannot shoot with high quality.
In our post “How to choose a flash”, we already covered the basics of choosing a flash, and in my previous article “Sporty Photographer's Equipment”, I talked about flash accessories. If you are interested in learning about soft boxes, reflectors, boosters and strobe frames, you are in the right place.
Today we will talk about practical use outbreaks in the report.
On the set
So, you have arrived at the event, there is still half an hour before the event, there is time to "shoot".
First, let's look at the flash modes.

The report usually uses two modes:
TTL
Nikon has a TTL system called i-TTL, Canon has e-TTL.
The essence is the same - the camera itself sets the flash power, based on the analysis of the illumination of the frame. An almost universal mode suitable for most shooting situations.
Its main disadvantage is that if there is a lot of white or black in the frame, the flash can give out too weak or too strong puff. But this is not due to the operation of the flash, but to the complexity of the frame analysis.
This problem is solved by manually adjusting the operation of the TTL flash.
With experience, you will already anticipate situations when you need to manually change the flash output.
Are there 4 men in black coats in the frame?
Feel free to set the flash power to a step and a half less.

After all, the camera perceives the abundance of black in the frame as the "darkness" of the picture and gives a more powerful puff, completely highlighting black tailcoats and terribly burning people's faces.
Similarly, with a group of girls in white dresses or a person against a white wall in light clothes - a flash in TTL mode will give a weaker puff than usual, so you can safely “lift up” half a step-step of power

Manual mode
Working in manual mode (manual) requires a certain experience in reportage shooting and a good sense of the frame.
There are photographers among my reporting friends who constantly shoot with a flash in manual mode, but, in my opinion, it is worth working with a manual flash only in some situations.
First of all, manual mode is convenient for shooting in "static" conditions. A typical example is conference photography: all the subjects are sitting in the same places, almost motionless, the lighting conditions do not change, and you can safely set the flash output in manual mode.

Very often, photographers who hold the flash in their hand “on the go” work in manual mode (more on that below). When the photographer holds the puff in his hand, the conditions are essentially the same, and you can safely work on manual settings.
But I would not advise novice photographers to switch to manual for responsible shooting. In a reportage, the most important thing is not to miss a good shot, and working in manual mode, without shooting experience, it’s very easy to “ruin up” a photo.
We figured out the shooting modes, but this is only half the battle. The most important thing in working with flash is to get beautiful lighting in the frame.
Why does shooting with a soapbox produce such terribly boring, flat shots?
Everything is very simple - the flash works "on the forehead". That is, the light from the flash shines directly on the people in the frame and as a result - there is no “light pattern” and a three-dimensional picture, but only a poor flat light.
Therefore, the main rule of shooting with flash is work with reflected light.
Point the flash at the ceiling or at the wall - let the light bounce off it and "fall" on the people in the frame.

Volumetric light is the key to a good reportage frame
You will immediately notice how much more interesting the frame becomes with reflected light.
What to do when there is nothing to reflect from?
There are two options:
1) Puff "in the forehead", and then add life to the frame with processing (tools like Shadow / Highlights are especially helpful). But this is a terrible way out of the situation, since the light will be flat anyway.
2) Shoot "on the go". Many photographers use this technique: they put a large soft box or "burdock" on the flash, connect it to the camera with a sync cable and hold it at arm's length from the top left. Thus, they themselves put the light on the subjects of the shooting.
This method has one main disadvantage - it works really well only for big plans, a group portrait in this way makes little sense to cover.
As I already wrote in an article about flash accessories, all “fong jars”, mugs and other reflectors with diffusers can help indoors, but you definitely shouldn’t expect a miracle from them.
We figured out shooting indoors: if possible, we use a reflection flash, bad conditions - we hit “point-blank” or take the flash in our hand.
Now let's talk about what to do with puff on the street.
On the street
Many novice photographers are sure that a flash is not needed at all on the street. This is not entirely true. Or rather, not at all. A flash is needed, you just need to use it wisely.
For the most part, outdoor flash is used for two purposes:
1)
To highlight the shadows on the faces of people in the frame
On the street, “burdocks”, diffusers and other flash attachments are practically useless. To highlight the shadows, you can safely peel "in the forehead."
2) When shooting against the sun
Shooting against the sun is a classic outdoor flash technique.
Since today we are talking about working with flash on a reportage, we definitely need to talk about two things: radio synchronizers and color filters for flashes.
Radio synchronizers

We have already written in detail about what they are and how they work in our previous articles.
Working with radio synchroizers is already a different, higher professional level for a reportage photographer, which requires more shooting experience.
Therefore, at first, just get used to working with a flash on a reportage shooting, "shoot" to the manual control mode. And only then it is worth thinking about radio synchronizers.
As a rule, radio synchronization of flashes is used in a report in two cases:
1) When the photographer holds the flash in his hand "on the go."

For such shooting, radio synchronization is essentially just an alternative to a flash-to-camera cable. Radio synchronization allows you to do without unnecessary wires, which is very convenient.
2) The second use case is setting flashes on film set for better lighting.
A typical example is filming conferences or seminars.
The room is full of spectators and the speaker behind the podium. It's good when everything is in order with the lighting on the site - you can make a beautiful general shot of both the speaker and the auditorium.

Great room with good video light
If you work with a modern platform (for example, Digital October in Moscow), where all the amenities for the work of a photographer are created, everything is fine, there is nothing to worry about.
But when shooting in an ordinary hotel room, where most corporate conferences take place, the photographer faces one problem. The flash cannot evenly illuminate the entire room, and shooting without a flash does not allow low lighting.
And if you want to take a beautiful photo of the speaker and the auditorium, you simply won't be able to achieve uniform illumination of the frame - the light from the flash is not enough to highlight the speaker.
What do professional photographers do in such cases? Use radio synchronizers!

There was no additional stage lighting in the hall, so a flash with a radio synchronizer had to be installed between the speaker and the auditorium.
The photographer puts one flash with a radio synchronizer next to the speaker and can easily move around the auditorium - the speaker's illumination in the frame will remain unchanged.
An important point. Try to position the flash above the audience in the audience. You can put it on a table, cabinet, or ideally bring a flash stand with you.
If the flash is on the floor, the speaker and the hall will be lit from below, and this gives "demonic" shadows on the face and looks bad in the frame. Although if you are filming a conference of Satanists - everything is ok.
But putting light on the speaker is not always necessary. Very often, additional flashes are needed just to highlight the very room where the event takes place.
On one of the recent shootings, I specifically took three very revealing shots for this article. We filmed a conference big company, and one of the meetings was held in a large, elongated room.
Here's what the shot turned out if you shoot with one on-camera flash.

Terribly sad. The corners of the room fall into darkness - the on-camera flash cannot illuminate the entire room.

It has become better, but now the right corner noticeably falls into the shadow.
By adding a third flash, we got the desired picture.

Of course, there are no racks and flashes in the frames for the client - only a well-lit room.
small digression. Many organizers often do not understand why a professional photographer is worth his money and what he gets it for at all. For such working moments.
A professional reporter is ready for any difficult situation and knows how to get good shots even in bad shooting conditions. He has all the necessary equipment to work in difficult shooting conditions, and most importantly, he knows how to use it.
The client does not know about it (it is not necessary for him to know about it), he just always receives quality and beautiful pictures. This is the professionalism of a photographer.
But back to our topic.
Another option for using radio synchronization in a reportage is to organize a mobile studio.
Let's say you're filming a small party at a restaurant. Find a corner with a beautiful interior, put your flash on a stand and set up a beautiful key light.

Let the flash with a synchronizer stand on the stand - after all, most of the time you will be shooting classic reportage shots.
But if guests want to take beautiful staged photos, you will have all the conditions for this.
Of course, you can set the flash on the stand to light trap mode, but then it will fire every time one of the guests takes a picture with their camera. Working with radio synchronizers, you have full control over the shooting process.
color filters
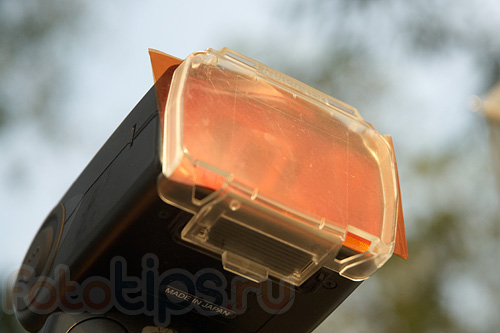
Color filters for flash, or as they are also called color gels, are an indispensable thing in reportage photography.
In fact, these are simple color films. You can buy specialized sets of ready-made flash gels, or you can just buy several different sheets of color film and cut them into rectangles. The effect will be the same, but 5 times cheaper.
As a rule, gels are used in two cases:
1) To bring the color temperature of the light from the flash closer to the conditions of the room where the shooting takes place.
How does it work in practice?
Very simple. Let's say you are shooting in a room where all the walls are yellow-orange, and the room is lit with yellowish lamps.

If you shoot without color filters on the flash, the entire foreground will be illuminated by colder light (from the flash) in the frame, and the entire background will be yellow-orange.
The fact is that since the light from the flash is colder than the color temperature in the room, you will have to choose which light to set the white balance to: either the cold light from the flash (then the backdrop will be excessively “warm”) or the main lighting in the room (then people in the foreground will be bluish-cold).
Putting a color filter on the flash, we roughly equalize the light from the puff with the lighting in the hall. The only thing left for us to do is to manually select the appropriate white balance, as a rule, this is a figure in the region of 3000 Kelvin.
2) The second case when gels are used is in order to create a color contrast between the foreground and background.
Let's say you're shooting in a boring (lighting) room, and you want to somehow "revive" the picture. A very effective technique is to make the foreground warm and the background cold.
Do not confuse this technique with the first point - there we are struggling with the problems of lighting a room that does not look good in the frame. Creating a contrast of "cold / warm", we do it consciously and only in those conditions that allow it to be done.
Typical example:
We shot for Mercedes at one of their showrooms. Good, spacious room, but boring in terms of lighting.
Here's what we got by simply putting an orange color filter on the flash:

This is a test shot with me in the foreground and the dealership in the background. How did this picture come about?
To begin with, we set the color temperature on the camera in the region of 2500-3000 K. Thus, the daylight became bluish-cold.
But then the foreground should have turned blue. That is why we used the gel on the flash - the flash shone orange on people in the frame, but thanks to the cold WB, we get natural colors in the frame.
How does this apply to reporting?
For example, you shoot during the day in a room with large windows. Excellent - we put the gel on the flash, set the “cold” BB and go ahead - the client will definitely be pleased with the “unusual” shots.
Also, gels are often used to illuminate the model with colored lighting, but this is a separate conversation and not about reporting.
Another technique for using flash gels is to add bright, colored colors to boring room lighting.
Six months ago, Anton Marakhovsky and I filmed a corporate event in a completely dull (in terms of lighting) room.
In order to somehow enliven the picture, we put one flash with a purple filter in the interior of the restaurant, and the second (with orange helium) on the music speaker near the stage.


And this is only part of the techniques for working with flash in a reportage, the basics that you need to know to work at events.
Another big and very interesting topic- Art photography with flash. But that's a story for a completely separate article.
Getting bright, clear photos in good natural light can be a photographer with any level of training, even if he shoots with a regular “soap box”. The situation is quite different when shooting in low or low light conditions. Needless to say once again what role light plays in photography. Some beginner photography enthusiasts honestly believe that the key to good, sharp low-light shots is to use an advanced, more expensive camera.
However, as practice shows, a high resolution The matrix of the camera, neither the built-in image stabilizer, nor the multiple zoom does not help in any way when it is necessary to obtain high-quality, clear photographs in low light conditions. The same applies to the use of flash, which often does not bring the desired result. Today we will talk about how to improve the quality of your photos when shooting in low light conditions without a flash.
Palace of Catalan Music, FR 52mm, F3.5, ISO 800, 1/20 c
Why do low-light pictures turn out bad?
Before talking in detail about what ways to improve the quality of photographic images exist when shooting in low light conditions, the most important thing to say is why in such situations the photos are so poor and poor quality? Indeed, often when shooting outdoors at night or under the light of a dim light indoors, photos look blurry and not clear. The thing is that light plays the decisive and most important role in photography. If there is not enough light on the photosensitive matrix of your camera, then most likely you will get pictures of unsatisfactory, poor quality.
What to do in such a situation? The way out suggests itself - the use of a flash. Almost all modern digital cameras are equipped with a built-in flash, which, it would seem, is just designed for such situations. But, in fact, the use of flash often leads to undesirable and unpleasant effects. After all, a flash in low-light scenes is like a burst of light, which causes the objects you want to photograph to be lit in the frame too brightly, harshly, and therefore look unnatural.
The built-in flash simply “destroys” the whole idea of the picture with hard and deep shadows or, conversely, with lighted areas. The foreground can come out quite flat in the photo, while the background will be underdeveloped. At the same time, photos taken in low light without using a flash look much more natural and beautiful. Of course, such a result can only be achieved with the right approach to the shooting process and the availability of the appropriate skills for the photographer.
 Palace of Catalan Music - Stage, FR 52mm, F4.5, ISO 800, 1/15 s
 In some cases, the use of a flash is generally undesirable, since the flash may spoil the natural lighting of the scene or frighten the subject in the frame. Flash photography is prohibited in many museums and galleries, and the lighting situation in exhibition halls is far from ideal. And when photographing evening landscapes, the flash can generally do the photographer a disservice. In this regard, you have to think about how to improve the quality of photographs without using a flash, that is, by other means. And here there is only one option - to catch as many light fluxes as possible in the optical scheme of the camera. The more light is on the surface of the photosensitive sensor, the more likely it is to get a high-quality, bright frame.
Improving the quality of photos when shooting without a flash
Modern digital photography offers us several ways to ensure that the camera matrix captures as much light as possible:
- Sensitivity settingsISO
Perhaps the easiest and most logical way is to raise the ISO sensitivity in the settings digital camera. This parameter determines how much light hits the sensitive sensor. The ISO value can be squeezed to the maximum, but the problem is that high sensitivity, although it allows you to capture more luminous flux, but at the same time increases the likelihood of noise in the photo. In this regard, it is recommended not to twist the ISO too much, but to raise the sensitivity value to the optimal level for your camera. This could be, for example, ISO 400 or ISO 800 in low light.
You may get some noise in your pictures, but it can be easily removed with post-processing software. Raising the ISO is the best solution when photographing in dark enclosed spaces or in a concert hall. Also, adjusting the sensitivity settings will be useful when shooting moving subjects in low light conditions.
 Trevi Fountain, FR 27 mm, F5.6, ISO 100, 2 s
 - Optics and aperture
If you often shoot in low light conditions, then it is worth getting a good fast lens. Optics with aperture f/1.4 - 1.8 will allow you to take better pictures in low light. Opening the aperture is one way to solve the problem of lack of light in the frame. It is desirable, if photographic equipment allows it, to open the aperture to the maximum. This allows more light to hit the camera's sensitive sensor, resulting in better, brighter pictures.
The more you open the aperture, the slower the shutter speed will be required to correctly expose the frame. It is best to switch to aperture priority mode to be able to manually set suitable values. For example, f/2.8 or f/1.4. When opening the aperture to maximum, be careful, as this increases the risk that bright objects in the frame will be too blurred, and the background and poorly aligned objects will remain poorly developed. So here, as in the case of photosensitivity, you also need to find the most correct value.
- Long exposure and tripod
Another way to shoot in low light conditions is to use slow shutter speeds. True, this option is only useful when shooting stationary objects or landscapes at dusk. The optimal shutter speed is determined by the lighting conditions of the scene and usually ranges from 1/60 to 10 seconds. When choosing a shutter speed, you should focus on medium-lit objects in the frame. When using slow shutter speeds, keep the ISO settings at a minimum to eliminate noise.
Long exposures will of course require you to use a tripod. This is necessary to avoid blurring the frame due to the slightest movement of the camera. It is also recommended to get a cable release or use the shutter timer to prevent any movement of the camera. If a tripod is not at hand, then you can simply put the camera on the curb, railing or ground, tightly clasping the camera body with both hands. The main thing is to ensure maximum immobility of the camera during the exposure of the frame.
By choosing one of the above methods. You will be able to ensure that enough light hits the sensor so that the photo is of acceptable quality. It is worth mentioning a few more practical advice for how to shoot in low light without a flash.
 Universita’ degli Studi di Roma La Sapienza, FR 27mm, F3.5, ISO 100, 4 s
 First, try not to use digital or optical zoom. It reduces the amount of light entering the matrix, which negatively affects the quality of the photographic image. This is especially true for digital zoom. If there is a need to get closer to the subject, it is better to get closer to it than to use the zoom.
Secondly, even if your camera has a so-called "night mode" of shooting, it is better to refuse it and use semi-automatic or manual mode. This will allow you to have more creative freedom, achieve better results when shooting in low light conditions, and at the same time thoroughly explore the capabilities of your camera. If you set the manual settings correctly in accordance with the characteristics of the lighting, you can get really high-quality and unusual results. Try manually setting the shutter speed and aperture, use spot metering, adjust ISO settings and white balance. Also, in low light conditions, it is advisable to shoot in RAW format to preserve maximum details. Thanks to this, you will get more opportunities for correcting minor defects in the photo image and adjusting the results in a graphic editor.
Thirdly, if you are photographing in low light, be sure to first take a few test shots with different settings and different modes to understand how to achieve a better photo. You can also take a picture with the built-in flash to compare it with photos taken by changing manual settings(increasing ISO, opening aperture or slow shutter speeds). You can compare individual frames directly on the LCD using the zoom function. Sometimes a photo taken using the built-in flash may be more acceptable in quality. For example, in cases where the background does not play a special role for you, it is only important that the subject is well lit.
So, in order to get better images in low light without using a flash, you will have to make sure that as much light as possible hits the camera's sensor. To do this, you can increase the sensitivity of the sensor, open the aperture as much as possible, or use slower shutter speeds by mounting the camera on a tripod or a reliable support. You will certainly improve the quality of your photos in low light, and individual small image defects can always be removed using specialized software.
On-camera flash is a tool that many photographers have, but not everyone knows how to use. Every day I see this amazing piece of equipment being wasted throwing a harsh light on the subject when it can be wrapped in soft, directional lighting. Flash, that's a sculptor's chisel, not a sledgehammer. You only need to know a few basic techniques.
Of the 400+ weddings I've photographed over the years, a lot of the indoors were shot with flash. I have a suitcase full of studio lighting that I occasionally use at events, but more often than not, I prefer my little on-camera flash (don't confuse it with the built-in flash). You can create beautiful light bouncing off walls, ceilings, mirrors, professional wrestlers, or a flock of sheep.
Let me illustrate with a few examples using my favorite model, my wife Karen. Each of these photographs was taken with the same lens (50mm), shutter speed (1/180) and aperture (f/4). We also didn't move at all. We are 10 feet from the gray paper background, white walls to the left and right about 7 feet apart. The ceiling is also white. The only difference in these photos is that I'm changing the direction of the flash.
What not to do

In the first example, I photographed Karen with direct flash. (She laughs because she thinks I don't know what position the flash is in).
This is a sharp, flat light. There is an unpleasant shadow in the background. This is the opposite of reflected light and is generally extreme case flash position. Go ahead.
A little better

Here I improved things a bit by bouncing the flash off the ceiling. The light is softer, but it's still coming from above, creating unattractive shadows under her eyes, and there's not enough glare in her eyes. We can do better!
Looks good

Here, I've set my flash to the side so that the light bounces off the wall to my left, giving a softer, better directed, and more dimensional light. I think this is what you need!
What's going on here?

For fun, I rotated the flash from top to bottom and aimed the light at the floor, so now the light is coming from below. We call it Franken light (monster light). This isn't something you'll often need, but if you're hired to photograph a vampire, this is a good scheme to have in your kit.
All of these photos illustrate the two main factors I think about when shooting with bounce flash: the direction of the light and the quality of the light (softness).
Direction Sveta
It just refers to the direction from which the light comes; something that is very easy to control with bounce flash. If you aim it at the ceiling, the light will bounce onto the object from above. If you point the flash to the side, then the light will return from the same side, and so on.

Check out this simple wedding guest portrait (above). The woman is looking to the right, so I bounced the light off the wall on the same side and got a nice light on her face. If the other person I want to photograph is looking the other way, all I have to do is rotate the flash 180 degrees and bounce the light off opposite wall. That kind of versatility is great when shooting events.

In this photo of the newlyweds walking down the aisle, I have flash light bounced off the wall on the left. If you look at the people in the background, you get a general idea of the lighting there.
The most beautiful light usually comes from the side, not from above. If the flash fires at a 90 degree angle to the left, the light will return from the left also at a 90 degree angle. By the way, from this angle you can get beautiful light at dawn and at sunset.
Quality Sveta (softness)
The softness of the light is mainly affected by the size of your light source. With bounce flash, this is the area of the wall or ceiling that the light bounces off. I think it's the most complex concept for people trying to reflect flash light. Just think of your light source as the surface illuminated by the flash (not the flash itself).
The larger the light source, the softer the light. In other words, the larger the area covered by the flash, the softer the light reflected from it will be. To cover a larger area, simply move further away from the reflective surface to allow the flash light to spread more. Many flashes have a zoom that allows you to create a narrow or wide beam (a wide beam allows the flash to spread faster, and vice versa).

It can be hard to imagine, so I took some pictures to illustrate how it works. In the first photo (above), my flash is fully expanded to create the widest beam possible. I then pointed it at the wall in my studio about 10 feet away. As you can see, the flash illuminates most of the wall. This allows for soft, beautiful light to reflect back towards us.
In the second photo (below), I placed the flash closer to the wall with the same zoom. As you can see, already a smaller part of the wall is illuminated, which means that the light source has become smaller (harder - less soft).

In the third photo, I left the flash in the same position, but closed the zoom. Therefore, the light source is now smaller (the area of the wall that reflects the light is the light source).

You can shine your light across the entire ballroom, for example, and it will come back soft and beautiful. In the photo of loving parents listening to the wedding speech, my flash light traveled 20 or 30 feet to the wall and back. The further it goes, the wider it spreads, and the softer the lighting is. Wonderful!

The issue of flash power and complex locations
There is a limit to flash output, and therefore to how far you can be from a reflective surface. Fortunately, with a digital camera, you can easily take a few quick tests to see how far you can go.
For example, let's say you're in a large conference room and you're photographing a speaker at the annual prune vendor convention. The hall is lit only by those awful ceiling lamps, and if you don't improve the situation, you will never get a job with this client again. So you're trying to bounce the flash light off the wall on the speaker's left side, but your flash isn't powerful enough to do so. Your image is underexposed and the camera battery is exhausted to recharge the flash.
In this situation, you can try a couple of different ways to fix the problem:
- Raise the ISO as high as possible.
- Open the aperture as much as possible.
- Close the flash zoom all the way down to make the beam of light bouncing off the wall straight.
If nothing works, then you will probably have to resort to a direct flash, but this should be the last resort.
Of course, you are not always in a room with white walls, but if you look around, you can find something to reflect the light from. White ceilings and dark wood walls? Bounce the light off the ceiling (but try to point the flash a little to the side to give the light some direction). You can reflect the beam from a dark surface. If it's not completely black, it will still reflect some light.
I bounce flash off everything from brick to wood paneling, although it must be admitted that such surfaces absorb a lot of light and drain batteries faster, so they're not perfect (they also give the image a tint).
When I walk into a room where I'm going to use bounce flash, I immediately look around and think what could be the reflective surface (light source). I identify surfaces that suit me (mostly light/reflective) and place them to take advantage of them.
Let's look at a few more examples:

These newlyweds had their first wedding dance at the Peabody Library in Baltimore, in a very large space that doesn't even have solid walls, just columns, due to the way the shelving is arranged. I increased the ISO to 4000 and was able to bounce the flash to get nice light in the photo.

I also include a photo of the entire space so you can see where I have been working.

This sleepy little girl was photographed at a wedding reception at a country club in Virginia. I bounced the flash light off the wall 30 feet to my left, and got a little help from the purple lighting in the background.

This wedding portrait was taken at night at Camden Yards in Baltimore. It was outdoors and there was nothing I could aim the flash at, so I had an assistant hold a white reflector behind me and to the left of the camera, where I pointed the flash.
As I write this article, I am sitting in a restaurant with a black ceiling, dark walls, dark carpet, and dark furniture. This is a truly light-absorbing space, but there are some framed photographs and a mirror. I'm sure I could bounce light off them and get some decent light if needed.
You can quickly master the art of reflecting flash light. Once you become familiar with the possibilities, it will be a matter of experimenting and refining your technique. Take a look around and ask yourself what you can use to reflect the light. Look at your subject and think, "Which side would the best light come from?"
Then try pointing the flash to the right, to the left, behind you. Once you know this, you'll be the flash bounce master! Do you want to learn how to take photos like in glossy magazines using a regular external flash? If so, feel free to click on the picture below.

Shooting in dark rooms is very difficult, especially for a beginner photographer. Here are some tips to help you get good shots when shooting in dark places. Of course, the places and types of shooting are very different from each other. A lot depends on what you're shooting. For different types of shooting and the required quality of photographs, you will need different techniques.

Dmitry Bashaev >
If you're shooting custom weddings or christenings, your shots must be of a certain quality and must be free of noise. If you are filming a friendly party or concert in order to show pictures on the web, you do not need to have a full-frame camera and a fast lens. Compacts with fast focus are quite suitable for shooting friends, parties and other domestic events. SLR camera you will need for shooting christenings, weddings, corporate events, etc. For events professional level(reports, political meetings, etc.) already need special professional equipment. Expensive professional equipment makes it easier to shoot in difficult conditions, such as shooting in dark places, but whether it is needed for your tasks is up to you.
Let's talk about the basic principles of shooting in dark rooms.
1. Camera stability.
You will have to shoot at slow shutter speeds and any movement of the camera can affect the quality of the image. If you're shooting more or less static scenes and don't need to constantly move, use a tripod or monopod (if allowed). In the theatre, for example, you can try to stabilize the camera on the back of the seat. Do not hold the camera at arm's length when shooting.
Some lenses have a stabilizer, but it will not be able to compensate for strong movement. Try resting your elbow on your stomach, relax, hold your breath, and gently press the shutter button.

Arman Zhenikeyev
2. Equipment.
As we wrote above, it all depends on your goals and objectives. It is optimal to have a full-frame DSLR with a fast lens (2.8 or higher). The professional reportage level camera has a fast focus and shoots on full frame. The noise in such a camera is 2-3 steps lower (i.e., the noise on it at ISO 6400 is the same as at ISO 800). What does it mean? This means that you can shoot at faster shutter speeds.
A fast lens gives a sharper image and makes it possible to use f-stops of 2.8 (on expensive zoom lenses). Whale zooms have a minimum aperture value of 3.5-5.6. Those. the short end loses by 2/3 steps, the long one by 2. What does this mean? You can shoot with a shallower depth of field and reduce the sensitivity by one or two stops, for example, use ISO 400 instead of ISO 1600.
Professional equipment allows you to solve problems that are not easy to solve with conventional equipment. But professional equipment is expensive and it is worth considering whether you need it to solve your problems.
3. Flash
If you try to shoot on the automatic in dark rooms, the flash turns on. In most cases, you will simply destroy the existing lighting. If you are shooting in a theater, the distance from your seat to the stage will not be captured by the flash and it will be ineffective and disturb other viewers. If you shoot a friend in a dark bar with a flash, you will get a picture with a face against an almost black background that the flash did not reach. Everything else can be bleached. Expensive flashes will allow you to shoot “not head-on”, even with slow synchronization they will help you freeze movement or simply highlight the subject from the background.
The flash should not be the main subject when shooting. It only helps to fill in the shadows, to separate the object from the background, to highlight a little. Never use flash head-on. Sometimes the flash can be directed into the stream, but first look at what color the ceiling and walls have. If they're not white, you'll be tired of fixing color reflections in the editor.
Use “slow rear-curtain sync”” , as the flash mode (in Canon rear curtain, in Nikon slow-sync rear).

"the sanctuary" captured by Federico
4. Exposure
As a rule, you will have to shoot at fairly high ISOs - from 800 to 1600, in new semi-professional cameras you can raise the ISO to 3200 and more. Try to shoot at fast shutter speeds (depending on the subject), and wide open apertures (between 2.8 and 4.0). If you shoot mostly on automatic, you will get the best results when shooting in "night mode" (or similar modes).
5. Exposure.
For different kind Shooting needs different shutter speeds. If you're shooting sports in a more or less well-lit room and want to freeze motion, you'll need shutter speeds of 1/120 or faster. In concert halls, the rooms are darker, but to freeze motion, you will still need shutter speeds of at least 1/60 to 1/100.
In a theater where there is movement, you may be able to shoot at shutter speeds slower than 1/60. In the museum, objects don't move, you can use shutter speeds below 1/60, while choosing a lower ISO and closing the aperture a little.
Change settings and try. Raise the values up a notch, go down a notch. In some cameras, you can set the ISO to automatic, but so that the ISO does not drop below a given value. Remember that long exposures require camera stabilization. You can shoot with hands at shutter speeds of no more than 1/60 (if strong hands - 1/30 / 1/40). This is usually the reciprocal of the focal length of the lens (or slightly longer if you have strong hands). For example, if you are shooting wide angle lens at 28mm, shutter speed should be no slower than 1/25s unless the subject is moving fast. If the focal length is 80mm, and the shutter speed should be set to about 1/80s.
6. Underexposure.
Sometimes you may not have enough sensitivity and aperture to get the correct exposure. Instead of slowing down your shutter speed and guaranteeing a blurry image, keep your shutter speed down and take an underexposed image. If possible, shoot in RAW. In your photo editor, you can tweak the exposure a bit.
7. Noise.
If you open the aperture and the shutter speed is no longer fast (Lo flashes in the viewfinder), you will have to increase the ISO. By doubling the sensitivity, you gain a full stop of exposure. With ISO, noise also increases. It can become an artistic device for your photos, but it tends to get in the way. Modern DSLRs shoot quite tolerably up to ISO 1600
Remove noise in post-processing, for example, in Lightroom, you can move the slider for color noise beyond 50, light no further than 30 with large noise. This must be done very carefully so that the picture does not become plastic. Photoshop has a filter that will help you remove the noise. There are also many plugins for Photoshop in which you can get rid of some of the noise in the pictures.
8. White balance.
The easiest way to shoot is to set the WB to automatic or shoot in RAW and fix the WB in post-processing.

"launching" captured by Federico
9. Focus.
Generally, your camera will not be willing to focus in the dark. You can switch to manual focus mode, take a test shot by shooting the subject at the same distance as the main subject. Autofocus may miss in the dark.
10. Post-processing.
So in the editor you have to edit the white balance and ISO. The easiest way to do this is if you shot in RAW.
Everything we have said is just Starting point for experiments. We wish you great pictures!!
How and in what mode to take pictures indoors? Beginning photographers have a lot of difficulties with this. The article will focus primarily on the creation of an artistic portrait, and not on a photo for memory. In this case, we must not only capture some moment in the photo, but also try to make the frame beautiful, aesthetic.
NIKON D810 / 85.0 mm f/1.4 SETTINGS: ISO 125, F2, 1/125 s, 85.0 mm equiv.
From the point of view of the camera, the lighting in any room will be insufficient. Therefore, you need to think about the location of the shooting, and about correct setting don't forget the settings.
Of course, there is always the option to use the flash. But the built-in flash will give not very beautiful, flat lighting, and ugly highlights may appear on the face of the model. With an external flash, it will be the same if you direct it frontally, in the forehead. But if you turn it to the ceiling, then the lighting will turn out to be more natural. But external flash not everyone has it. In addition, shooting not with a flash, but with available light, you can get interesting lighting more interesting.

It is important to choose a well-lit place to get high-quality shots. You can take pictures near the window. It is best to turn the model slightly sideways to the window, then the lighting will fall on the face naturally, emphasizing its volume. But it makes no sense to shoot against the background of the window: the face itself will not be lit and most likely it will turn out dark, and the window will come out too light.

Of course, it should be light outside the window so that light falls on the face of the model. To further soften the lighting so that unpleasant contrasting shadows do not appear on the face, the window can be closed with a tulle or a light curtain.
In addition to the window in the room, there are other sources of lighting. Use them! A person can be placed under the light of a floor lamp or table lamp. Compose the frame so that foreign, distracting everyday objects do not fit into it. On the occasion of taking pictures at home, you can also clean up.
An interesting technique when working in a confined space is shooting through a mirror. When we photograph in a cramped room, shooting through a mirror will help visually expand the space in the picture.
How do I set up my camera for indoor photography? When we shoot a scene in low light, the first thing to watch is shutter speed. If it turns out to be too long, the picture can be blurred both from camera shake in the hands and from the movements of our model. A person cannot completely freeze in place, so it is worth shooting at shutter speeds shorter than 1/60 s. It is most convenient to control shutter speed in mode S (“shutter priority”).
When shooting indoors, it is convenient to use high-aperture optics. It will allow you to shoot in poorer lighting with a short shutter speed, and the background will blur more beautifully. At the same time, it is not very convenient to work with long-focus lenses indoors. Therefore, for cameras with an APS-C sensor, it is appropriate to use lenses with a focal length of 28mm (Nikon AF-S 28mm F / 1.8G Nikkor), 35mm (Nikon AF-S 35mm f / 1.8G DX Nikkor) or 50mm (Nikon AF- S 50mm f/1.4G Nikkor). For full frame cameras fit 35mm (Nikon AF-S 35mm f/1.8G ED Nikkor), 50mm (Nikon AF-S 50mm f/1.4G Nikkor), 85mm (Nikon AF-S 85mm f/1.8G Nikkor). It is possible to use shorter throw optics if there is not enough space for shooting, but it is important to remember that short throw optics can distort the proportions of the faces and bodies of our heroes.