
How to connect high-speed Internet on windows 7. How to set up an Internet connection on a computer via a cable
Today we will deal with the question how to set up the internet on a computer or laptop. As a rule, the Internet is configured by an employee of the provider at the moment when you conclude an agreement with him for the provision of services - after all, it is the correct access to the World Wide Web that is an indicator of the performance of this service. However, subsequently, when reinstalling Windows or purchasing new computer Internet settings can fly off, and here we will face a dilemma - call technical support or do it yourself. In fact, this task is not at all difficult, so by reading this article to the end, you can save money more than once.
The most common type of connection is cable - a wire is pulled into your apartment with a special LAN connector at the end, which is inserted into the network card in the PC case. However, depending on the provider, there are several types of network connections. How to set up the Internet correctly and in what way is the connection to worldwide network, should be indicated in the papers of the contract that was given to you during the initial setup of the Internet by the employee. There are several of them - automatic IP, static IP, PPPoE, L2TP, with filtering by MAC address. Let's consider them in order.
Internet setup automatically
I called this type automatic, because if your ISP connects you using this type, then you're in luck - you won't have to configure anything at all. With it, the computer receives an IP address on the network "by itself" - that is, we simply plug in an Ethernet cable and use the Internet. If it does not work, then make sure that all configurations are reset - for this, go to "Start> Control Panel> Network and Internet> Network and Sharing Center> Network Connections Management> Changes to adapter settings", right-click on " Connection by local network"And go to" Properties> Internet Protocol version TCP / IP v.4 ". Here all values should be set to "Automatic", as in the picture
Internet connection on a computer with authorization
In this fairly common type, or rather types, because there are two of them, you have to sweat a little and use the handles to create a connection and enter a username and password to set up an Internet connection. If you click on the desktop icon every time to access the Internet, a connection window opens, in which you click on a button - this is your case.
PPPoE
PPPoE - connection to the provider's servers occurs only by login and password. If suddenly you reinstalled Windows, then in order to restore the possibility of going to no, we do the following:
- Go to "Start> Control Panel"

- further in "Networks and Internet"

- and in the "Network and Sharing Center"

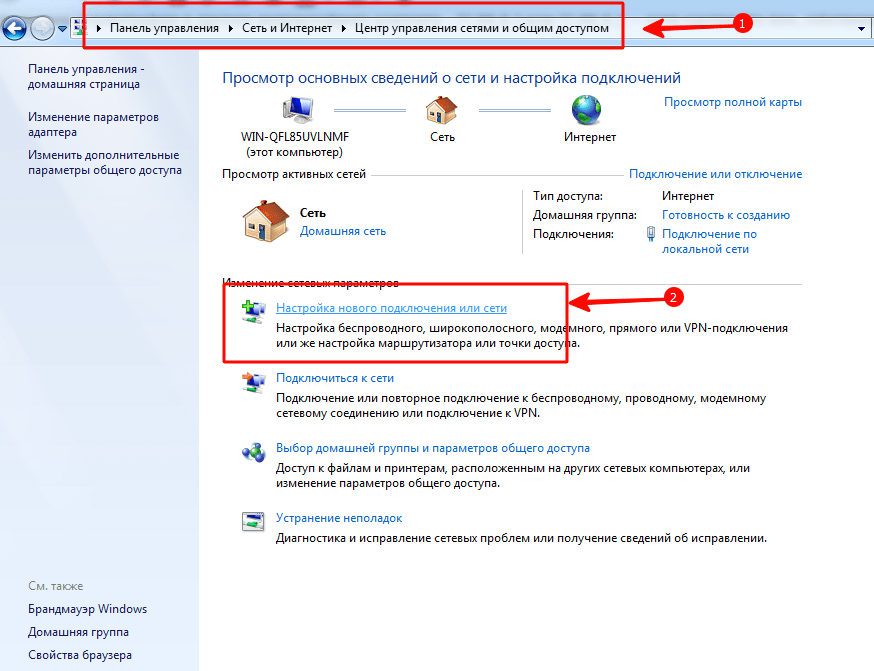
- Here somewhere on the page (in the left column for Windows 7 or in the main window in Windows 8 and 10) we see the menu item "Establish a connection or network" - click on it

- Here we select "Internet Connection" and click "Next"

- Select "High Speed (PPPoE)" and move on

- We enter the login and password that the provider issued - they, as a rule, are indicated in the contract.

- After that, we return to the "Network Control Center" and find in the menu the link "Change adapter settings" - go through it.

- We find "High-speed connection" - now it is in the "Disabled" state.

- Double click on it, a window for authorization will open. We press the button "Connection" and rejoice! For convenience, this "High-Speed Connection" can be dragged to the "Desktop" with the mouse, creating an icon with a quick link.

L2TP
L2TP is another type of Internet configuration with authorization. To activate it, we do everything the same as in the previous method, up to step 4 inclusive.

Connecting a laptop to the Internet with a static IP
Next type will not ask you to enter your username and password and click each time on the icons for the connection, but it does require manual input of the IP address settings to connect to the provider's equipment. For the settings, we go through the chain "Start> Control Panel> Network and Internet> Network and Sharing Center> Manage network connections> Change adapter settings", right-click on "Local Area Connection" and go to "Properties> Protocol Internet version TCP / IP v.4 ".
And enter the values provided by the provider in the IP address and DNS server fields.

Filtering by MAC address
And finally, the provider can filter by MAC address for any of the above types. This means that you can only connect to the Internet on the computer that is registered with the provider. Plug the cable into another, and the internet will be gone. This byaka usually appears at the moment when you bought new computer(or a network card), brought home, but the Internet does not plow. Honestly, I don’t understand at all why some of our “friends” are doing such garbage, but if so, then you can activate the network connection only by calling the support service and saying that you bought a new PC.
That's all for today - I'm sure that you now know exactly how to connect the Internet to your computer and you can 100% do it yourself!
So, you have finally concluded an agreement with a new provider, and a cable with a plug has been brought into your apartment - a real window into the world. All that remains is to connect it to your computer - and the Internet is at your service. However, if it was enough to insert the plug into the jack, you would not need to read this article.
Let's consider how to connect the Internet to a computer via a cable, in the simplest case. Let's say you have only one computer, and you will use it as a router (if you suddenly need a tablet). Or (as an option) you are going later, so turn off the router to facilitate remote access.
Let's say you have a network card on your computer (it doesn't matter whether it is separate or built into the motherboard), and you just connected an Ethernet cable to its input. We assume you are using the most up-to-date Windows 10. Although correct settings Windows 8 / 8.1 or even 7, these instructions will also work: the principle is the same.
Of course, you can always call the master to do everything the right job for you. But specialists are not always free. In addition, on your own you will not only save money on the call, but also learn how to set up the Internet on your computer via a cable. In our world, such knowledge can come in handy at any time.
Dynamics vs. Statics
Now check with the provider what kind of connection he offers on your tariff plan: dynamic or static.
With a dynamic connection your IP-address may change depending on the provider's settings (and if you intend to subsequently connect to your workplace remotely, this may interfere with you). But manipulations with entering parameters are reduced to a minimum: the provider sets the IP address, subnet mask and default gateway independently. In this case, it is enough to insert the cable into the computer and that's it, access to the Internet will appear.
Static connection provides a static IP address assigned to your computer (or router, if you choose to connect through one). In this case, you will have to manually register the IP address itself, the subnet mask and the default gateway in the connection settings. Usually, all these incomprehensible numbers and letters fit into the agreement on the provision of access or in the annex to it. If necessary, you can clarify them in the technical support service, naming your data.
In some cases, access also requires a username and password (do not confuse Internet access as such with access to a personal account on the provider's website - for personal account data is required).
How the connection is made
Let's consider the procedure step by step.
- Plug the Ethernet cable into the apartment into the corresponding port on the computer. Even if you have never done this before, you will not be able to confuse this type of connector and plug with something.

- Right click on the "Start" button and find the section "Control Panel - Network and Internet - Network and Sharing Center". In the left column, select the "Change adapter settings" tab. The main window will display a list of your adapters (more precisely, in our case, one adapter "Local Area Connection"). Apply the crown trick again "right click" and select "Properties".

- The small pop-up window contains a whole column of different rows with properties. Select the line "IP version 4 (TCP / IPv4)" in them. While it is selected, click the Properties button below the combo box.

Now our instruction is branching out. Have you checked with your provider what IP you are provided with? If not, check right now.
- If it is dynamic, then trust the automatic selection in the IP address and DNS server settings.
- If it is static, then you have to enter the values manually. As a rule, you need to specify "IP address", "Subnet mask", "Default gateway" and "DNS server". When you have finished entering your data, press the OK button to save your selection.
Important points:
- If the connection requires a modem, enter its default address as the IP-address; usually 192.168.1.1. If the modem has a different IP (which is rare), it is indicated on the bottom of the modem itself or in its instructions.
- Usually the ISP provides the DNS server details, but sometimes this is omitted. Then you can use the universal ones:
1) Public DNS from Google: 8.8.8.8 or 8.8.4.4 - a universal solution, usually suitable for all computers
2) OpenDNS - 208.67.220.220 and 208.67.222.222
3) Yandex DNS with its own antivirus filter - 77.88.88.88 or 77.88.8.2 - if you trust Yandex's antivirus policy (although sometimes it may find it unreliable and quite a decent site)
4) Yandex DNS with a filter for pornography and other obscene content - 77.88.8.7 or 77.88.8.3 - although depending on what you actually need from the Internet, hehe.
- Let's repeat: if remote access is important to you, make sure that your provider's support will not change your IP.
If your ISP offers L2TP access, this may require some additional steps on your part. Usually, the provider provides instructions for setting up such a specific type of connection, but from our side it also does not hurt to duplicate.
So, to set up L2TP, you need:
- Go to the already known to us section "Network and Sharing Center" and choose to create a new connection
- Unlike the previous options, here you should go to the "Connection to the workplace"
- When the system prompts you to create a new connection, select this item
- Select "Use my connection"
- Enter the server address provided by the provider. The immediate connection option should not be selected. You can assign a name to your liking.
- In the next window, enter the login and password provided to you. Do not forget to tick the box "Remember password"
- Connect now when the system prompts you
- Return to "Adapter Properties" (as discussed above) and select the "Security" section
- Select "L2TP IPsec VPN" from the drop-down options "VPN type". Below is the line "Data encryption", here you need to select "Optional",
- Under the line "TypeVPN" click the button "Advanced options"
- Enter this same key in the "Key" field. You should have it from your provider.
- Everything, you can click "OK" with peace of mind and use the connection.
This instruction works for Windows 7 and newer versions.
Why all these complications? - you ask. This solution has advantages: for you - increased security of the connection (compared to a regular LAN), for the provider - simplification of the billing system.
PPPoE setup
Before setting up the Internet on your computer, check with your provider for the type of access that it offers. PPPoE access requires not only correct settings, but also authorization using a username and password. You will need this method of connection if you do not use a modem or router, but insert the cable from the provider directly into the connector on the computer, without intermediaries.
To do this, you again go to the "Network Control Center" and select there, create a new connection with it.
In the launched wizard, you select the first item - "Internet connection" - and click "Next". Then in the window that appears, you must select "High Speed (with PPPoE)".
The final step remains. In the final window, you need to come up with a name for the connection and enter the login and password issued by the provider. If your computer is used by several people (for example, family members), each under his own account, and you want to give them all access, then check the box "Allow other accounts to use this connection".
Now make sure your internet connection is working. And if so, hello world!
Over the past 10 years, the Internet has rapidly entered our life and into every home where there is a computer.
Now, not a single user working at a computer can imagine it without being connected to the Internet. After all, you can find almost everything on the Internet. Watch movies, sports broadcasts, listen to music, play Online Games... Find the information you need on any topic and download it.
Order tickets for a train, plane, concert, sporting event, pay for communication services, communal payments, buy the thing you like in the online store.
In a word, the Internet is very good and useful thing... That is why it is so popular.
To connect a computer to the Internet, you must have:
- installed network card and driver for it.
- Adsl Modem, router, access point, etc.
- Ethernet cable
- Cable for connecting to telephone line RJ-45.
- Splitter.
And most importantly, the Internet access service must be provided by the provider.
Connect all cables to the computer and modem according to the instructions.

Let's get down to configuring the network card andInternet connection on windows 7... To do this, follow these steps step by step. Step 1 . Click Start and go to Control Panel... Click on the link.

Step 2 ... Next click on.

Step 3. On the left menu of the window, click.

Step 4 ... Right click on the iconLAN connectionand in the menu that appears, select Properties left mouse button.

Step 5 ... In the window that appears, left-click the itemInternet Protocol TCP / IPv4and click on the button Properties .

Step 6. Select item Use the following IP address, and fill in the fields as shown in the picture. Addresses forPreferredand Alternative DNS servers you must take from the contract for the provision of Internet services. Then press the button OK.

The configuration of the network card is completed. Next, we start creating a new connection.
Execute Step 1 and Step 2 again.

Step 4. In a new window select a connection optionInternet connections... This is a wireless, high-speed, or dial-up Internet connection. Click to continue Further .

Step 5. In the window Internet connection choose High Speed (with PPPoe). DSL or cable connection requiring username and password.

Step 6 ... In the next window you need to enterinformation obtained from your internet service provider:
Username.
- Password.
- Connection name.
All this data should have been given to you at the conclusion of the contract.
Check the boxRemember this password.
You can allow other users to use this connectionby checking the corresponding box.
Having entered all the data correctly, press the button To plug .

Step 7 ... The connection should be established after verifying the username and password. After that, a window will appear in which the system will notify you thatinternet connection ready to use... Press the button to exit. Close.

In order to connect to the internet, in the window in the right part of the window, click on the link... Then double click on the iconHigh speed connection.

In order not to constantly go to the control panel to connect to the Internet, you can create a shortcut on the desktop. To do this, right-click on the connection icon and from the context menu select Create shortcut.
The popular Windows 7 operating system without an Internet connection turns into an ordinary and unremarkable system. But its peculiarity is that you can use the Internet access from anywhere in the world. Asking the question of how on Windows 7, it is worth deciding which type of connection is used.
General settings
Before connecting to the Internet on Windows 7, you need to connect the modem to your computer. Regardless of which type of device is used, the general settings are set the same. Therefore, when choosing a switch for Internet surfing, focus on the capabilities of your computer. For example, Wi-Fi does not work on all PCs, and 3G modems do not always pick up the signal well in apartments.
Control Panel
To enter the Network settings mode, you need to open the "Control Panel" tab. It is located in the Start menu. Those who are wondering “how to configure the Internet on Windows 7” need the “Network and Internet” tab, “Network and Sharing Center”.

New connection
In the paragraph "Setting up a new connection", difficulties may arise, since you need to connect your own specific modem. For example, owners of a "whistle" from a cellular operator (3G-modem) can simply connect the device, run the drivers autorun and easily use the Internet. But only if it was configured correctly. If not, then the question of whether on Windows 7 does not lose its relevance.
3G modem
An unlocked "whistle" (one that was not properly prepared for use in the store) is connected in a few clicks. To do this, select the "Telephone connection settings" item. Next, you should see a modem connected to the port. It is required to enter the dialed number (each operator has his own, usually spelled out in the instructions for the device), after which the inscription "The device is ready to use" should appear. That's all, you can use the services of the world wide web.

High speed connection
Internet drivers (Windows 7) are not required. They are already in the operating system itself, you just need to connect the device. Select "Connect to the Internet" (first in the list). Please note that it must be wireless, high-speed, since only this option is suitable for ADSL modems. Be sure to select I need to enter the username and password provided by an Internet service provider (for example, Rostelecom or any other). All the data you need to find out before setting up the Internet. On Windows 7, as in the case of any other version, you cannot connect to the Network without a password and login. After a successful connection, you can display the shortcut on the desktop so that it is always at hand, or use the icon minimized to the tray (on-screen menu near the clock at the bottom of the screen).

Wi-Fi setup
The use of wireless Internet has become familiar to users. personal computers, especially with an operating system such as Windows 7. Setting up the Internet over a Wi-Fi network is not difficult. Modern computers usually come with a built-in signal receiver. To catch him, you need:
- Turn on the router, check if everything works (simple technical steps, which are described in the instructions for the device).
- On your computer, expand the tray, open the connections tab. Pay attention to the new available connection(it was not there before the router was turned on). The name may depend on the name of the device or service provider.
- Click the "Connect" button. Enter the Wi-Fi password provided by your ISP.
- You can check the "Connect automatically" checkbox.
- Check the connection.
Some models of computer system units do not support Wi-Fi connections. You need to carefully study all the points of the instructions, since there is a risk of simply not connecting to the router. Moreover, the new models are already being released without the usual Ethernet cables.
Browsers for work
Microsoft, with the release of the Windows 7 operating system, took care of users by creating a new and improved version of the standard Internet Explorer browser. Despite the renewal, the work in it is very difficult. "Internet Explorer" for Windows 7 can be updated immediately after connecting to the Internet, or even change the browser to any other ("Google Chrome", "Amigo", "Mozila", "Yandex browser" and others). In many ways, the speed of the Internet depends not only on the provider, but also on what program to use it through. The standard browser is not very fast, even if the data transfer from the web is quite fast.

Possible problems
If all the steps have been completed, and the Internet still does not work, there may be several reasons for this. So, for example, Wi-Fi may not connect because there is no wireless adapter or it is disabled or blocked. You can check for its presence by looking in the device manager of your computer. The wired connection may not work because the installed firewall or antivirus will not let it through. Check all settings, as these programs may identify new network access as a threat to your computer's security. You just need to turn off some functions, and after going online, turn them back on. Sometimes users simply enter data incorrectly when filling in the password and login when setting up the equipment.
Another option is to check the device itself on other computers. It is possible that the modem or router is damaged and does not work. There is nothing you can do about it, either ask a professional PC user for help, or contact your provider.
Conclusion
Before connecting to the Internet on Windows 7, check the equipment for operability. Then go through all the steps to set up your device. Check if everything is ok, enjoy surfing the net. If the connection fails, try troubleshooting possible problems(for example, an incorrect connection number, an error in the password or login, other reasons described above). If it is impossible to make adjustments on your own, it makes sense to contact a professional.
Often after reinstallation operating system users are faced with a situation when the Internet does not work on their computer. Let's find out how to fix the indicated issue on Windows 7 PC.
The reason for this problem is quite trivial: after reinstalling the system, all settings are lost, including Internet parameters, and network drivers also fly off. The algorithm for getting out of this unpleasant situation depends on the specific method of connecting to the world wide web. Below we will look at the procedure for resolving this problem when using Wi-Fi and a standard cable connection through the 8P8C network card connector.
Method 1: Wi-Fi
First, let's look at the algorithm of actions when using a Wi-Fi connection. The main reason for the failure to access the world wide web after reinstalling the OS is the lack of an appropriate driver for the adapter, through which the interaction takes place via Wi-Fi.
- Click "Start" and go to "Control Panel".
- Then go to the section "System and safety".
- In the opened window in the block "System" find subsection "Device Manager" and click on it.
- The interface will open "Device Manager"... Click on the name of the section "Network adapters".
- If in the list that opens you do not find the network adapter with which you connect to Wi-Fi, or there is an exclamation mark next to its name, then this means that the required driver is missing or incorrectly installed.
- Try reinstalling it. To do this, select on the top panel "Action" and click on the item "Update configuration ...".
- After that, the configuration update procedure will be performed and there is a possibility that your network adapter will be displayed, which means that the Internet will work.

But an outcome is also possible in which everything will remain as before. In this case, only the installation of the "native" drivers of this device will help you. They can be installed from the disc that came with the adapter. If for some reason you do not have such a medium, then the necessary component can be downloaded from the manufacturer's official web resource. After installing the driver and displaying the device in "Dispatcher", search for available networks and connect to the one to which you have access by entering a password, as is done in a normal situation.


Method 2: Internet via cable
If you have a regular cable Internet, then in this case, after reinstalling the operating system, you may not be able to connect to the World Wide Web. The likelihood of this is even higher than in the previous case, since interaction with many providers requires special settings, which naturally got lost during the OS reinstallation process.
- Left-click on the network connections shortcut in the notification area. In the displayed list, go to "Control center…".
- In the window that opens, navigate through the position "Setting up a new connection ...".
- Then select "Internet connection" and press "Further".
- Choose one of the two connection options provided by your provider:
- High speed;
- Switched.
With a high degree of probability, you will need to choose the first option, since a dial-up connection, due to its low speed, is currently rarely used.
- A window will open for entering information about the service provider. To connect to the provider, enter in the appropriate fields your username and password, which the service provider must give you in advance. In field "Connection name" you can enter an arbitrary name by which you will recognize the created connection among other objects on the computer. If you do not want to repeat the authorization procedure every time you enter the network, then in this case, check the checkbox Remember this password... After all the above settings have been entered, click "To plug".
- After that, the procedure for connecting to the Internet will be carried out.
- But there are times when you entered all the settings correctly, but you still cannot connect to the World Wide Web. In such a situation, open "Device Manager" In chapter "Network devices" as in the Wi-Fi situation. This time, the lack of a built-in network card of the computer in the list should serve as a signal of trouble. Next, do all those manipulations, including updating the configuration and, if necessary, installing the drivers that have already been described above.
- After that, the built-in network card should appear in the list, and the Internet should be working.

- But this does not always help, and if the problem persists after performing the indicated actions, you need to check the network settings. This is relevant if your provider does not support working with automatic settings... But first, you need to contact the service provider to find out exactly what data you need to enter. In particular, the IP address and the address of the DNS server. Then go to "Control Panel" and choose "Network and Internet".
- Then open the next section "Control center…".
- After that, go through the position "Change settings…".
- In the window that opens, find the name of the connection through which you want to activate the connection with the World Wide Web. Click on it with the right mouse button and select a position "Properties".
- In the displayed shell in the list of components, find the name "Internet Protocol (TCP / IP4)"... Select it and press "Properties".
- Just in the window that opens, you should enter the settings that the provider provided. But in order to be able to drive in data, move the radio buttons to the position "Use…"... After that, enter information in the active fields and click "OK".
- The network connection should appear.


After reinstalling the operating system, the Internet may disappear due to the lack of necessary drivers or the loss of the installed settings. The algorithm of actions for elimination of this problem depends on the type of connection to the World Wide Web.