
Dobory for doors with grooves. What are interior door trims and how to install them correctly. Dimensions of extensions for interior doors
Simply installing a door for a presentable opening is not enough. In order for the door - at least the entrance, even the interior - to look good, it is necessary to decorate it with the help of platbands and extensions. These details will give the installed structure completeness, and make the appearance more neat and respectable. It is about dobors that will be discussed in our article. We will find out what types and sizes of these elements are, what extensions are in general, how to choose and install them yourself.
Description
talking plain language, extensions are strips made of the material corresponding to the door, which mask the wall in the opening. Thus, these details in a peculiar way "get" the missing width of the door trim. Hence, in fact, their name.
door extension- uh then a flat wooden or plastic plank that covers too wide slopes at the doors. Sometimes, of course, the door frame itself and the platbands are enough to cover the entire “stuffing” of the doorway. But now, when many houses and apartments are being built according to individual projects, more and more often these elements are not enough, so that the “bare” side walls of the opening remain in sight. This is where the extensions come to the rescue, completing the installation of the door, and giving the whole composition a finished look.
You may also be interested in information about what types there are.
We will find out what parameters of door extensions are standard, and whether it is possible to manufacture these parts according to individual measurements.
Without a doubt, in addition to the standard parameters of extensions suitable for standard doors, it is possible to order the entire “economy”: the door itself, trim, frame and extensions according to individual sizes. To do this, contact the company located in your city that manufactures these products. But more often, after all, people acquire extras of standard sizes. This is understandable - after all, most people live in standard apartments with a standard thickness of doorways.
So, now the height of a typical door, which is mass-produced, is two meters. Therefore, the accompanying accessories: platbands and extensions also have a similar length. But the euro-version is also in stable demand, when the length of the canvas with components is 2.10 meters.
The situation is quite simple with the width of the extensions: most often there are finished goods width from 10 cm to 40 cm.
The thickness of the part also matters. It should be identical to the thickness of the door frame groove. It is best to measure everything carefully before buying several times. In most cases, this thickness is 10 mm, however, in individual apartments and houses it can vary, but not significantly.
Attention: it happens that in the purchased door frame the groove for the addition is not provided. In this case, if you plan to install extensions, you can make a groove yourself by sawing it out with a router.
Kinds
Find out what types of door extensions can be found on sale, and how they differ.
The standard types of extensions are as follows:
- simple without edge;
- with edge;
- telescopic.
Door forms.
The first two types are straight, even planks, with even side cuts. It is best to choose an extension with an edge, since the existing trim may not cover the entire cut of the part, which will affect the general appearance of the structure, giving the door a sloppy look. Simple extensions are mounted directly on the wall in the opening.
Telescopic dobor - a more modern and "advanced" look. The difference from the simple one is that the telescopic one has a special groove, with which it becomes possible to firmly and securely attach the part, even without glue. Fastening is carried out according to the principle of a laminate: who saw the grooves in this floor covering or he mounted it himself, he knows what he is talking about. Telescopic products are also good because they can be used to mask an opening of any thickness.
What are telescopic extensions for interior doors read.
In addition, dobors differ in the type of material from which they are made. Usually this detail corresponds to the material of the door leaf: a wooden door is supplied with wooden extensions, a plastic one - with plastic ones.
Wooden dobors are made from a board: edged, even, sometimes tongue-and-groove. But modern standards Increasingly, manufacturers are forcing manufacturers to offer their customers extensions from MDF. In this case, the part is made in this way: thin MDF plywood sheets are attached to the wooden frame. Inside, such extensions are not solid, but are made according to the honeycomb principle, which makes them much easier and more convenient to install. On top of them, a decorative coating of veneer, PVC film or plastic is applied.
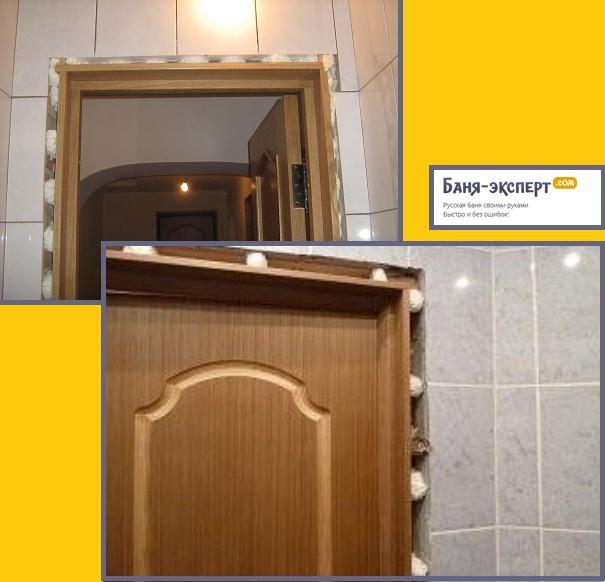
Installation
Let's get acquainted with the process of installing door extensions. Let's consider the installation of a standard extension for an interior door.
Let us immediately note that this species work is always carried out after the installation of the door leaf and frame, and after the mounting foam used during the work has hardened.
If the door frame is equipped with a groove, it must be cleaned of dirt, dust and foam residues. If there is no groove, it is necessary to cut it out with a milling cutter.
First, the upper dobor is installed - above the doors. Adjust this part to fit the length, cut only after careful measurement. The width also needs to be adjusted, but it is better to do this after trimming to length. Work on adjusting the width and length is most conveniently done using an electric jigsaw, which will allow you to quickly and accurately cut off unnecessary parts of the material. 
To install the corrected part, you must first use wedges to free up space between the frame and the doorway. This is necessary to avoid the appearance of cracks.
A bar is installed, and then the evenness of the installation is checked: the joints are necessarily controlled, and, if necessary, corrected by wedging. After the control check, making sure that everything is level, the gap between the bar and the opening is blown with mounting foam at low pressure. Platbands are installed only when the foam hardens completely, that is, not earlier than the next day.
You will also be interested in information about insulated wooden entrance doors, which you will read about.
Attention: all work must be done as carefully as possible, since carelessly cut and somehow installed extensions can spoil the appearance of any, even the most expensive door. Therefore, if you are not confident in your abilities, it is better to invite a specialist for this simple but delicate work so that the door is guaranteed to get the proper look.
How to choose
People who are far from construction and finishing work may find it difficult to choose extensions in a store or on an Internet site. So let's give a few useful advice to make this difficult choice easier.
Please note when purchasing Special attention so that as a result of work general form doorway looked harmonious. This the main task, therefore, the selected decorative details must match the color and material of the door. In addition, it is necessary that the patterns and texture of the materials are identical.
It should be noted that there are no special differences when choosing extensions for entrance metal and wooden interior doors: the principle is the same. The main difference is in the installation, as the box metal door does not have a groove, so you have to use docking parts.
Pay attention to the cost of materials. It is not worth saving on the addition by buying a laminate model if the door itself is from an expensive array. There will be a clear discrepancy, disharmony, and the general appearance of the door structure will become cheaper.
It is possible that you will need the standard sizes of doorways, which you will learn about.
Before you go to a hardware store or place an order on the appropriate site, be sure to carefully take measurements by setting the exact parameters of the doorway. If the wall where the door is installed has a width of up to 8 cm, then you can do without extensions, the box itself and the canvas will be quite enough. But if the wall is thicker, even by 5 cm, it makes sense to think about extensions. 
The best option is to purchase extensions in one store and at the same time when you purchase the door block itself. In this case, you will be able to pick up decorative details that exactly match the pattern and texture of the door material.
Manufacturers and prices
Find out which of the modern manufacturers offers customers best choice dobor for doors at the best cost.
Mario Rioli
The company from Tula works, guided by Italian technology. Therefore, it mainly offers products according to European standards, that is, 210 cm long. So, an addition from this company of a designated length, 10 mm thick and 5 cm wide will cost the buyer 330 rubles. And if the width is 10 cm - 640 rubles.
matadoor
The Yaroslavl brand also works according to European standards. The company can offer customers, including telescopic extensions. A product 210 cm long, 10 mm thick and 10 or 15 cm wide will cost 440 rubles.
If the width increases to 40 cm, the cost rises to 1100 rubles. The telescopic version with a width of 15 cm will cost the buyer 500 rubles.
Uberture
A manufacturing company from Reutov offers extensions at a low price with good quality. So, a euro-length product, a standard thickness of 10 mm and a width of 10 cm will cost only 270 rubles. If the width is 15 cm, then 380 rubles. In addition, this brand offers customers a non-standard width of 20 cm at a price of 500 rubles.
Astral Design
The company from Korolev near Moscow can boast, indeed, good quality products. Therefore, the prices here are higher than others. So, a euro-length product 10 mm thick and 10 cm wide costs 600 rubles. A width of 15 cm will cost the buyer 700 rubles, and 20 cm - 800 rubles.
Video
In the video, they will tell you how to properly measure the extensions and platbands for interior doors.
When the wall between the rooms exceeds 14 cm in thickness, when installing the door, you need to think about special decorative panels that cover the side slopes of the opening - extensions. These items are widely used in finishing work associated with door installations. Extensions give the finished installed door structure a complete and neat look. They mask the "stuffing" of the walls from the side and top, thereby giving the opening a proper presentable look. The article will focus on one of the types of extensions - telescopic.
This is the most preferred option, since the peculiar arrangement of these parts provides for the presence of grooves that allow you to tightly and securely “fit” the extensions even without glue. As a result, the work process becomes easier, and the result is better and more durable. We will find out what characteristics telescopic extensions for interior doors have and their advantages. In addition, we will get acquainted with the process of self-assembly of these decorative parts.
Description of telescopic extensions for interior doors
A telescopic extension is an indispensable detail in order to mask the walls of doorways when they exceed a thickness of 14 cm. And in modern houses and in apartments of an individual layout, massive interior walls are not uncommon. Externally, a telescopic extension is a flat, straight plank, most often made of MDF, and covered with veneer or PVC film. On the side panels (ends) of the telescopic extension, longitudinal holes are cut - grooves, thanks to which docking with the door frame is reliable, tight and fast. What types of platbands exist on the door, and how to install them, is indicated in this
And if there is a groove on the rail on one side, then on the other there is a comb that is inserted into another groove. This technology allows you to assemble a part of the required parameters. The principle of fastening is similar to laminate flooring.
The top coating of extensions is most often varnished, thanks to which the details acquire a soft noble sheen and become resistant to external dirt, damage and water penetration.
pros
As already mentioned, the main advantage of this type of decorative panels is the reliability and ease of installation at the same time. Special grooves, which are available only for telescopic extensions, put them head and shoulders above the simple and simple with edging types. Quick installation too characteristic property this type of decorative details.
What are the advantages of telescopic extensions, we will find out.

Telescopic dobor device
Dobory help to exclude any decoration of the walls facing the side and top. These details reliably cover all the unsightly details of the concrete or brick wall thus giving the apartment a cozy and neat look. Telescopic extensions look presentable, with their help the door block looks “more expensive”.
The great advantage of telescopic extensions is that they can be used to close walls in doorway any thickness. This is the versatility of this type of decorative details, and one of their main advantages.
First of all, we note that in order for the door block, along with the extensions and platbands, to look neat and presentable, it is desirable for the room to have even walls. But since the ideal evenness of the walls is a rarity, most often it is necessary to bring the width of the extension to mind with the help of wedging. Therefore, when installing these parts, an excellent eye, accuracy, slowness, and attentiveness are required.
Telescopic extensions can be installed in three ways:
- with the location of the upper horizontal part between the two side vertical ones.
- With the expectation that the upper bar rests on the side ones.
- With a 45 degree seam cut.
The last option for self-execution is quite complicated: therefore, if you want to do the work yourself, it is better not to consider it. It is within the power of experienced craftsmen, for whom installing doors is a profession. In addition, for this type of installation, you need a rotary saw, which is not found in every home.
But how the installation of extensions and platbands on interior doors is carried out, it will help to understand this
When installing extensions, you can fix each part separately, but you can assemble the entire structure on the floor in the form of the letter P, and mount it as a whole. For self installation We advise you to choose the first option, as it is easier.
In order for the telescopic extensions to be installed correctly, it is necessary that the parts fit snugly into the grooves. But they do not need additional foaming or gluing to reduce the cost, speed up and simplify the work.
Installation
We will learn how to properly install telescopic extensions on interior doors.
Dobors are installed only after the box is in place and the door leaf is hung. It is necessary to wait until the foam used when installing the door block has completely solidified, and only then proceed with the installation of extensions.
If there are grooves in the box, they must be cleaned from the remnants of foam, dust, dirt. If there is no such recess, you will have to cut it yourself - for this you need a milling cutter.
The specificity of telescopic extensions is that they are adjusted in width not by trimming, like simple ones, but by attaching rails. The more rows of rails are assembled, the wider the finished additional shield, and vice versa.
But how is the installation of platbands on plastic windows V wooden house, can see
Video: installing door extensions
On the video installation of telescopic extensions:
First of all, the first row of rails is mounted: it is installed around the entire perimeter of the opening. After checking the accuracy and evenness of its installation, you can mount the second row, and if necessary, the third. Of course, experienced craftsmen can mount the finished structure immediately, and not in separate rows, however, if you carry out the installation on your own, you should not risk it. Better slower, but more accurate, and guaranteed to be correct.
It may also be useful for you to learn about what happens and how to use it.
If your additional shield will consist of one or two planks, then you can handle the installation yourself. But if you need to fasten the rails more, it’s better to call a specialist for work, since there is a high risk of “screwing up”.
Carefully join the horizontal and vertical parts, get rid of the gaps, if any. After all the details are fitted, there are no cracks and other defects: everything is strong, smooth and neat, you can attach the trim.
Attention: Take special care during installation to drive the tongues of the rails into the grooves as tightly as possible: this will help to avoid gaps in the final structure.
If the box is skewed
It often happens that the existing skew of the door frame does not make it possible to mount the extensions normally, firmly and beautifully. Let's find out what to do in this case. 
If there is a skew, then during the installation of the extensions there will be a clear deviation of the upper part from the side ones. And if this deviation is more than 5 percent of the length of the extension, then experts recommend that you first completely straighten the skew, and only then proceed with the installation of decorative parts. If you give up on this drawback and put the extensions on a skewed box, over time, gaps will appear between the top and side strips that will spoil the appearance of the door block.
If the distortion is slight, it can be removed by additionally plastering the wall. Well, in the case when the slope is solid, you will have to adjust the evenness of the installation of extensions with wedges. But what are the sizes of entrance doors with a box, you can see
How to choose the width
We will find out why, when choosing an extension, such a parameter as width is of particular importance, and how to choose it correctly. 
Modern manufacturers meet all the wishes of customers, and therefore offer not one or two standard widths of decorative strips for doorways, but several. So, a typical set of options for extensions of any brand includes a width range from five to forty cm. As you can see, almost any width of existing internal walls can fit in this range. But if the wall is already very thick, in this case, the craftsmen in the door manufacturing company may well make custom-made rails according to the required non-standard parameters.
But most often on sale you can find the following width of decorative strips for interior doors: 10 cm, 15 cm and 20 cm.
Material
Let us dwell in more detail on such an important point as the choice of material for the telescopic addition of an interior door.
Of course, as already mentioned, the material of decorative parts must match the material from which the door block is made: its color, pattern, texture. And even there should be a match in terms of cost, since, for example, inexpensive laminate dobors will not look at all with respectable and heavy solid wood doors. But what material are the best door frames for interior doors, you can see in this
Material types
- natural wood. An expensive choice for respectable people and presentable apartments.

from wood
- MDF. The most common material for the manufacture of extensions. The advantage of MDF is that the slats are lighter, and, therefore, more convenient for installation and inexpensive. And externally, the planks can be finished with any kind of veneer or PVC film of any color. Decorative details from fiberboard and other derivatives of the woodworking industry can also be included in the same category. You may also be interested in learning about what happens

- Plastic. This material is most often used to decorate the slopes of the balcony door.

Made of plastic
Without a doubt, when purchasing extensions, it is necessary to take care of platbands made of a similar material so that the finished door structure has a complete look. In addition, it will also provide a more reliable docking of parts.
Appearance
We will find out what decorative points you need to pay attention to when purchasing telescopic extensions for an interior door.
Firstly, it is necessary that the appearance, color, pattern and texture, as well as the material correspond to the door unit itself: the leaf and the box. Otherwise, disharmony and incompatibility will result, which can spoil the whole impression of a brand new door. Pay attention to the quality of products.

One color
But how to attach the extension to the door frame, and how to do all the work with your own hands, you can learn from this
The color of the parts can also be selected as follows:
- to match the sash;
- in the tone of the plinth;
- according to the color of the walls;
- contrasting shade to highlight the door structure.
It is also important that the planks are strong and stable: this will help them serve faithfully for a long time.
If you decide to install doors in your apartment or office, in 80% of cases you will need to install extensions on interior doors.
Why do I need an extension when installing a door?
Extensions are vertical flat panels, made in the color of the door, and allow you to "get" the thickness of the doorway and fix the trim on the other side of the wall. Extras are:
- Ordinary, i.e. flat panels
- Telescopic, having grooves at the end for a platband with a spike
Additional door elements are most often made of: MDF, fiberboard or wood coniferous trees and are flat panels about 1 cm thick and about 207 cm high.
Standard width extensions are usually 100,120, 150 and 200mm wide. It is better to buy them together with interior doors so that all elements are made in the same color.
Installation of add-ons must be calculated in advance
If it is required to install extensions on interior doors, the price for the work is calculated separately. Therefore, when measuring openings, it is necessary to immediately calculate the number of additional trims, and inform the master on how many doors the installation of extensions is required.
First of all, you need to measure the thickness of the walls in the openings, and understand how much thicker the wall in the opening is than the box of the interior door. If the extension is normal and the thickness of the wall is more than 7-7.5 cm, the extension is needed in any case
For example, if the wall of the doorway has a thickness of 10cm. - we make such a calculation: 10-7 + 1 \u003d 4cm. In total, three such elements are needed for one door: two vertical and one horizontal. In the store we order one additional element 15 cm wide, the master cuts it into 3 parts of 4 cm each and installs the additional elements.

Installation of a door extension is necessary:
- when installing, if the thickness of the wall is greater than the thickness of the door frame:
- when installing, for a beautiful finish on warped slopes:

- when finishing the doorway to the portal, without a door leaf
- when finishing the doorway to the portal with the installation of a sliding door
All of the above work is performed by our masters, the cost of installing interior doors with extensions can be found in. When ordering slope finishes front door, you can order dobor with color selection from us.
Installation of doors with extensions, if the wall is 1 cm thicker than the box.
It is necessary to make extensions 2 cm wide, 1 cm will go into the grooves and 1 cm will remain. It is necessary to attach platbands to this narrow extension. In order to save material, it is allowed to saw the extensions along at least 1.5 cm. in width.
If the walls are piled up vertically or the doorway has different thickness walls above and below, then the extensions have to be made trapezoidal. For example, the bottom edge can be 3 cm wide, and the top 2 cm wide. Not very nice, is it? Therefore, in this case, telescopic extensions with extended architraves look more aesthetically pleasing.
Installation of extensions on a thick wall
If the wall is very thick (from 20 cm and above), the panels are glued together using furniture clips, glue, hardboard strips and thin pine bars.
Here is a photo of an interior door with wide slopes on a thick wall: 
Installation of telescopic extensions on interior doors
Installing telescopic extensions on interior doors is not quite the same as installing conventional ones. Such a panel has longitudinal grooves up to 2 cm deep at the ends for installation. The advantage of telescopic moldings is that fasteners (studs or studs) are not visible, and it is possible to easily dismantle the platbands. Telescopic extensions do not need to be wedged during installation, as it is enough to insert them into narrow grooves in the box.
Here is an approximate calculation if the spike on the casing has a width of 2 cm:
- If the extension is telescopic and the wall thickness is more than 10cm. , and the door does not need to be opened 180 degrees - extensions are needed
- If the extension is telescopic and the wall thickness is more than 8.5 cm, and the door needs to be opened 180 degrees, extensions are needed
If the spike on the casing has a smaller width, then the above calculations must be revised.
As you can see, the installation of an extension with a trim on a telescopic system has its own characteristics due to the presence of a groove in the extensions and a spike on the trim.
For example, when installing conventional extensions 4 cm wide, you can order one panel 15 cm wide and “dissolve” it into 3 strips. And when installing telescopic extensions, it will no longer be possible to do this - you will have to order 2 elements of 10 cm each. width due to the presence of two grooves for trim in the ends. If the extension board has only one groove at the end, and on the other side it has a spike, then you will have to order 2.5 extensions of 10 cm for 1 door. width.
The width of the telescopic extension bars is calculated based on the fact that the architraves can be extended from the extensions to the width of the tenon. You also need to take into account the length of the spike that goes into the extension and you will understand what width is required.
The disadvantage of the telescopic system is that the extensions cannot be sawn into narrow strips due to the groove for the trim. This is especially noticeable with a wall thickness of 9 to 11 cm. the cutting line passes through the groove and therefore the dobor falls apart into 2 parts. Therefore, it is necessary to abandon the extensions, to expose the door frame not flush with the wall, but in the middle, thereby deepening the door leaf, which limits the opening of the door by 180 degrees, because. the hinges begin to pull out the door.
When installing telescopic extensions on portals (openings without a door decorated with platbands and extensions), approximately the same situation almost always occurs. The wall has a thickness, for example, 13 cm, and the extension has a standard width of 15 cm. and slots on both sides. Therefore, it must be sawn lengthwise, cut off the spikes from the platbands and nail the platbands to the cut edge of the trim with studs or studs.
Extensions between the front door and the second wooden door
To enhance sound insulation, the input and wooden door are installed side by side, while between them remains free place, which is best done with extras. This type of work is considered very time consuming due to the difficulty in foaming the extensions and subsequent smooth docking with both doors at the same time.
requires a certain experience from the master. It is necessary to draw and cut all the planks, taking measurements with a ruler with the door frame installed. It is important that the gaps between the box and the extensions are minimal, and for this they need to be properly wedged around the entire perimeter of the door frame or fixed to self-tapping screws.
Sections of the article:
What are interior door trims? These are rectangular slats that serve to make the door frame wider (if it does not match the thickness of the doorway, and its thickness needs to be increased). In what cases are these rails installed? Either for the purpose of framing the doorway, or when the thickness of the wall is much greater than the thickness of the door frame.
Most of the factory-made doors are made for standard city apartments, in which the thickness of the walls between rooms is from 7 to 8 cm. But for country or private houses, where the walls are much thicker, it is necessary to adapt to the proposed factory standard products. In this case, the situation will be saved by extensions for interior doors, which are a kind of door frame expanders. Consider what it is, what types of extensions exist, and also go through all the stages of their installation with our own hands.
Varieties of dobors
There are three main varieties of these products: conventional, telescopic and combined. The characteristic of conventional extensions is very simple - these are laminated slats (veneered or not finished). The width of such rails can be 100, 120, 150 mm and so on.
 The usual addition.
 Telescopic extensions for interior doors allow you to cover the opening in the wall with any thickness. Such rails are made in such a way that a groove is located on one side, and a ridge on the opposite side. This makes it possible to create a shield of the required size. Telescopic slats may differ in color and type of finishing material. Another difference between these products is their width. The width of the extensions that are designed for interior doors can be 150, 120 or 90 mm.
The combined type combines the functions of door extensions and platbands. This is a decorative corner that is used in a door frame with a special design (if there are deep grooves in the ends of the frame). The platband-dobor is installed precisely in these grooves.
 Telescopic extension.
 These products are ideal for increasing the door frame by 20-50 mm. You can see how these types of extensions are installed on interior doors in the video.
Door fitting process
Installation of additional strips for doors for each specific type of these products will differ from others. Consider how the installation is carried out in each case, and what installation sequence should be followed.
Installation of conventional extensions
After the installation of the door block is completed and the foam is completely dry, you can install the additional rail. If the door frame has recesses for installing the addition of interior doors, then you must first complete it complete cleaning. If there is no recess, then the space located behind the door frame must be cleared of foam. The width of the space should be taken from 15 to 20 mm and to a depth of 10-20 mm.
 Establishing the amount of the allowance.
 At the end of the cleaning and preparation of the area, you can begin to fit the top bar. To do this, you must first cut it to the required length, and also cut it to width. To know how to install extensions on an interior door correctly, you must first read the exact installation sequence.
It is recommended to leave the length of the bar so that it can protrude slightly beyond the box. For a correct fit in width, you will need to put an extension on the wrong side, then you should make a couple of marks, focusing on the wall, and only after that you can remove the extension and connect the marks with a line. Cutting should be done with an electric jigsaw. After that, insert the dowel in the required position. In the same way, we adjust the rest of the side rails, paying special attention to their length.
It is necessary to install extensions for interior doors in such a way that there is no gap between the side trims and the upper extensions.
The location of the top rail relative to the two side rails must be strictly horizontal. Now let's start mounting. Using wooden wedges, we wedge the rail between the opening and the door frame in order to eliminate gaps. We check how evenly the additional bar is installed, if an unevenness is found, then we eliminate it. 
Installation of extensions intended for installation on interior doors should be carried out using polyurethane foam, which we blow into the space between the rail and the opening. We pre-fix the extensions in width and edges using the dot method. After the foam hardens, it remains only to blow out the remaining space. After the foam has completely hardened, we carry out the installation of platbands.
Features of mounting telescopic extensions
Installation of telescopic extensions on interior doors is carried out in the same sequence as the installation of conventional type extensions. The main difference is only in the very process of connecting the planks, which are built up on top of each other. It is impossible to assemble a wide shield in one fell swoop and carry out its installation, because the whole process must take place in stages.
We install the first rail along the perimeter of the opening and fix it, then we carry out the installation of the second row. But the question immediately arises, why not put the whole shield at once? The answer is simple - there is a fairly high probability that when the mounting foam hardens, the connection of the extensions will be broken. This is especially true for sets of a large number slats (more than three). If there is sufficient experience, as well as a lot of spacers, then it is possible to simultaneously install two extensions on interior doors. But if there is no experience, then it is not worth experimenting.
Installation of combined extensions
Combined dobors with platbands are quite easy to install. There is no need for capital fastening, and installation is carried out thanks to fastening into the grooves of the door frame. Pay special attention to the fit of the corners. First, the upper trim should be cut, and after its installation, it is necessary to adjust the rest of the side products.
 Installation diagram.
 Important: trimming the side extensions should be carried out only from the bottom side, since there is a notch at the top, which is not desirable to touch. After all, it is she who is responsible for the correct connection of the side extensions and the upper casing. Remember that improperly installed additional rails can spoil the beauty of even the most expensive doors. Therefore, treat the process of their installation with special responsibility.
Tools and accessories needed for the job
For correct installation door extensions, you will need to prepare tools and accessories:
- Manual milling machine designed for woodworking;
- Circular hand saw and clamp (or electric jigsaw);
- Several stools;
- A dozen wedges and strips (regular plywood for packaging or drywall).
The clamp must have a soft lining of the bed. To fit it, you need a heat-shrinkable tube, which must be put on in series and heated over a gas burner at a distance of no closer than half a meter. It will take 3 to 4 layers of such a tube.
If the door frame is slanted
If the door frame is skewed, there will also be a deviation of the top rail from the horizontal level. If the deviation is 5% of the length of the plank or more, and the door leaf is already fitted to the skewed doorway, then you should install extensions for interior doors only after a complete alteration of the entire door frame.
 If necessary, you can adjust the size of the extension in width.
 It is necessary to first correct the structural defects that caused the skew, and only then carry out the installation of the strips. If the door frame is not altered, but simply installed as is, then over time they will split, and there will be no decent appearance. If before installation you find that the walls have a positive or negative slope, which is not more than 5 mm in height of the doors, then this slope under the casing can be removed with plaster.
If the slope is large enough, then in the process of sawing the planks for extensions, it will also be necessary to cut them into a wedge.
Benefits of door extensions
The door unit, expanded with extensions, is quickly installed. The installation process takes place without "wet" work, which could harm the wood. Also among the advantages, one can single out the aesthetic appeal of the door frame at the end of the work. The design becomes integral and will have a presentable appearance.
If you do not have sufficient experience in such work, then in order to choose extensions for interior doors and choose the right size for them, you need to consult with a specialist.
The extension of the door unit discussed above applies not only to interior doors, but also to entrance doors. The main difference will be only in how to choose the width of the additional strips. For the front door, the width of ordinary additional slats will not be enough, so you will have to connect several rails to each other. The connection can be made using splines or special adapters.
You can see how the extensions on the interior doors look in the photo. In the case where the hinge post is located near a blank wall, the door frame extension can be carried out in all directions. In the absence of a bounding sheet (when the door can open 180º), the frame must be installed flush with the outer opening plane, and the slats themselves must be located on the side that is opposite to the opening and closing of the door. That is, there should be no interference with the operation of the doors.
Why do you need extras and what is it? Before answering this question, you need to remember a little, and young people to study history. As it was before? Each enterprise for the production of building materials strictly complied with the current state standards for its products. The sizes of bricks, blocks, panel slabs, etc. were regulated. e. Building organizations had standards for the thickness of the plaster. This allowed woodworking companies to produce joinery (windows and doors) with standard door frame dimensions. After their installation in the openings, no additional fitting with trims was required.
Today everything is different. The vast majority of enterprises are guided not state standards, and own specifications. This has led to the fact that the same brick or block from different manufacturers can have different sizes. Now no one can determine the thickness of the walls with certainty; it is impossible to make several standard sizes of door and window frames. The solution was found simple and effective. The box is made with the minimum allowable width, which guarantees its physical strength, and the missing width, depending on the thickness of the walls, is made up by installing extensions.


Due to the fact that most modern door frames are made of MDF in order to reduce costs, the same material is also used during the manufacture of extensions. There are, however, door frames and extensions made of natural wood, but they are rare and much more expensive. Principles of installation of wooden and MDF extensions are no different.
Extensions - ordinary MDF boards, have a width of 100 mm to 200 mm, are produced by door manufacturers, have the same color and texture as the doors. According to the constructive device, they can be ordinary (simple) and adjustable. Simple extensions rest against the L-shaped cutout in the sidewalls of the box, adjustable with the box have a tenon / groove connection. This allows you to precisely adjust the protrusion after taking the preliminary dimensions and preparing the extensions. In addition, the presence of the connection somewhat simplifies and speeds up the foaming process.

| Photo | Size | Color | Price |
|---|---|---|---|
| 8x100x2070 mm | bleached oak | RUB 114.00/piece | |
| 10x100x2070 mm | italian walnut | RUB 167.00/piece | |
| 12x2150x2150 mm | snow rosewood | RUB 188.00/piece | |
| 12x80x2100 mm | pine | RUB 193.00/piece | |
| - | acacia | RUB 2,192.00/piece | |
| 100x2150 mm | nut | RUB 468.00/piece |

We will look at installation methods for both types of extensions, starting with simple ones.
Prices for extras
Installation of simple extensions

Simple extensions can be joined with foam (the most fast way), studs and self-tapping screws (the longest way). Choose on your own the method that seems most appropriate to you, experienced builders install extensions only on foam. The method of installing extensions has almost no effect on the reliability of fastening the platbands, and the work is greatly simplified and accelerated.
Adjustable extensions are installed only on the foam.

Measurement and preparation of additions
The technological task of the extensions is to serve as a platform for attaching trim. In order for the architraves to lie correctly, the end of the extensions must lie on the same line with the plane of the wall. Measurements should be made on an already installed door frame. Dimensioning is done in the following ways.

Now we need to find out the height of the left and right elements and the length of the horizontal element. At the top of the box, the extensions are connected with the letter P, keep this in mind when taking measurements.
You can cut off the additional boards with a hand saw, electric jigsaw, portable electric saw or on a stationary machine. The latter option is preferable - work is much accelerated, their accuracy is increased and the risks of chipping are minimized.


First, cut the blanks along the length, then on each make width marks at the ends. Draw a straight, even line and carefully cut off the excess. It is better to draw a straight line with the same extensions; you don’t have to look for even and long wooden slats. At the place of the cut, you need to remove a small chamfer, so the board will fit snugly against the door frame.
Jigsaw prices
jigsaw
Video - Measurement of extensions
All elements are prepared, you can proceed to their installation. Let's start from the very complex method and end with the simplest.
Installation of dobors on self-tapping screws
Step 1. On the extensions, make a sweat under the screws.

The thickness of the MDF boards is 10 millimeters; for melting, you need to take a drill with a diameter of no more than 9 millimeters. The exact diameter should be consistent with the diameter of the head of the self-tapping screws. The diameter of the caps, in turn, varies with their length. The length of the self-tapping screws is selected so that they enter the door frame for two or three turns, otherwise it may crack.

It is desirable that the drills were under the tree, they have thin needle protrusions at the end, which allow you to more accurately center the hole and prevent the drill from moving during drilling.
Important. Always leave at least 1.5 mm of board thickness on the side of the front part of the extension, there is nothing to worry about if the hole for the flush completely drills the wall of the extension with reverse side. The depth of sweating is regulated by the length of the self-tapping screws, the main condition, as we have already mentioned, is that they must be screwed into the box by no more than two or three turns. In total, it is enough to install 4 screws for the long vertical part, make the same number of holes.
Step 2 Drill holes for self-tapping screws. The diameter of the drill must match the diameter of the screws. Drilling these holes is somewhat more difficult, you need a "keep" eye and skill.

How to drill them?
- It is better to drill holes on the reverse side of the holes for sweat.
Very important. Drilling will not need to be perpendicular to the plane of the board, but at a slight angle. This is done so that the self-tapping screw has a direction towards the center of the door frame - they decrease possible risks its cracking on the front. If the end of the self-tapping screw comes out from the back of the box, there is nothing to worry about.
- Place the drill perpendicular to the plane of the addition, exactly opposite the hole for the sweat.
- Drill a few millimeters deep, turn off the drill. Set the drill bit to the desired angle and continue drilling until the end of the bit shows up in the hole for the flush.


We have already mentioned that this method is the most difficult, we do not recommend using it. But, if someone has convinced you, then we will continue to talk about him. Prepare all the elements of the add-ons in the described way.
Step 3 Insert self-tapping screws into the holes and scroll them until the ends appear on the opposite side.

Step 4 First screw the vertical extensions, then the horizontal one. If the self-tapping screw is tight, do not apply much force, unscrew it a few turns, and then tighten it again.


Step 5 Check the position of the extensions, if there are places with a loose fit to the door frame - press them with any materials at hand.
Step 6 Prevent bending of the extensions with mounting foam.
To do this, you can fix them in two ways: with construction paper tape or spacers. Construction tape has high tensile strength in the perpendicular direction and calmly holds the force of the foam. If the wall is smooth - use carpenter's tape, stick it to the extension and the wall in three or four places on the vertical elements and in two or three on the horizontal.
If the tape does not stick to the wall, use spacers. They can be made from wooden slats. The length of the rail should be 1÷2 centimeters shorter than the width of the doors. In the future, the spacers are pressed with various linings.
Step 7 Fill the gap between the wall and the extensions with mounting foam.

Very important. It is rare to find responsible builders who, before foaming any structures, clean them of dust and wet the surfaces. And the foam has very weak adhesion to dry surfaces, there is nothing to say about dust and dirt. Try to touch the fresh foam with a wet finger - then you won’t wash it off with anything.
For foaming, use any foam, extensions are not a door frame, they do not carry any load, you can use the cheapest brands. The main thing - do not leave passes. If the gap between the wall and the extension is narrow and deep, fit various extensions to the nozzle. For very thin gaps, we used cocktail tubes - we taped them with tape to the existing outlet from the foam can and worked. This design, however, is a one-time use, but you don’t need more.

Step 8 Wait at least 24 hours for the foam to cool, cut off the excess with a sharp mounting knife. Check by tapping the stability of the position of the extensions. Problem areas are found - add foam to them.

Prices for mounting foam
polyurethane foam
Video - Installing dobors on self-tapping screws
Everything, on this work on the installation of extensions is completed, you can start working with
Installation of dobors on carnations
In this section, we will talk about another way to measure extensions. They need to be inserted in turn into the seats of the door frame and, using the sharp side of the rule, draw a wall line.

You must act carefully. If you inserted additional elements in the position in which they will be fixed, then the marked line must be symmetrically transferred to the other side of the board and cut off only along it. But you can insert the board in a rotated form, then the line will immediately be in its place. Further, all cutting operations are identical to those described above.
Step 1. With a drill of small diameter (should correspond to the diameter of the finishing nails no more than one millimeter), drill holes at a distance of approximately 20 cm in the end of the extension adjacent to the door frame.

In the photo - the finishing nail next to the finisher
Important. Carefully drill, keep the drill strictly in a vertical position. The depth of the holes should be 3 ÷ 5 millimeters less than the length of the studs.
Step 2 Insert the nails into the drilled holes as far as they will go. Before this, you need to bite off the caps with wire cutters, the carnations are inserted with the sharp end outward.
Step 3 Carefully insert each element of the extension into its place in the door frame in turn. Using a hammer, drive the sharp protruding ends of the nails into the door frame through the wooden gasket. Do not rush, before fixing, firmly press the additional element to the side of the protruding seat of the box. If you are inattentive and miss the gap, you will have to remove the additional element and start all over again or seal the gap with sealant to match the door. Both options are highly undesirable. In the first case, because you have to pull out the “wrong” nail and drill a hole for it in another place. The fact is that the wrong mount is a few tenths of a millimeter from the right one. And in this case, the nail will never make a new hole for itself, but will always slip into the existing one. In the second case, any sealing of cracks with sealant will not go unnoticed and will indicate the low professionalism of the performer.

Step 4 Wedge the extensions on the reverse side, with tape or spacers, fix their position from bursting with foam.
Step 5 Clean the surfaces from dust and dirt, moisten them with an ordinary water spray (spray gun).

Step 6 Blow out the gap with sealant over the entire plane. After the foam has cooled, carefully cut off the protruding part.

Video - Installing dobors on carnations
We deliberately left the easiest way for last, this will give you the opportunity to compare all the described methods and make right choice. Marking and cutting out elements is no different from the first two.

And then everything is simple. Put the extensions in place, wedge them from the inside until the surfaces are completely pressed against the seats of the door frame, prevent bursting with adhesive tape or spacers and foam after cleaning and wetting the surfaces. As you can see, there are no steps, drillings and clogging. Why do we recommend using this method?
- The strength of such an installation is no different from complex methods.
- You never run the risk of ruining the extensions while drilling holes or driving in studs for one simple reason - there are no holes or studs.
- During the time that the “big” specialist drills holes for screws or nails, you yourself will completely install the extensions on two door frames with the same quality of work.

We compared how much less technological operations, how much less risk of damage to extensions and the door frame, and how much more benefits? Now make a decision.
Video - Installing foam extensions
Installation of adjustable extensions
Adjustable extensions have several advantages.
- The connection of the elements in a tongue/groove allows you to tightly press the elements with visible planes. The appearance of cracks is completely excluded, there is no need to wedge them.

- The extensions can be moved in the door frame up/down or out/in. These few "free" millimeters allow you to fine-tune their location and compensate for possible mistakes during measurement or sawing.


Such extensions also have a drawback - they cannot be installed without a stationary circular. The fact is that only on a stationary circular saw can a spike of the desired thickness and depth be cut on the additional elements.
How are they installed?
Step 1. Take measurements, while taking into account the depth of the groove on the door frame. You can measure it and add it to the obtained width values, or you can take a piece of thin plywood or a ruler, insert it into the groove and measure the width of the extensions in this position. Take measurements in several places around the entire perimeter of the doorway, the walls are often uneven.
Step 2 Designate the left and right extensions and transfer the dimensions to the blanks.
Important. In order to further simplify the installation of all elements, reduce their width by 2÷3 millimeters. This stock will make it possible to move the extensions in the grooves in the right direction.
Step 3 Cut the blanks to length and width.
Step 4 Set the stop of the circular saw to the width of the tenon, raise the saw table in such a way that the desired height of the tenon is provided. Put the extension on the edge and carefully cut out the spike.

Step 5. In the same way, prepare all the remaining elements of the extensions.
Further, everything is simple. Install them in place, align at the joints and along the plane of the wall. To prevent cracks, stick construction tape to the wall and extensions, clean the surfaces from dirt and dust, moisten them and foam them. The presence of a tongue/groove connection eliminates the need for wedging, the extensions keep their size perfectly and are tightly pressed against the door frame.
Video - Installing adjustable extensions
During the installation of extensions, do not create unnecessary problems and difficulties for yourself, use only the third most in a simple way- Foam mounting. Why?
- Firstly, pull-out efforts never act on the extensions; in any case, they will reliably hold the platbands.
- Secondly, the studs only play the role of reliably pressing the extensions to the door frame, and do not keep them from tearing out. Ordinary wedges made of foam, paper and other improvised materials cope with the same task no worse.
- Thirdly, any "drilling" in thin boards of extensions and in the door frame can cause cracks to appear on the front side. You will have to change the dobor or repair the box.
And the first, and the second, and the third nobody needs. Why are there the first two installation methods? We think that this is one of the most effective methods of undeserved salary increases for unscrupulous builders. They importantly declare to customers what kind of complex work you have to pay the appropriate amounts.

It is not necessary to nail the horizontal addition to the vertical ones in the corners of the joints, it is already perfectly pressed with foam. If you are worried, press it in these places with any wedges. Extra studs in thin extensions - an extra chance to see a hole on the front, and this is a direct marriage in the work.

Do not pinch planks together
You can find advice before installing extensions in the door frame to connect all the elements with the letter P. We do not recommend doing this for two reasons.
- First, it does not reduce, but increases the installation time.
- Secondly, the connection is “flimsy”, during the movement and installation of the structure, the carnations will still move away a little and a gap will appear between the horizontal and vertical extensions. In any case, it will need to be eliminated on the spot.
- Thirdly, the design may warp so much during transportation that the studs will violate the integrity of the front side of the extensions. This is a very unpleasant situation; it will never be possible to repair a crack “to its original state”. An experienced master will always see a problem area.
AND last tip. Sometimes there are times when you have to invite the help of a master. You install several door extensions yourself, and the master must install several. Perhaps you want to finish this stage of the construction of the bath as soon as possible, or there is not enough time, the vacation is ending, but you want to finish the decoration of the bath as soon as possible, the reasons may be different.

The master has come - look what tools he has. If they are dirty, it immediately catches your eye that they are not looked after - refuse the services of such a master. If among his tools you saw sealants for gaps, shake the hand of the “craftsman” and send him back. Modern MDF doors must be installed so accurately that the presence of gaps only indicates carelessness, inexperience or irresponsibility of the master.
Video - Installing an extension on the door